To test an electrical outlet with a voltage tester, simply turn off the power, insert the tester’s probes into the outlet slots, and read the voltage display. When it comes to ensuring the safety and functionality of your electrical outlets, testing them with a voltage tester is vital.
By doing so, you can identify any potential issues, such as overvoltage or inconsistency in supply. This short and straightforward process involves disconnecting the power supply, inserting the voltage tester’s probes into the outlet slots, and observing the displayed voltage.
By following these steps, you can quickly assess the condition of your electrical outlet and address any necessary repairs or replacements.
Contents
- Importance Of Testing Electrical Outlets
- Types Of Voltage Testers
- Preparation Before Testing
- Step-by-step Guide To Testing
- Understanding Voltage Readings
- Interpreting Testing Results
- Common Issues And Troubleshooting
- Safety Tips And Best Practices
- Frequently Asked Questions On How To Test An Electrical Outlet With A Voltage Tester
- Conclusion
Importance Of Testing Electrical Outlets
Testing electrical outlets is crucial to ensure the safety of your home and avoid potential electrical hazards. An electrical outlet that is not functioning correctly can pose a significant risk, from heat damage and electrical fires to electrocution.
By regularly testing your outlets with a voltage tester, you can identify any issues and address them promptly, providing a secure environment for yourself and your family.
Ensuring Safety At Home
Testing your electrical outlets is an essential part of maintaining a safe home environment. Faulty outlets can lead to electrical shocks, which can cause serious injuries or even be fatal.
By using a voltage tester, you can easily determine if an outlet is functioning properly or if it needs professional attention. This simple precautionary measure can help prevent accidents and protect your loved ones from harm.
Avoiding Electrical Hazards
An electrical hazard is a situation that poses a risk of electrical shock, injury, or fire. Testing your outlets can help you identify potential hazards and take appropriate measures to eliminate or minimize the risk.
This includes identifying outlets with improper grounding, loose wiring, or any signs of damage that could lead to electrical malfunctions. By promptly addressing these hazards, you can prevent electrical fires and ensure the overall safety of your home.
Regularly testing your electrical outlets is an essential task for every homeowner. It helps ensure the safety of your home and minimizes the risk of electrical hazards.
By using a voltage tester, you can easily identify any issues and take the necessary steps to address them. Remember, prevention is always better than cure, especially when it comes to electrical safety. So, take the time to test your outlets regularly and prioritize the well-being of your household.
Types Of Voltage Testers
Non-contact Voltage Tester
A non-contact voltage tester detects voltage without touching the electrical outlet.
Contact Voltage Tester
A contact voltage tester requires physical contact with the outlet to detect voltage accurately.
Preparation Before Testing
Preparation before testing the electrical outlet is crucial for safety and accuracy. Taking the necessary precautions and gathering the essential tools will help ensure a successful and secure testing process.
Switching Off Power
Before beginning the testing process, it is essential to switch off the power to the outlet to avoid any potential dangers. This can be done by turning off the corresponding breaker at the electrical panel. Use a voltage tester on a known live circuit to ensure the power is off.
Gathering Essential Tools
When preparing to test an electrical outlet with a voltage tester, it’s important to gather essential tools to ensure a smooth and efficient process. The following items are necessary:
- Voltage Tester: A non-contact voltage tester is the most convenient and safest option for testing electrical outlets.
- Screwdriver: A flathead or Phillips screwdriver will be needed to remove the outlet cover plate for access to the wiring.
- Protective Gear: Safety glasses and insulated gloves should be worn to reduce the risk of electrical shock.
Step-by-step Guide To Testing
In this step-by-step guide, you will learn how to test an electrical outlet with a voltage tester. Before performing any electrical work, always ensure your safety by turning off the power to the outlet you are working on.
Identifying The Hot Wire
To begin testing an electrical outlet with a voltage tester, identify the hot wire. This is typically the black or red insulated wire.
Testing The Hot Wire
First, insert the voltage tester into the hot slot of the outlet. If the voltage tester lights up or beeps, it means the hot wire is live and carries electrical current.
Testing The Ground Wire
It’s important to ensure that the outlet’s ground wire is functioning correctly. To test the ground wire, insert the voltage tester into the ground slot of the outlet.
If the voltage tester lights up or beeps, it indicates that the ground wire is properly connected and in working condition.
Understanding Voltage Readings
Ensure the safety of your electrical systems by using a voltage tester to measure voltage readings in your outlets. By following simple steps, you can verify the voltage output for safe and efficient usage. Understanding voltage readings can help you identify potential issues and prevent electrical hazards.
Understanding Voltage Readings Voltage readings from a voltage tester can provide vital information about the condition of an electrical outlet. It’s essential to understand the significance of these readings to ensure the safety and functionality of the outlet.
Let’s explore the normal voltage range and abnormal voltage readings to help you interpret the results accurately. Normal Voltage Range The normal voltage range for a standard electrical outlet is between 110 to 120 volts.
This range indicates that the outlet is functioning within the expected parameters, providing the necessary power for your devices and appliances. When testing with a voltage tester, a reading within this range indicates that the outlet is in good working condition.
Abnormal Voltage Readings In contrast, abnormal voltage readings can signal potential issues with the electrical outlet. If the voltage reading is significantly lower (below 110 volts) or higher (above 120 volts) than the normal range, it can point to underlying electrical problems.
Low voltage may indicate an overloaded circuit or loose connections, while high voltage could be a result of issues with the electrical system. It’s crucial to address any abnormal voltage readings promptly to prevent potential hazards and ensure the proper functioning of the outlet.
Consulting a professional electrician is advisable if you encounter abnormal voltage readings during the testing process. Understanding the voltage readings obtained from a voltage tester empowers you to identify any underlying electrical issues and take the necessary steps to rectify them.
By being aware of the normal voltage range and recognizing abnormal readings, you can proactively maintain the safety and efficiency of your electrical outlets.

Interpreting Testing Results
Now that you have tested an electrical outlet with a voltage tester, it’s important to accurately interpret the testing results. Interpreting testing results will help you determine whether the outlet is safe to use or requires repair or replacement. Let’s take a closer look at each possible outcome.
Outlet Is Safe To Use
If the voltage tester indicates that the outlet is safe to use, congratulations! This means that the outlet is functioning properly, and you can confidently plug in your devices without any safety concerns.
However, it’s always a good idea to double-check the testing results by testing multiple outlets in different locations of your home. Remember, safety should never be taken for granted.
Outlet Requires Repair Or Replacement
If the voltage tester indicates that the outlet requires repair or replacement, it’s important not to ignore this warning. Failing to address issues with electrical outlets can lead to potential hazards, such as electrical shocks or fires.
If there is visible damage to the outlet, such as loose wires or scorch marks, it’s best to call a qualified electrician to handle the repairs or replacement.
However, if the outlet appears to be in good condition but still fails the Voltage Tester’s test, there may be an underlying problem with the electrical wiring.
In such cases, it is recommended to contact a licensed electrician to diagnose and resolve the issue. Attempting to fix electrical wiring issues without the necessary expertise can be dangerous and may result in further damage or injuries.
Keep in mind that regular maintenance of electrical outlets is crucial to ensure their safety and functionality. It’s a good practice to periodically test your outlets using a voltage tester, even if you haven’t experienced any issues.
This proactive approach can help you catch any potential problems early on, preventing more significant electrical issues down the line.
Common Issues And Troubleshooting
Troubleshooting electrical outlets using a voltage tester can help identify common issues. By following simple steps, you can test the outlet’s functionality and ensure safety. It’s crucial to familiarize yourself with the process to address any potential electrical concerns.
Frequent Tripping Of Circuit Breaker
If your circuit breaker keeps tripping frequently, it can be a sign of an underlying electrical issue that needs to be addressed.
Here are a few common causes and troubleshooting steps you can take:
- Overloaded Circuit: One possible reason for the circuit breaker tripping is that the electrical circuit is overloaded. This can happen if you are running too many appliances or devices on a single circuit. To troubleshoot this issue, try unplugging some of the devices and see if the circuit breaker stops tripping.
- Short Circuit: Another common cause of circuit breaker trips is a short circuit. This occurs when the hot wire comes into contact with the neutral wire, causing a surge of electricity. To troubleshoot this, check for any damaged or exposed wires and have them repaired by a qualified electrician.
- Faulty Appliance: Sometimes, a faulty appliance can be the culprit behind frequent circuit breaker trips. To identify if a specific appliance is causing the problem, unplug all the devices from the circuit and plug them in one by one. If the circuit breaker trips immediately after plugging in a particular appliance, it is likely the cause of the issue.
Outlet Not Providing Power
If you have an electrical outlet that’s not providing power, there are a few things you can check and troubleshoot:
- Reset the Outlet: The first step is to make sure that the outlet is not tripped. Many outlets have a reset button located between the sockets. Press the reset button to see if the power is restored.
- Check the Circuit Breaker: If resetting the outlet doesn’t solve the problem, check if the circuit breaker for that specific outlet has tripped. Locate the corresponding circuit breaker in your electrical panel and switch it off and then on again to reset it.
- Test with a Voltage Tester: If the circuit breaker is not the issue, you can test the outlet with a voltage tester. First, turn off power to the outlet by switching off the circuit breaker. Then, insert the voltage tester into the outlet slots and check if it indicates any voltage. If the tester doesn’t light up, it’s likely that there’s a problem with the wiring and you’ll need to call a professional electrician for further inspection.
:max_bytes(150000):strip_icc()/testing-receptacles-for-grounding-1152807-hero-950a0fba66b642678045d408d98cbcf7.jpg)
Safety Tips And Best Practices
Ensure electrical safety by testing your outlet with a voltage tester. Learn how to effectively check for potential hazards using step-by-step instructions and best practices.
Using Personal Protective Equipment
Always wear rubber gloves and safety goggles when testing electrical outlets.
Protective gear helps prevent electric shock and eye injuries during testing.
Hiring A Professional For Complex Issues
For complicated electrical problems, seek a licensed electrician’s assistance.
Professionals have the expertise to tackle intricate issues effectively and safely.
Frequently Asked Questions On How To Test An Electrical Outlet With A Voltage Tester
How Do You Test An Outlet With A Voltage Meter?
To test an outlet with a voltage meter, set the meter to AC voltage, insert the probes into the outlet slots, and check the reading displayed on the meter. Make sure the reading falls within the expected voltage range for your region.
How Do You Test The Voltage Of A Plug Socket?
To test the voltage of a plug socket, use a digital multimeter set to the AC voltage range. Insert the probes into the socket’s live and neutral slots, then check the multimeter’s reading.
If it’s within the normal range (110-120V in the US), the socket has the correct voltage.
How Do I Know If My Electrical Outlet Is Bad?
You can check if your electrical outlet is bad by using a plug-in tester or multimeter. Look for loose connections, burn marks, or unusual sounds or smells.
If you experience frequent tripping or sparking, it may be a sign of a faulty outlet. If in doubt, consult a qualified electrician.
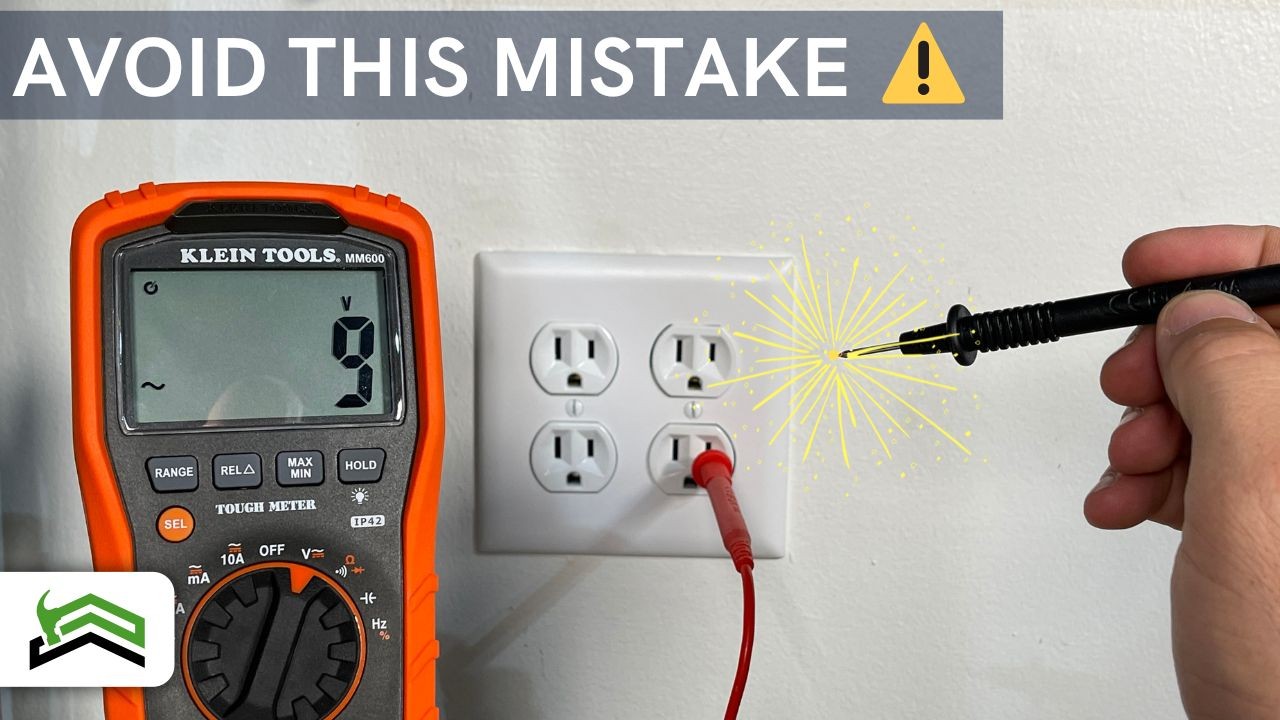
Can You Stick A Voltage Tester In An Outlet?
No, sticking a voltage tester in an outlet is dangerous and can cause harm.
Conclusion
In a nutshell, testing electrical outlets with a voltage tester is essential for safety. Regular checks can prevent hazards. Remember to follow safety precautions.
Stay informed and ensure your outlets are functioning properly. Test them regularly for peace of mind.