To build your own air compressor, gather the necessary materials and components, such as an air tank, compressor pump, motor, pressure switch, and fittings. Assemble the components according to the manufacturer’s instructions, ensuring proper connections and secure fastenings.
Install the air tank in a suitable location, preferably in a well-ventilated area to prevent overheating. Connect the compressor pump to the motor and mount both securely. Attach the pressure switch, regulating the desired pressure levels for the compressor. Finally, connect the fittings to the tank and to any accessories or tools you wish to power using the air compressor.
Test the compressor for proper operation and adjust settings as necessary. Intro: Building your own air compressor provides a cost-effective and customizable solution for your pneumatic needs. Whether for home use or small-scale projects, crafting your own compressor allows you to tailor it to your specific requirements.
By following a few simple steps and using readily available components, you can create a functional and efficient air compressor that offers the power and performance you need. In this guide, we will outline the essential steps and considerations in constructing your own air compressor, enabling you to enjoy the benefits of a DIY approach.
Contents
Understanding Air Compressors
Discover the process of crafting your personalized air compressor at home. Learn how to select the right components and build an efficient air compressor for your specific needs. Master the art of assembling an air compressor with step-by-step guidance.
What Is An Air Compressor?
An air compressor is a device that converts power into potential energy stored in pressurized air. It works by forcing air into a confined space, increasing its pressure.
This compressed air can then be used for various applications, such as powering pneumatic tools, inflating tires, or even cleaning debris.
Why Build Your Own Air Compressor?
Building your own air compressor allows you to customize it to suit your specific needs and budget. It also gives you a deeper understanding of how air compressors work, enabling you to troubleshoot and maintain it more effectively.
Moreover, DIY air compressors can be a fun and rewarding project for those who enjoy hands-on work.
Safety Precautions
When it comes to building your own air compressor, safety precautions are of utmost importance to avoid any potential accidents or injuries.
Taking the necessary safety measures ensures a secure environment for you to work in. Next, let’s delve into the key safety precautions that you should uphold throughout the process.
Importance Of Safety Precautions
Safety precautions are crucial in any DIY project, particularly when constructing machinery such as an air compressor. They help to prevent accidents and ensure the well-being of the individual involved in the construction process.
Without adhering to safety measures, there is a greater risk of personal injury or even damage to property. Therefore, it’s vital to prioritize safety at every step of building your own air compressor.
Protective Gear
Wearing appropriate protective gear is essential when assembling an air compressor. This includes eye protection, gloves, and a dust mask.
This gear serves as a shield against any potential hazards associated with the tools and materials used during the construction process.
By donning these protective items, you significantly reduce the risk of injury and exposure to harmful particles or substances.
Work Area Considerations
Creating a safe work area is paramount to the successful construction of an air compressor. Ensure adequate lighting and well-ventilated space to work in, minimizing the chances of accidents due to poor visibility or improper air circulation.
Additionally, be mindful of keeping the workspace clean and organized to prevent tripping hazards and to easily access tools and materials required for the construction.
Choosing The Right Components
When it comes to building your own air compressor, choosing the right components is crucial for ensuring your compressor operates at its optimal level.
This involves determining your needs, researching available options, selecting the compressor pump, and choosing the motor. Let’s delve into each of these components to help you make informed decisions.
Determining Your Needs
Determining your specific needs is the first step in building your own air compressor. Consider factors such as the intended use, the air pressure and volume requirements, and the available space for the compressor.
These considerations will help guide you in choosing the right components for your unique requirements.
Researching Available Options
Researching the available options in the market is crucial to finding the best components for your air compressor.
Look for reputable brands and suppliers, read customer reviews, and seek recommendations from experienced DIY compressor builders.
This research will help you make informed decisions and avoid potential issues down the line.
Selecting The Compressor Pump
The compressor pump is a critical component that determines the performance of your air compressor. Consider factors such as the pump type (e.g., reciprocating, rotary screw), the air displacement capacity, and the duty cycle.
Selecting a high-quality compressor pump suited to your specific needs is essential for the overall efficiency and longevity of your DIY air compressor.
Choosing The Motor
Choosing the right motor is essential for powering your air compressor. Consider the motor’s horsepower, voltage requirements, and compatibility with the selected compressor pump.
Ensure that the motor you choose can provide sufficient power to drive the compressor pump and meet the desired airflow and pressure specifications for your applications.
Building The Air Tank
Building the air tank is a crucial step in creating your own air compressor. Let’s dive into the process!
Selecting The Tank Material
Choose a durable material like steel to ensure safety and longevity of your air tank.
Calculating The Tank Size
Calculate the tank size based on your air compressor requirements and available space.
Assembling The Tank
Assemble the tank carefully following the manufacturer’s instructions for a secure construction.
Installing Fittings And Valves
Install appropriate fittings and valves to ensure smooth air flow and control.
Assembling And Wiring The Components
Learn how to assemble and wire the components of your own air compressor with this step-by-step guide. From connecting the motor to installing the pressure switch, you’ll be ready to power up your DIY compressor in no time.
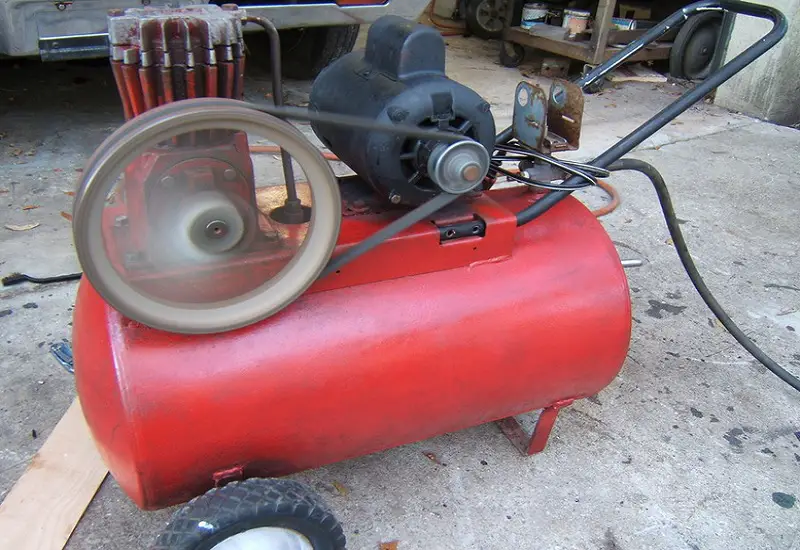
Mounting The Pump And Motor
To start assembling your air compressor, you’ll need to mount the pump and motor to a sturdy base. We recommend using a solid, level platform to ensure stability. Begin by placing the pump on the base and securing it with bolts or screws.
Make sure the pump is positioned in a way that allows easy access to the intake and exhaust ports. Next, mount the motor beside the pump, aligning the pulley with the pump’s drive shaft.
Secure the motor with bolts or brackets, ensuring it is firmly attached to the base. This step is crucial for maintaining proper alignment and preventing any unwanted vibrations during operation.
Connecting The Components
With the pump and motor securely mounted, it’s time to connect the various components of your air compressor. Start by attaching the intake filter to the intake port of the pump. This filter helps prevent debris from entering the pump, ensuring smooth operation.
Use a flexible hose to connect the filter to the port, making sure it’s tight and secure. Next, connect the pressure switch to the pump’s outlet port. The pressure switch is responsible for regulating the air pressure inside the tank.
Use a suitable threaded connector to attach the switch, ensuring a leak-free connection. Finally, connect the discharge line from the pump to the tank’s inlet port. This line carries compressed air from the pump to the tank, allowing it to accumulate for later use.
Proper Wiring Techniques
To ensure the safe and efficient operation of your air compressor, it’s crucial to follow proper wiring techniques. Start by locating the motor’s wiring box, usually found on the side or back of the motor. Inside the wiring box, you’ll find various color-coded wires.
Connect the corresponding wires according to the manufacturer’s instructions. It’s important to use wire connectors or terminal blocks to secure the connections and prevent any loose or exposed wires.
Additionally, consider using wire protectors or conduits to shield the wiring from potential damage. Make sure to double-check all connections for accuracy and tightness before proceeding.
Once the wiring is complete, plug the motor into a suitable power source, ensuring it meets the voltage and current requirements specified by the motor’s rating plate. By following these steps, you’ll be well on your way to assembling and wiring your very own air compressor.
Remember to consult the manufacturer’s instructions for any specific requirements or recommendations. With proper assembly and wiring, your homemade air compressor will be ready to tackle various tasks, from filling tires to powering pneumatic tools.
Testing And Troubleshooting
When it comes to building your own air compressor, proper testing and troubleshooting are essential to ensure its efficiency and safety.
Once the assembly process is completed, the next step is to thoroughly test the equipment and address any potential issues that may arise. In this section, we will cover the key aspects of testing and troubleshooting your DIY air compressor.
Conducting A Pressure Test
Before using the air compressor, it’s crucial to conduct a pressure test to verify the functionality of the system. To do this, follow these steps:
- Connect the air compressor to a power source and ensure all connections are secure.
- Turn on the compressor and allow it to build up pressure.
- Use a pressure gauge to measure the output pressure, ensuring it matches the intended levels.
Checking For Leaks
Leaks can compromise the efficiency and performance of your air compressor. To detect and fix leaks, go through the following steps:
- Inspect all connections and fittings for signs of air leakage.
- Apply a soapy water solution to the connections and look for bubbles, which indicate leaks.
- Tighten any loose connections and replace damaged seals or fittings.
Common Troubleshooting Tips
Despite careful assembly, issues may still arise with your DIY air compressor. Here are some common troubleshooting tips to help diagnose and address problems:
- Unusual noise: Check for loose components or worn-out parts, and tighten or replace them accordingly.
- Inconsistent pressure: Inspect the pressure regulator and adjust it to maintain consistent output.
- Overheating: Ensure proper ventilation and check for any obstructions around the compressor to prevent overheating.
Maintenance And Safety Checks
Keeping up with regular maintenance routines and safety checks is crucial to ensure the efficient and safe operation of your DIY air compressor. Here’s a breakdown of the key aspects you need to focus on:
Regular Maintenance Routine
- Check oil levels frequently to ensure proper lubrication.
- Clean or replace air filters to prevent dust buildup.
- Inspect hoses and connections for any signs of wear or leaks.
- Monitor pressure gauges to ensure they are accurate.
Safety Checks And Inspections
- Always wear appropriate safety gear such as goggles and gloves.
- Inspect the compressor for any damages or loose parts before each use.
- Ensure the compressor is on stable ground to prevent tipping.
- Keep the work area well-ventilated to avoid inhalation of fumes.
Frequently Asked Questions For How To Build Your Own Air Compressor
How Do You Make A High Cfm Compressor?
To make a high CFM compressor, follow these steps:
1. Choose a compressor with a high cubic feet per minute (CFM) rating.
2. Opt for a larger tank size to store more air.
3. Ensure the compressor has a powerful motor to drive high CFM output.
4. Match the compressor’s CFM rating with your intended use and tools.
5. Regularly maintain and clean the compressor for optimal performance.
What Size Compressor Do I Need For Diy?
For DIY projects, you typically need a compressor with a 2 to 6-gallon tank size.
Is A 6 Gallon Compressor Enough For Air Tools?
Yes, a 6 gallon compressor can provide sufficient air power for light to medium-duty air tools. It can operate tools such as nail guns, staplers, and small impact wrenches effectively.
However, for heavier tools like sanders or grinders, a larger compressor may be required for optimal performance.
Is It Worth Owning An Air Compressor?
Yes, owning an air compressor is worth it for tasks like inflation, power tools, and pneumatic tools. It saves time, money, and effort in various applications.
Conclusion
In crafting your own air compressor, precision and safety are key. Remember to follow instructions meticulously for optimal performance.
Experimenting with different components can lead to a custom creation that suits your unique needs. Embrace the satisfaction of DIY projects and enjoy the benefits of a personalized air compressor.