To attach a car battery charger, first, make sure the car is turned off and the charger is unplugged. Then, connect the positive clamp of the charger to the positive terminal of the battery and the negative clamp to the negative terminal.
Contents
- 1. Choose The Right Car Battery Charger
- 2. Prepare For The Charging Process
- 3. Connect The Charger To The Battery
- 4. Set The Charger Parameters
- 5. Start The Charging Process
- 6. Perform Safety Checks
- 7. Maintain Your Car Battery
- 8. Troubleshooting Tips
- Frequently Asked Questions On How To Attach A Car Battery Charger
- Conclusion
1. Choose The Right Car Battery Charger
When it comes to ensuring your car’s battery is always charged and ready to go, choosing the right car battery charger is crucial.
With so many options available in the market, it can be overwhelming to make the right decision. This section will guide you through the process, helping you select the perfect car battery charger for your needs.
1.1 Determine Battery Type And Voltage
Before investing in a car battery charger, it’s crucial to determine the type and voltage of your car battery. Car batteries come in different types, such as lead-acid, AGM, gel, and lithium-ion. Each requires a specific charger to ensure safe and efficient charging.
To determine the battery type, refer to your car’s manual or inspect the battery itself, usually labeled with the battery type. Once you’ve identified the battery type, it’s time to determine its voltage.
The most common car batteries have a voltage of 12 volts, but some vehicles may have 6-volt or 24-volt systems. It’s vital to match the charger voltage to your battery voltage to avoid damaging the battery or the charger.
1.2 Consider Charger Features
When selecting a car battery charger, you should also consider the charger features. These features ensure convenience, safety, and efficient charging. Here are some essential features to look for:
- Automatic shut-off: An automatic shut-off feature stops the charging process when the battery is fully charged, preventing overcharging and prolonging battery life.
- Maintenance mode: A maintenance or float mode allows the charger to keep the battery at optimal levels without overcharging it. This feature is beneficial for long-term storage or battery maintenance.
- Reverse polarity protection: This feature protects the charger and the battery from damage caused by incorrect connections. It prevents the charger from functioning when the polarity is reversed.
- Multiple charging modes: Some chargers offer different charging modes, such as fast charging or desulfation mode, which helps rejuvenate sulfated batteries.
Consider these features when selecting a car battery charger to ensure a safe and efficient charging experience. Investing in a quality charger with the right features will save you time, effort, and money in the long run.
2. Prepare For The Charging Process
2.1 Park In A Safe And Well-ventilated Area
Choose a flat, stable surface away from flammable materials and with enough space to safely maneuver.
2.2 Gather All Necessary Tools
- Car battery charger
- Wrench or pliers
- Safety goggles
2.3 Put On Safety Gear
Wear gloves and protective clothing to prevent accidents and shield your eyes from exposure to battery acid.
3. Connect The Charger To The Battery
Now that you have the charger and battery prepared, it’s time to connect the charger to the battery. Follow the steps below to safely and effectively attach the car battery charger.
3.1 Locate The Battery In The Vehicle
Before you can connect the charger to the battery, you need to locate the battery within your vehicle. In most cars, the battery is located under the hood, but in some models, it may be in the trunk. Refer to your vehicle’s manual if you’re unsure of the battery’s location.
3.2 Identify The Positive And Negative Terminals
Once you’ve located the battery, identify the positive and negative terminals. The positive terminal is typically marked with a red color or a plus (+) sign, while the negative terminal is marked with a black color or a minus (-) sign.
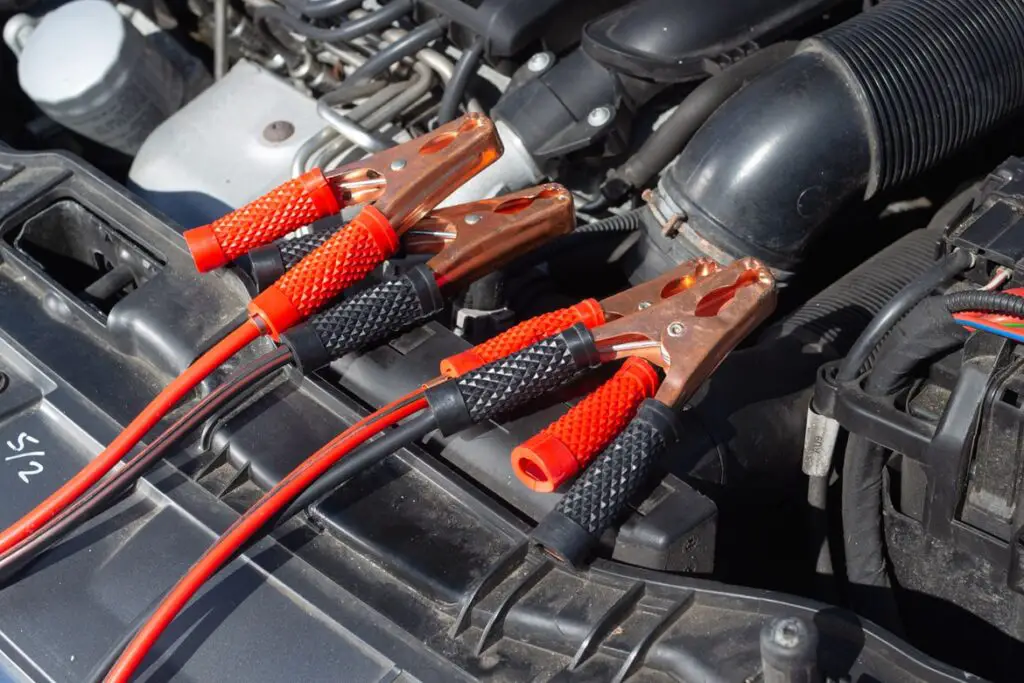
3.3 Attach The Charger Clamps
- Turn off the Charger: Before attaching the clamps, ensure the car battery charger is turned off to prevent any electrical hazards.
- Attach the Positive Clamp: Connect the red or positive clamp from the charger to the positive terminal of the battery. Ensure a secure and snug connection without any loose fittings.
- Attach the Negative Clamp: Connect the black or negative clamp from the charger to the negative terminal of the battery, again ensuring a secure and snug connection.
4. Set The Charger Parameters
When it comes to attaching a car battery charger, setting the charger parameters is crucial to ensure successful and safe charging. This step involves configuring the charger’s settings to align with the specific requirements of your vehicle’s battery.
Here’s how to set the charger parameters properly:
4.1 Read The Charger’s Manual
Before proceeding, it’s essential to read the charger’s manual thoroughly. The manual provides valuable insights into the specific settings of the charger, including important safety precautions and instructions for setting the parameters correctly.
4.2 Set The Correct Voltage And Amperage
Ensure that the voltage and amperage settings are tailored to match the requirements of your car battery. Adjust the charger to the recommended voltage and amperage levels to prevent any potential damage to the battery during the charging process.
4.3 Select The Charging Mode
Choose the appropriate charging mode, based on the specific needs of your car battery. Different modes, such as standard, quick, or trickle charging, cater to varying battery conditions. Selecting the right mode optimizes the charging process and enhances the overall effectiveness of the charger.
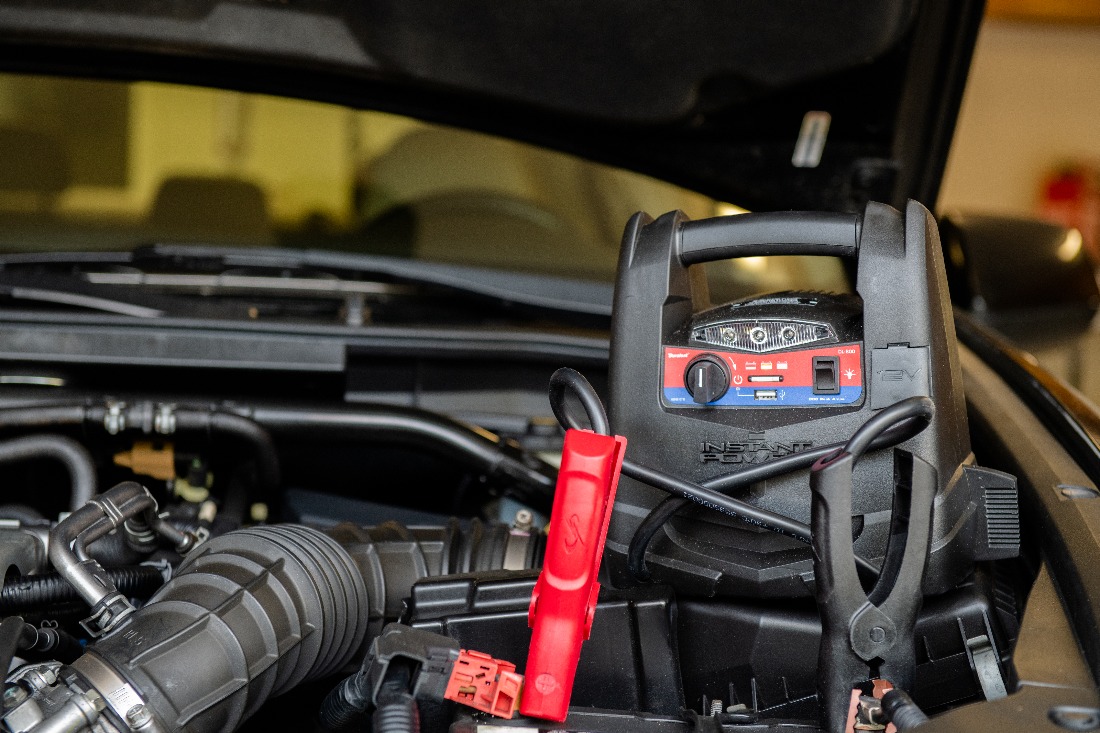
5. Start The Charging Process
Once the car battery charger is properly connected, it’s time to start the charging process. This phase involves plugging in the charger, monitoring the charging progress, and eventually disconnecting the charger.
5.1 Plug In The Charger
First, plug in the charger to the power source. Ensure that the power outlet is compatible with the charger’s specifications. Check the charger’s display to verify that it has initiated its charging cycle. Monitor the charger periodically to ensure it’s functioning correctly.
5.2 Monitor The Charging Progress
During the charging process, it’s essential to monitor the charging progress. This involves keeping an eye on the charger’s display to track the battery voltage and the charging status. Be attentive to any unusual behaviors or discrepancies in the charging process.
5.3 Disconnect The Charger
Once the charging process is complete, it’s crucial to disconnect the charger properly. Unplug the charger from the power source first, and then detach the clamps from the battery terminals in the reverse order of how they were attached. Handle the charger and its cables with care to avoid any potential risks or hazards.
6. Perform Safety Checks
Before you begin attaching a car battery charger, it’s crucial to perform safety checks to ensure a smooth and secure charging process.
Taking a few minutes to inspect the charging cables, check for any abnormalities, and ensure proper securement can prevent potential hazards and ensure your safety. In this section, we’ll walk you through these safety checks step by step:
6.1 Inspect The Charging Cables
Thoroughly inspecting the charging cables is the first safety check you should perform. Follow these simple steps:
- Check for any visible damage such as frayed wires, cracks, or cuts in the insulation. Replace any cables with signs of damage to avoid electrical mishaps.
- Ensure that the connectors on the cables are clean and free from corrosion. Use a wire brush or a clean cloth to remove any traces of dirt or oxidation.
- Verify that the cables are long enough to reach from the charger to the battery without any undue tension. Avoid stretching or bending the cables excessively, as this can weaken them.
6.2 Check For Any Abnormalities
In addition to inspecting the cables, it’s essential to check for any abnormalities in the battery and surrounding area. Follow these guidelines:
- Examine the battery for any signs of leakage, bulging, or a bloated appearance. If you notice any of these abnormalities, do not attempt to charge the battery, as it may be damaged or defective.
- Inspect the battery terminals to ensure they are free from dirt, corrosion, or loose connections. Clean the terminals with a wire brush if necessary.
- Check the area around the battery for any flammable or combustible materials. Remove any potential hazards to create a safe charging environment.
6.3 Ensure Proper Securement
Proper securement of the charging cables is crucial to prevent accidental disconnections during the charging process. Ensure the following:
- Attach the positive (red) cable clamp to the positive terminal of the battery, marked with a “+” symbol. Tighten the clamp securely to ensure a stable connection.
- Attach the negative (black) cable clamp to a metal part of the car’s chassis or engine block, away from the battery. This provides a good grounding point and prevents potential sparking near the battery.
- Make sure that the cable clamps do not touch each other or any metal surfaces other than the designated terminals. This prevents short circuits and ensures safe charging.
By following these safety checks before attaching a car battery charger, you can proceed with confidence, knowing that you have taken the necessary precautions for a safe and successful charging experience.
7. Maintain Your Car Battery
Proper maintenance of your car battery is crucial to ensure its longevity and optimal performance. Neglecting your battery can result in frequent breakdowns and expensive replacements.
By following a few simple steps, you can keep your car battery in top shape and prevent unexpected inconveniences on the road.
Here are three essential tasks you should regularly undertake to maintain your car battery:
7.1 Regularly Clean Battery Terminals
Keeping your battery terminals clean is essential for maintaining a reliable electrical connection and preventing corrosion.
Over time, dirt, grime, and corrosion can build up on the battery terminals, hindering the flow of electricity. To clean the terminals, you will need a few basic tools:
- A wire brush or battery terminal cleaner
- Baking soda or a commercial battery terminal cleaner solution
- A pair of safety gloves and protective eyewear
Follow these steps to clean your battery terminals:
- Put on your safety gloves and protective eyewear.
- Disconnect the negative terminal (usually marked with a -) using a wrench or socket. Ensure you loosen the nut and remove the cable from the battery post.
- Repeat the same process for the positive terminal (usually marked with a +).
- Pour a mixture of baking soda and water or a battery terminal cleaner solution onto a wire brush or terminal cleaner.
- Scrub the battery terminals and cable ends thoroughly until all the dirt and corrosion are removed.
- Rinse the terminals and cable ends with clean water.
- Make sure the terminals and cable ends are completely dry before reattaching them.
- Reconnect the positive terminal first and then the negative terminal. Ensure that the connections are tight.
7.2 Check The Battery’s Fluid Levels
The fluid levels in your car battery play a crucial role in its proper functioning. If the fluid levels are too low, the battery’s plates can become exposed, leading to reduced performance and a shorter lifespan.
To check the battery’s fluid levels, follow these steps:
- Park your car in a well-ventilated area.
- Open the hood and locate the battery.
- Check if your battery has removable caps on top. If it does, carefully remove them.
- Inspect the fluid levels in each cell. Ideally, the fluid should cover the plates, but should not exceed the maximum fill level.
- If the fluid levels are low, carefully add distilled water until they reach the appropriate level. Avoid overfilling to prevent acid spills or damage to the battery.
- Replace the caps securely.
7.3 Test The Battery’s Voltage
Regularly testing your car battery’s voltage will give you an indication of its current health and performance. To perform a voltage test, you will need a multimeter or a battery tester.
Here’s how to test your car battery’s voltage:
- Start by ensuring your car is turned off and the ignition is in the “off” position.
- Open the hood and locate the battery.
- Set your multimeter or battery tester to the DC volts range.
- Connect the positive (red) test lead to the positive terminal of the battery and the negative (black) test lead to the negative terminal.
- Read the voltage displayed on the multimeter or tester.
- If the voltage reading is between 12.4 and 12.6 volts, your battery is considered fully charged. However, if the voltage drops below 12.2 volts, it may indicate a weak or discharged battery that requires charging or replacement.
- If you suspect your battery is faulty, consider consulting a professional or a trusted mechanic to get a more accurate assessment.
8. Troubleshooting Tips
If you encounter issues with your car battery charger, don’t worry. Here are some troubleshooting tips to help you get back on track:
8.1 Charger Not Powering On
If your charger is not turning on, double-check the power source and connections. Ensure the charger is plugged in securely and the power outlet is functioning. If the issue persists, try using a different outlet or check the fuse in the charger.
8.2 Slow Charging Speed
If your charger is charging slower than usual, make sure the battery terminals are clean and properly connected. A buildup of dirt or corrosion can affect the charging speed. Consider using a battery terminal cleaner to improve the connection. If the problem continues, consult the charger manual for recommended charging times.
8.3 Battery Not Holding A Charge
If your battery is not holding a charge, it may indicate a deeper issue with the battery itself. Check the battery for signs of damage or wear and consider replacing it if necessary. Ensure the charger is compatible with the battery type and voltage to avoid overcharging or undercharging.
Frequently Asked Questions On How To Attach A Car Battery Charger
How Do You Hook Up A Battery Charger To A Car?
To hook up a battery charger to a car, first, park the car and turn off the engine. Open the car hood and locate the battery.
Connect the red clamp to the positive terminal and the black clamp to the negative terminal. Plug the charger into an outlet and turn it on.
When Charging A Car Battery Which Terminal Do You Connect First?
Connect the positive terminal first when charging a car battery. This reduces the risk of sparking.
Do You Attach The Positive Or Negative First?
Attach the positive first to maintain proper alignment and prevent any wiring mishaps.
Can I Connect Charger Directly To Battery?
Yes, you can connect a charger directly to a battery. It is a common and convenient method for charging batteries.
Conclusion
In a few simple steps, you can easily attach a car battery charger. Remember to follow the guidelines for safe charging.
Regular maintenance is key to ensuring your battery stays in top condition. Now you’re all set to keep your vehicle powered up and ready to go!