Wood chisels should be sharpened at an angle of 25-30 degrees. When it comes to working with wood chisels, maintaining a sharp edge is crucial for achieving clean and precise cuts.
The angle at which you sharpen your chisels plays a significant role in determining their performance. Most experts recommend sharpening wood chisels at an angle of 25 to 30 degrees.
This angle provides a balance between durability and sharpness. If the angle is too steep, the chisel may become brittle and prone to damage, while a shallower angle may result in dull and ineffective cuts.
By sharpening your wood chisels at the correct angle, you can ensure optimal cutting performance and prolong the lifespan of your tools.
Contents
Angle Guide For Wood Chisels
Wood chisels are essential tools for any woodworker. Whether you’re a beginner or an experienced craftsman, keeping your wood chisels sharp is crucial for achieving clean and precise cuts.
One of the most important aspects of sharpening wood chisels is the angle at which you sharpen it.
In this article, we’ll explore the angle guide for wood chisels, including the importance of sharpening, choosing the right angle, understanding bevel angles, and commonly recommended angles for different wood chisels.
An Introduction To Wood Chisels
Wood chisels are versatile tools used for shaping, carving, and removing wood material. They consist of a handle and a blade with a cutting edge, often made of high-carbon steel.
Wood chisels come in various sizes and shapes, including bench chisels, mortise chisels, and paring chisels, each designed for specific woodworking tasks.
Importance Of Sharpening Wood Chisels
Sharp wood chisels allow for effortless and precise cuts. When a chisel blade is dull, it requires more force to make a cut and often results in tearing or splintering the wood.
Sharpening your wood chisels regularly not only improves the quality of your work but also makes your woodworking experience safer and more enjoyable. Properly sharpened chisels require less effort to use and reduce the risk of accidents caused by slipping or jamming.
Choosing The Right Angle For Sharpening
The angle at which you sharpen your wood chisel blade is crucial for its performance. It determines the sharpness and durability of the cutting edge.
The two main factors to consider when choosing the right angle are the wood material you’ll be working with and the type of wood chisel you have.
Different angles work better for certain applications, and experimenting with various angles can help you find the most suitable one for your specific needs.
Understanding Bevel Angles
Bevel angle refers to the angle between the chisel’s flat back and the bevel face that forms the cutting edge. It directly affects how the chisel cuts through the wood.
Lower bevel angles produce sharper but more delicate edges, making them ideal for softwoods and delicate tasks.
Higher bevel angles create stronger, more durable edges, making them suitable for hardwoods or heavy-duty applications. The choice of bevel angle also depends on personal preference and the level of control and precision you desire.
Commonly Recommended Angles For Different Wood Chisels
Recommended angles for sharpening wood chisels can vary depending on the woodworking task and personal preference.
Below are some commonly recommended angles for different wood chisels:
| Wood Chisel Type | Bevel Angle |
|---|---|
| Bench Chisels | 25-30 degrees |
| Mortise Chisels | 30-35 degrees |
| Paring Chisels | 20-25 degrees |
| Mortise Chisels | 30-35 degrees |
| Skewed Chisels | 30-35 degrees |
Remember, these are general guidelines, and you may need to adjust the angles based on your specific wood type, chisel quality, and personal preference.
Regular honing and sharpening sessions will help you maintain the optimal angle for your wood chisels and ensure optimal performance when working on your woodworking projects.
Pre-sharpening Preparation
Before sharpening wood chisels, it’s crucial to determine the correct angle. Typically, a 25-degree angle is suitable for most chisels.
To achieve this, paying attention to proper pre-sharpening preparation is essential. This will ensure that the chisel is accurately sharpened and ready for use.
Inspecting The Chisel
Check chisel for any damage or rust before sharpening.
Cleaning The Chisel
Use a cloth to wipe off dirt or debris from the chisel.
Preparing The Sharpening Surface
Set up a stable and well-lit work area for sharpening.
Inspect chisel before sharpening to ensure it’s in good condition.
Wipe any dirt or debris from the chisel.
Set up a stable work area with good lighting.
Sharpening Techniques
When it comes to woodworking, maintaining sharp wood chisels is essential to ensure precise and clean cuts. Sharpening chisels can seem daunting at first, but with the right techniques, it can become a simple and effective process.
Finding the right angle and using the appropriate sharpening tools are crucial aspects of this process. Let’s explore different sharpening techniques for wood chisels.
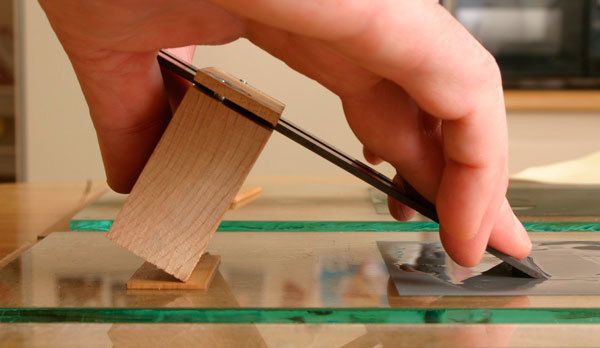
Using A Honing Guide
A honing guide is a tool that aids in maintaining consistent angles while sharpening. It clamps onto the chisel to ensure a stable and predictable sharpening process.
By using a honing guide, woodworkers can achieve precise and uniform bevel angles, resulting in sharp and reliable chisels.
Freehand Sharpening
Freehand sharpening is a skill that requires practice and a steady hand. This technique involves sharpening the chisel without the aid of a guide, relying on the woodworker’s ability to maintain a consistent angle and pressure. While it may be more challenging, mastering freehand sharpening allows for greater flexibility and adaptability in the sharpening process.
Sharpening Jig Options
Sharpening jigs can provide an effective middle ground between using a honing guide and freehand sharpening. They offer stability and repeatability while allowing for adjustments to accommodate different bevel angles. Woodworkers can choose from a variety of sharpening jigs to suit their preferences and sharpening needs, ensuring precision and efficiency in the sharpening process.
Credit: www.reddit.com
Tips And Tricks
Wood chisels are essential tools for any woodworking project, and keeping them sharp is key to achieving precision and accuracy. In this section, we will explore some tips and tricks for sharpening wood chisels to maintain their effectiveness and prolong their lifespan.
Maintaining Consistency In Angle
Consistency in the sharpening angle is crucial for ensuring that the chisel maintains its cutting edge and bevel. It is recommended to use a honing guide to maintain the desired angle, typically around 25 degrees for bevel-edged chisels and 30 degrees for firmer chisels. This ensures that the edge is uniform along the entire length of the chisel, enabling precise and efficient cutting.
Using The Correct Sharpening Stone Grit
The choice of sharpening stone grit can significantly impact the quality of the chisel’s edge. Coarse grit stones, around 250 to 400, are ideal for reshaping the edge and removing nicks, while medium grit stones, approximately 800 to 1000, are suitable for refining the edge. Finally, fine grit stones, ranging from 4000 to 8000, are used for polishing and honing the edge to razor-sharp precision. Utilizing the correct grit sequence is essential to achieve the desired sharpness.
Proper Chisel Technique
When sharpening a wood chisel, it’s important to maintain a consistent and smooth motion along the sharpening stone to avoid creating an uneven edge. Applying even pressure and moving the chisel in a circular or back-and-forth motion ensures that the entire edge is honed evenly. This technique results in a sharp and durable edge that’s ready for woodworking tasks.
Keeping The Chisel Cool
Heat can negatively impact the temper of the chisel’s edge, leading to decreased durability and edge retention. To prevent overheating during sharpening, it’s crucial to periodically dip the chisel in water or use a honing fluid to keep it cool. This practice helps maintain the integrity of the chisel’s steel, ensuring a long-lasting and effective cutting tool.
Troubleshooting
When it comes to troubleshooting the sharpening process of wood chisels, it’s essential to understand common sharpening mistakes and how to fix chipped or damaged edges. By addressing these issues, you can ensure your wood chisels are properly sharpened, allowing for precise and efficient woodworking.
Common Sharpening Mistakes
When sharpening wood chisels, it’s important to avoid these common mistakes:
- Uneven sharpening, leading to an inconsistent cutting edge
- Excessive grinding, causing overheating and tempering of the steel
- Incorrect angle, resulting in a dull or ineffective edge
- Using a coarse grit without progressing to finer grits for a polished edge
Fixing Chipped Or Damaged Edges
If you encounter chipped or damaged edges on your wood chisel, follow these steps to rectify the issue:
- Assess the Damage: Identify the extent of the damage to determine the appropriate course of action.
- Grind Away the Damage: Use a coarse sharpening stone to carefully remove the damaged portion of the edge.
- Re-establish the Bevel: Once the damage is removed, re-establish the bevel by grinding the edge to the correct angle.
- Progress to Finer Grits: After re-establishing the bevel, progress to finer grits to hone the edge to a sharp finish.
Credit: www.finewoodworking.com
Honoring Safety Precautions
When it comes to sharpening wood chisels, the utmost importance lies in prioritizing safety precautions. Ignoring or neglecting safety measures can lead to accidents and injuries. To ensure a safe and productive experience, keep in mind the following guidelines:
Wearing Protective Gear
Protective gear plays a crucial role in safeguarding yourself from potential harm during chisel sharpening. Ensure you have the right equipment:
- Wear safety goggles to shield your eyes from flying debris.
- Use a dust mask to prevent inhalation of dust particles.
- Ensure your hands are protected with sturdy gloves to provide an extra layer of safety.
Securing The Chisel
Before diving into the sharpening process, it’s essential to secure the chisel properly to minimize the risk of accidents:
- Use a dedicated sharpening jig or bench vise to hold the chisel firmly.
- Ensure the chisel is tightly secured by adjusting the jig or vise accordingly.
- Take a moment to double-check the stability of the setup before proceeding.
Working In A Well-lit Area
Adequate lighting is vital to maintain visibility and precision while sharpening your wood chisels:
- Select a well-lit area or use additional task lighting.
- Avoid shadows that can hinder your ability to see the sharpening process clearly.
- Ensure the light source is positioned appropriately for optimal visibility.
Maintaining Proper Grip
Proper grip not only enhances your control over the chisel but also minimizes the chances of accidents:
- Hold the chisel firmly but avoid applying excessive pressure.
- Position your hand away from the cutting edge to avoid accidental slips.
- Maintain a secure grip throughout the sharpening process.
By following these safety precautions – wearing protective gear, securing the chisel, working in a well-lit area, and maintaining a proper grip – you can ensure a safer and more efficient experience while sharpening your wood chisels.
Maintenance And Storage
Maintenance and storage are crucial aspects of keeping your wood chisels in tip-top shape. By properly maintaining and storing your chisels, you can ensure their longevity and optimal performance.
In this section, we will guide you through the essential steps to take after sharpening your chisels, how to apply precision oil, and the best practices for chisel storage.
Cleaning After Sharpening
To maintain the effectiveness of your wood chisels, it is essential to clean them properly after sharpening. Cleaning removes any debris, such as wood shavings or metal filings, that may have accumulated during the sharpening process.
Here’s a step-by-step guide to help you clean your chisels:
- Wipe down the chisel with a clean, dry cloth to remove any loose debris.
- Use a bristle brush or a toothbrush to gently scrub the chisel, paying attention to the blade and the handle.
- Rinse the chisel under running water to remove any remaining dirt.
- Dry the chisel thoroughly with a clean cloth, ensuring there is no moisture left on the blade or handle.
- Inspect the chisel for any signs of damage or wear and address any issues before storing it.
Applying Precision Oil
Applying precision oil to your wood chisels can help prevent corrosion and keep them in excellent condition. The oil creates a protective barrier that reduces friction and prevents moisture from seeping into the metal.
Here are the steps to follow when applying precision oil:
- Choose a high-quality precision oil designed for woodworking tools.
- Apply a small amount of oil to a clean cloth or paper towel.
- Gently rub the oil onto the blade and the metal parts of the chisel, ensuring full coverage.
- Let the oil sit on the chisel for a few minutes to allow it to penetrate the metal.
- Wipe off any excess oil with a clean cloth, leaving a thin protective film on the chisel.
Proper Chisel Storage
Storage plays a crucial role in maintaining the sharpness and overall condition of your wood chisels.
Here are some best practices to ensure proper chisel storage:
- Store your chisels in a dedicated chisel rack or a tool chest to protect them from dust, moisture, and potential damage.
- Avoid leaving your chisels on a workbench or any surface where they can be knocked or scratched.
- If storing multiple chisels together, use blade protectors or wrap each chisel individually to prevent accidental contact or blade damage.
- Keep your chisels in a dry environment with stable temperature and humidity levels.
- Regularly inspect your chisels for any signs of rust or damage and address them promptly.
Ensure a precise angle when sharpening wood chisels for optimal performance. Consistent angle maintenance is key to achieving clean and accurate cuts in woodworking projects.
Developing a reliable sharpening routine will enhance the longevity and effectiveness of your chisels.
Practice Makes Perfect
Consistent practice is key to mastering chisel sharpening techniques.
- Start with a lower angle
- Gradually increase angle for different tasks
Experimenting With Angle
Don’t be afraid to experiment with different sharpening angles to find what works best.
- Try different angles on scrap wood
- Observe the results and adjust accordingly
Investing In Quality Chisels
Quality chisels make a significant difference in the sharpening process and overall woodworking experience.
Frequently Asked Questions For What Angle Sharpen Wood Chisels
What Is The Angle To Which A Wood Chisels Cutting Edge Should Be Ground?
The cutting edge of a wood chisel should be ground at a 25-degree angle for optimal performance.
What Is The Angle Of A Stanley Wood Chisel?
The angle of a Stanley wood chisel is typically 25 degrees. This angle allows for precise and efficient cutting through wood materials.
What Is The Angle Of A Grind Chisel?
The angle of a grind chisel refers to the slope of its cutting edge. It’s typically around 25-30 degrees for woodworking.
How Do You Find The Angle Of A Chisel?
To find the angle of a chisel, place a protractor on the cutting edge and measure the angle. Adjust as needed to match the desired angle. Regular sharpening is crucial for optimal performance.
Conclusion
Choosing the right angle to sharpen wood chisels is crucial for precision. By understanding the nuances of different angles, you can achieve optimal results in your woodworking projects.
Keep practicing and experimenting to find the angle that works best for you. Enhance your craft with sharp chisels!