To cut a groove in wood with a Dremel, use a straight router bit and guide the tool along the desired path. This method allows for precise control and depth adjustment, resulting in a clean and accurate groove.
Creating a groove in wood with a Dremel can add decorative or functional elements to your woodworking projects. Whether you’re working on a DIY craft or a home improvement task, knowing how to use a Dremel for this purpose can be a valuable skill.
By following the right steps and using the appropriate tools, you can achieve professional-looking results.
We will provide a step-by-step guide on how to cut a groove in wood with a Dremel, along with tips for ensuring precision and safety. Let’s explore the process and unleash your creativity with this versatile tool.

Contents
Introduction To Grooving Wood With A Dremel
Grooving wood with a Dremel is a versatile technique that allows for precise and intricate designs. Using a Dremel for wood grooving provides a fast and efficient way to create custom patterns and designs.
Let’s explore the benefits of utilizing a Dremel for grooving wood and the types of projects that are ideal for this method.
Benefits Of Using A Dremel For Wood Grooving
- Precision: Achieve intricate details with ease
- Versatility: Suitable for various wood types and projects
- Efficiency: Quick and accurate results
- Control: Allows for fine adjustments during grooving
Types Of Projects Suitable For Dremel Grooving
- Creating Inlays: Add decorative inlays to wooden surfaces
- Engraving Designs: Personalize items with engraved patterns
- Carving Textures: Enhance wood pieces with textured grooves
- Wood Joinery: Improve wood joints with precise grooving
Choosing The Right Dremel Tool
When it comes to cutting a groove in wood with a Dremel, selecting the right tool is crucial. The right Dremel model and essential features can make the task easier and more efficient. Let’s explore the key aspects to consider when choosing a Dremel for wood grooving.
Comparing Dremel Models
When comparing Dremel models for wood grooving, it’s essential to consider the power, speed, and versatility of each model. Here’s a comparison of popular Dremel models:
| Model | Power | Speed | Versatility |
|---|---|---|---|
| Dremel 3000 | Variable-speed motor | 5000-32000 RPM | Compatible with various attachments |
| Dremel 4000 | High-performance motor | 5000-35000 RPM | Improved airflow for cooler operation |
| Dremel 4300 | Universal motor | 5000-35000 RPM | 3-jaw chuck for easy accessory changes |
Essential Features For Wood Grooving
- Variable Speed: Look for a Dremel with variable speed settings to adjust the RPM based on the wood type and groove depth.
- Comfortable Grip: A tool with an ergonomic design and comfortable grip can enhance control and reduce fatigue during extended use.
- Compatibility: Ensure the Dremel model is compatible with router attachments and accessories designed for wood grooving.
- Dust Collection: Opt for a Dremel with a dust collection attachment to maintain a clean working environment and visibility of the cutting area.
Selecting Your Dremel Bits
To create a groove in wood with a Dremel, choose a straight router bit for precision. Secure the wood and set the Dremel to the desired speed. Slowly guide the Dremel along the marked line to cut the groove. Experiment with different bit sizes for varying groove widths.
Selecting Your Dremel Bits: When it comes to cutting grooves in wood with a Dremel, selecting the right bit is key. With so many different types of bits available, it can be overwhelming to choose the best one for your project.
In this section, we’ll cover the best bits for cutting grooves and how to maintain them for optimal performance. Best bits for cutting grooves:
Here are the most effective Dremel bits for cutting grooves in wood:
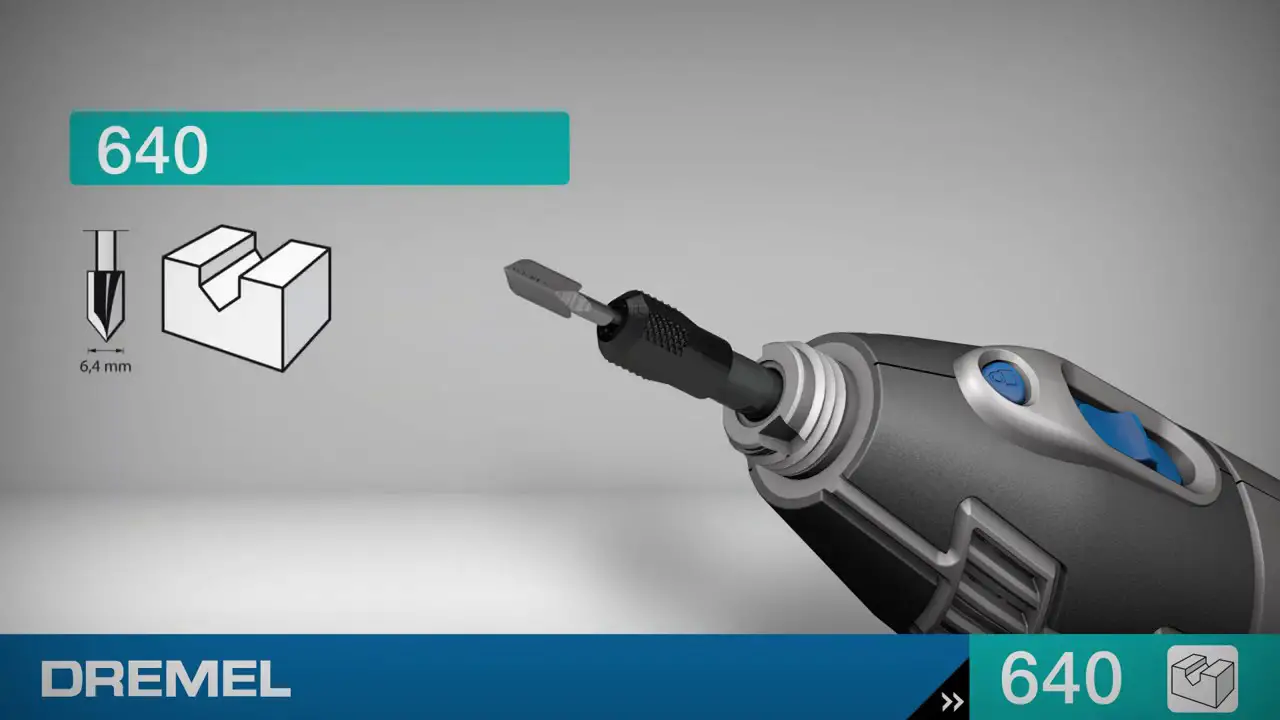
1. Straight Router Bits: These are ideal for making straight grooves or channels in wood, and are available in a variety of sizes.
2. Spiral Router Bits: These bits are great for making grooves with a curved or circular shape, and can also be used for cutting in a variety of materials.
3. Roundover Bits: These bits are designed to create a curved edge or round over on the wood, and can be used to create decorative grooves or channels.
4. V-Groove Bits: These bits are perfect for creating V-shaped grooves in wood, and are often used for decorative purposes. How to maintain your Dremel bits: Maintaining your Dremel bits is essential for ensuring optimal performance and longevity.
Here are some tips for keeping your bits in top condition:
1. Clean your bits after each use to remove any debris or buildup.
2. Store your bits in a dry, clean place to prevent rust or corrosion.
3. Use a lubricant such as WD-40 to prevent rust and keep your bits running smoothly.
4. Sharpen your bits regularly to maintain their sharpness and effectiveness.
By selecting the right Dremel bit and properly maintaining it, you can easily cut grooves in wood for a variety of projects. Remember to always wear protective gear and follow safety guidelines when using your Dremel.

Setting Up Your Workspace
Setting up your workspace is essential when it comes to cutting a groove in wood with a Dremel. By properly organizing your workspace and prioritizing safety, you can ensure a smooth and efficient workflow while minimizing the risk of accidents.
Safety Gear And Precautions
Before starting the process, ensure that you have the necessary safety gear in place. This includes safety goggles to protect your eyes from wood particles and a dust mask to prevent inhalation of sawdust.
Additionally, it’s important to wear hearing protection as Dremel tools can be loud. Always work in a well-ventilated area to minimize exposure to wood dust.
Organizing Your Workspace For Efficiency
When setting up your workspace, ensure that your work area is clean and well-lit. This will help you to see the wood and the cutting line clearly. Organize your tools in a way that they are easily accessible.
Keep the power cords away from the cutting path to avoid accidents. It’s also important to secure the wood firmly using clamps or a vise to prevent it from moving during the cutting process.
Preparing The Wood
To cut a groove in wood with a Dremel, start by clamping down your wood securely. Use a straight router bit to carefully guide the Dremel along the marked groove line. Take your time to ensure precision and safety throughout the cutting process.
Choosing The Right Type Of Wood
Before beginning to cut a groove in wood with a Dremel, it’s crucial to select the appropriate type of wood for the project.
Hardwoods such as oak, maple, or cherry are ideal for intricate grooves, while softwoods like pine or cedar may be better suited for simpler designs. Ensure the wood is clean and free from any defects that could affect the cutting process.
Marking And Measuring For Precise Cuts
Precision is key when it comes to cutting a groove in wood. Start by marking the exact location of the groove using a pencil and a straightedge.
Measure the depth of the desired groove carefully, ensuring it aligns with the specifications of the project. Take the time to double-check all markings to avoid errors during the cutting process.
Step-by-step Groove Cutting
Learn the step-by-step process of cutting a groove in wood with a Dremel. Start by marking the groove’s path, then set the Dremel at the correct speed and depth. Next, slowly guide the tool along the marked line, maintaining a steady hand to achieve a precise groove.
Cutting a groove in wood with Dremel can be a challenging task. However, it is not impossible if you know the right technique and follow the correct steps. In this section, we will discuss the step-by-step process of cutting a groove in wood with Dremel.
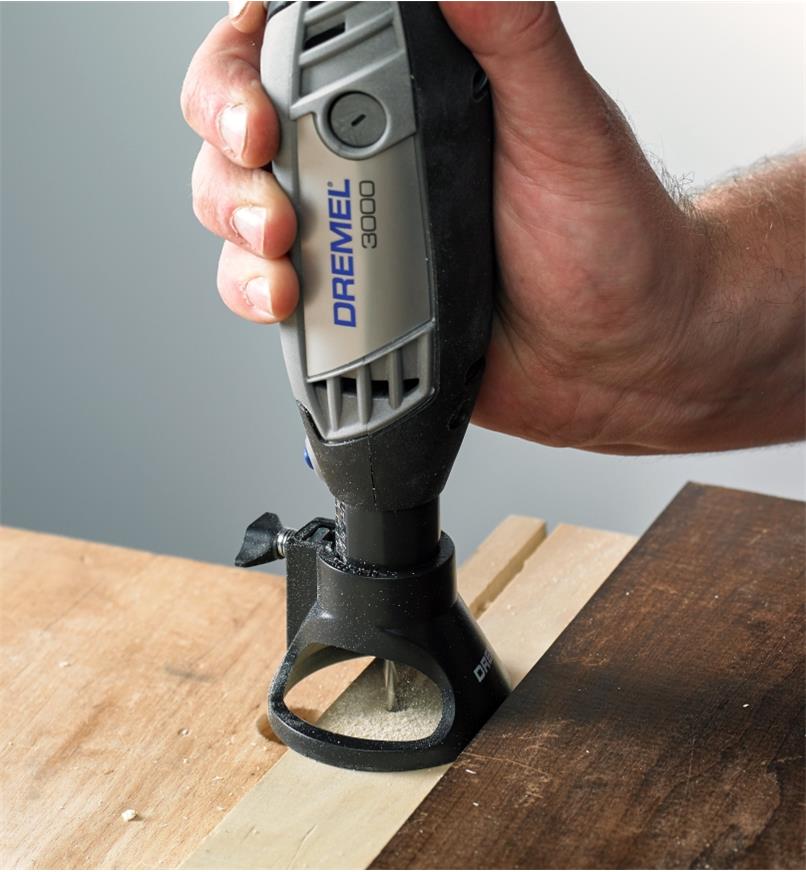
Securing The Wood
Before starting the groove cutting process, it is important to secure the wood properly. You can use a clamp to hold the wood in place and prevent it from moving during the cutting process. This will ensure that the groove is straight and precise. Alternatively, you can use a vice to hold the wood securely.
Adjusting The Dremel Speed And Depth
The next step is to adjust the speed and depth of the Dremel. The speed should be set to a medium level to ensure that the groove is cut smoothly and evenly.
The depth should also be adjusted based on the thickness of the wood. You can start with a shallow depth and gradually increase it until you reach the desired depth.
Steps to Adjust the Dremel Speed and Depth
- Turn on the Dremel and set it to a medium speed level.
- Adjust the depth of the Dremel by loosening the collet nut and moving the bit up or down.
- Tighten the collet nut to secure the bit in place.
- Test the depth by making a small groove on a scrap piece of wood.
- Adjust the depth accordingly until you reach the desired depth.
Cutting The Groove
Now that the wood is secured and the Dremel is set to the right speed and depth, it’s time to start cutting the groove.
Hold the Dremel with both hands and slowly guide it along the line where you want to cut the groove. Make sure to apply even pressure and keep the Dremel moving smoothly to avoid any uneven cuts.
Tips for Cutting the Groove
- Use a straight edge or ruler to guide the Dremel along the line.
- Take breaks in between to avoid overheating the Dremel.
- Wear safety goggles and a dust mask to protect yourself from wood dust and debris.
Cutting a groove in wood with Dremel requires patience and practice. With the right technique and tools, you can achieve a precise and clean groove.
When it comes to woodworking with a Dremel, the finishing touches can truly elevate the overall look and feel of your project. In this section, we’ll explore the essential steps of sanding the groove, as well as sealing and protecting the wood to ensure a professional and polished outcome.
Sanding The Groove
After cutting a groove in wood with a Dremel, it’s crucial to sand the edges to achieve a smooth and refined finish.
Using fine-grit sandpaper, carefully sand along the groove to remove any roughness and imperfections. This step not only enhances the appearance of the groove but also ensures a seamless fit for any inserts or inlays.
Sealing And Protecting The Wood
Once the groove is sanded, it’s time to seal and protect the wood to prolong its longevity and enhance its visual appeal.
Apply a high-quality wood sealer using a small brush, ensuring even coverage across the entire groove. This protective layer not only adds a professional sheen but also guards against moisture, preventing warping or damage over time.
Troubleshooting Common Issues
Encountering issues while cutting grooves in wood with a Dremel is common but can be easily resolved. Here are some solutions to common problems:
Dealing With Uneven Grooves
If the grooves are uneven, adjust the depth of the Dremel bit and ensure a steady hand while cutting.
Fixing Mistakes During The Grooving Process
To fix mistakes while grooving, use wood filler to correct errors and smooth out the surface.
Frequently Asked Questions
How To Cut A Groove In Wood?
To cut a groove in wood, use a router with a straight bit. Mark the groove’s position, set the router’s depth, and make multiple passes. Ensure to secure the wood and wear safety goggles. Sand the edges for a smooth finish.
What Bit Do I Use To Cut Wood With A Dremel?
Use a high-speed cutter or multipurpose cutting bit to cut wood with a Dremel tool.
Can You Do Routing With A Dremel?
Yes, you can do routing with a Dremel tool. It is versatile and suitable for various routing tasks.
How Do You Notch Wood With A Dremel?
To notch wood with a Dremel, mark the cut, wear safety gear, choose the right bit, set the Dremel to the correct speed, and carefully cut along the marked lines.
Conclusion
Mastering how to cut a groove in wood with a Dremel can open up a world of possibilities for your DIY projects.
With the right technique and a steady hand, you can create intricate designs and precise cuts. Keep practicing and experimenting to enhance your woodworking skills.