To sand with a Dremel, attach a sanding drum, set the speed, and hold the tool steadily. Start sanding in small, controlled movements to achieve smooth results.
Sanding with a Dremel allows for precision in intricate or hard-to-reach areas, making it a versatile tool for various projects. When working with delicate materials or detailed projects, the Dremel’s compact size and range of accessories provide the control needed for accurate sanding.
The speed settings on the Dremel allow for customization based on the material being sanded, ensuring optimal results. With proper technique and attention to detail, sanding with a Dremel can enhance the quality and precision of your work.
Contents
- Introduction To Sanding With A Dremel
- Choosing The Right Dremel Tool
- Safety First: Preparing To Sand
- Understanding Sanding Bits And Accessories
- Setting Up Your Dremel For Sanding
- Techniques For Effective Sanding
- Sanding Different Materials
- Finishing Touches: Post-sanding Practices
- Maintenance Of Your Dremel
- Projects To Test Your Sanding Skills
- Troubleshooting Common Sanding Issues
- Expanding Your Dremel Skills
- Frequently Asked Questions
- Conclusion
Introduction To Sanding With A Dremel
Popular Uses For Dremel Sanding
Dremel sanding is versatile and commonly used for shaping, smoothing, and finishing various materials such as wood, metal, and plastics.
- Create intricate designs on wood crafts
- Remove rust or paint from metal surfaces
- Refine edges of DIY projects
Advantages Of Precision Sanding
Precision sanding with a Dremel offers several benefits, including:
- Ability to reach tight spaces
- Control over speed and pressure
- Efficient material removal
Choosing The Right Dremel Tool
When it comes to sanding with a Dremel, selecting the right tool is crucial for achieving optimal results. The right Dremel rotary tool can make all the difference in the precision and efficiency of your sanding projects. Here’s a guide to help you choose the perfect Dremel tool for your sanding needs.
Types Of Dremel Rotary Tools
Dremel rotary tools come in different types, each designed for specific applications. The two main types are corded and cordless models. Corded Dremel tools provide continuous power, making them suitable for prolonged use, while cordless models offer greater portability and flexibility.
Selecting The Perfect Attachment
Equally important is selecting the right attachment for sanding. Dremel offers a variety of attachments specifically designed for sanding tasks, including sanding drums, sanding bands, and abrasive buffs.
Each attachment serves a unique purpose, so it’s essential to choose the one that best suits your specific sanding needs.
Safety First: Preparing To Sand
Before you start sanding with a Dremel, prioritize safety by wearing protective gear such as goggles and a dust mask. Secure your workpiece and choose the appropriate sanding attachment for your Dremel tool to ensure precision and control.
Always work in a well-ventilated area to minimize dust inhalation. Before you start sanding with a Dremel, it’s important to take some safety precautions to avoid any potential injuries.
This includes wearing personal protective equipment and following workspace safety tips. Here are some guidelines that you should follow to prepare for sanding with a Dremel.
Personal Protective Equipment
When sanding with a Dremel, you should always wear personal protective equipment (PPE) to protect yourself from any potential hazards.
Here are some essential PPE that you should wear when sanding with a Dremel:
- Safety glasses or goggles to protect your eyes from flying debris.
- A dust mask or respirator to protect your lungs from dust and debris.
- Gloves to protect your hands from sharp edges and hot metal.
- Earplugs or earmuffs to protect your ears from loud noise.
Workspace Safety Tips
In addition to wearing PPE, you should also follow some workspace safety tips to ensure that your work area is safe and free from any potential hazards.
Here are some workspace safety tips that you should follow when sanding with a Dremel:
- Clear your workspace of any clutter or debris to avoid tripping hazards.
- Make sure that your Dremel is securely fastened to your workbench or table.
- Never touch the sanding drum or any other part of the Dremel while it’s running.
- Keep your fingers and other body parts away from the sanding drum at all times.
- Never force the sanding drum into the material you’re sanding.
- Use a light touch when sanding to avoid damaging the material.
- Always unplug your Dremel when you’re not using it.
By following these PPE and workspace safety tips, you can ensure that you’re prepared for sanding with a Dremel in a safe and secure manner. Remember that safety should always come first when using any power tool.
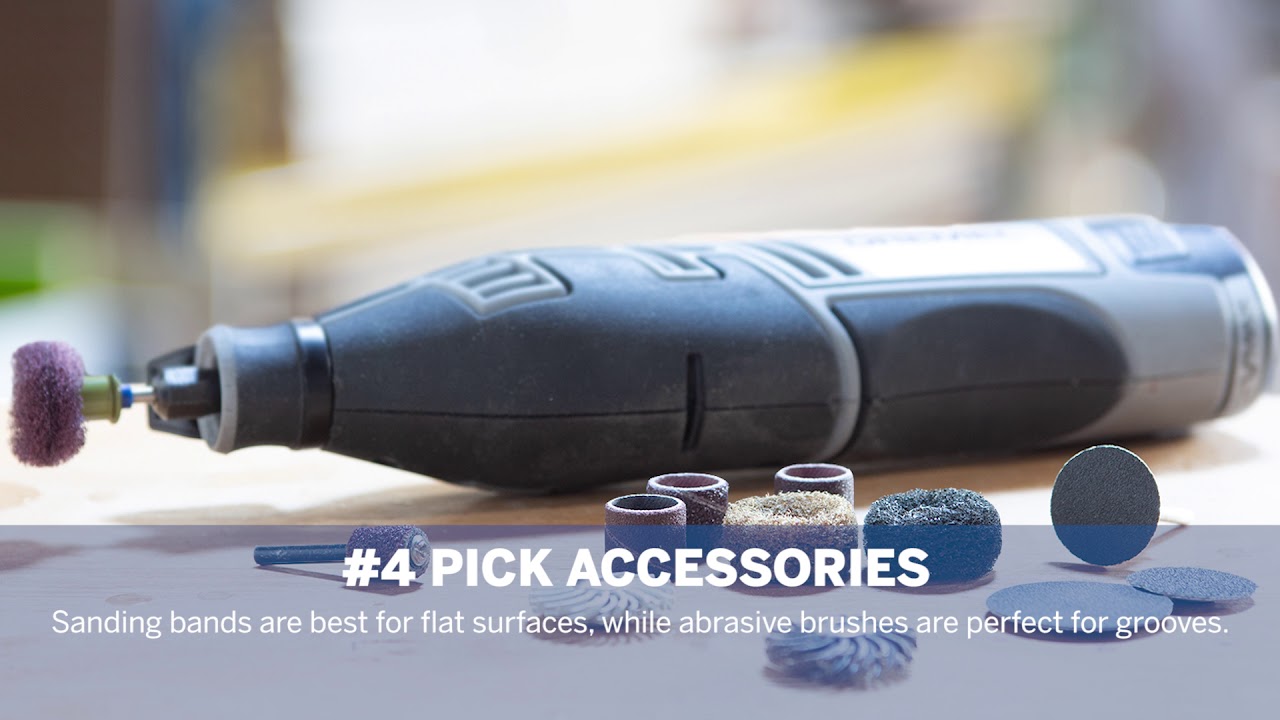
Understanding Sanding Bits And Accessories
Different Grit Sizes
Sanding bits come in various grit sizes, ranging from coarse to fine. Coarse grits such as 60 or 80 are ideal for rapid material removal, while medium grits like 120 or 150 are suitable for smoothing surfaces. Fine grits such as 240 or 320 provide a polished finish.
Shapes And Purposes Of Sanding Bits
The shapes of sanding bits determine their specific purposes. Cylinder bits are ideal for flat surfaces, while cone-shaped bits are perfect for curved or contoured surfaces. Wheel bits work well for flat surfaces and edges, and disc bits are suitable for fine detail work.
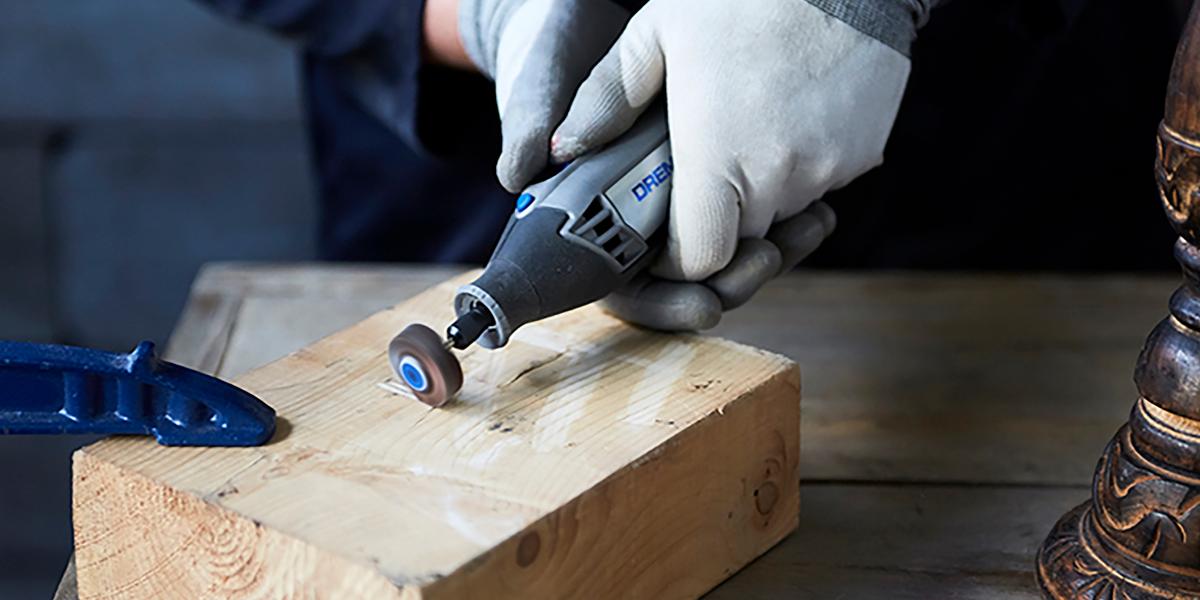
Setting Up Your Dremel For Sanding
Setting up your Dremel for sanding is a crucial first step to ensure a successful and efficient sanding process. By properly preparing your Dremel and selecting the appropriate sanding bits and speed settings, you can achieve smooth and precise sanding results on various materials.
Attaching Sanding Bits
To begin, ensure that the Dremel is unplugged and turned off. Then, locate the collet lock button on the tool and press it to lock the collet in place. Next, insert the sanding bit into the collet, making sure it is fully inserted and secure. Finally, use the wrench to tighten the collet securely around the sanding bit.
Adjusting Speed Settings
Turn on the Dremel and adjust the speed dial to the recommended setting for the specific sanding task. Lower speeds are suitable for delicate materials, while higher speeds are ideal for tougher surfaces. Ensure that the Dremel is set to the appropriate speed to prevent damage to the material or the sanding bit.
Techniques For Effective Sanding
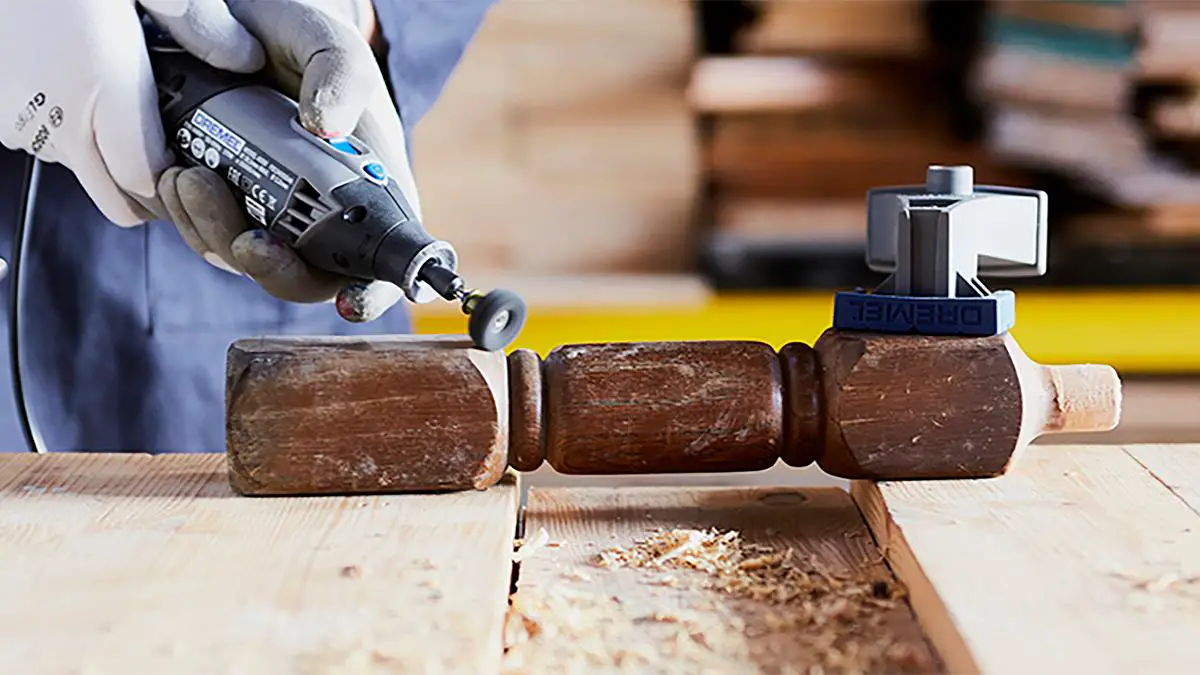
Discover effective sanding techniques using a Dremel tool for smooth finishes. Begin by selecting the right sanding accessory based on the project requirements. Maintain a steady hand and apply gentle pressure for precise results.
When it comes to sanding with a Dremel, it’s important to use the right techniques to achieve the best results. Here are some helpful tips on how to sand with a Dremel:
The Art Of Gentle Pressure
One of the most important things to keep in mind when sanding with a Dremel is to use gentle pressure. The Dremel is a powerful tool, and if you apply too much pressure, you can easily damage the surface you’re working on. Instead, use a light touch and let the tool do the work for you.
Moving The Dremel For Uniform Sanding
Another important technique for effective sanding with a Dremel is to move the tool in a uniform motion. This means keeping the tool moving in the same direction and at the same speed across the entire surface you’re sanding.
This will help ensure that the sanding is even and consistent throughout. To achieve uniform sanding, you can use a combination of back-and-forth and circular motions. Start with a back-and-forth motion to remove the bulk of the material, and then switch to a circular motion to smooth out the surface.
Using The Right Sanding Bits
In addition to using the right techniques, it’s important to use the right sanding bits for the job. Dremel offers a wide range of sanding bits, each designed for a specific type of material or task.
When selecting a sanding bit, consider the material you’re working on, as well as the level of sanding required. For example, a coarse sanding bit is ideal for removing rust or paint from metal, while a fine sanding bit is better suited for smoothing out a finished surface.
By using the right techniques and sanding bits, you can achieve professional-looking results when sanding with a Dremel. Remember to use gentle pressure, move the tool in a uniform motion, and select the right sanding bit for the job. With a little practice, you’ll be able to tackle any sanding project with confidence and ease.
Sanding Different Materials
Sanding different materials with a Dremel requires specific approaches tailored to each type of material. Whether you’re working with wood, metal, or plastic, understanding the right techniques for sanding will help you achieve the best results. Below, we’ll explore the approach for woods and provide tips for sanding metals and plastics with a Dremel.
Approach For Woods
When sanding wood with a Dremel, it’s important to start with a lower speed setting to prevent overheating and damaging the material. Use a medium-grit sanding band or drum attachment for initial shaping and smoothing.
Gradually increase the speed as needed, and finish with a fine-grit attachment for a polished surface. Remember to move the Dremel in the direction of the wood grain to achieve a smooth and uniform finish.
Tips For Metals And Plastics
For sanding metals and plastics, it’s essential to choose the right attachments and speed settings. Select a high-speed setting for metal sanding, and use diamond bits or abrasive discs designed for metal applications.
When working with plastics, opt for lower speed settings and fine-grit attachments to avoid melting or warping the material. Always wear protective eyewear and a mask when sanding metals or plastics to ensure safety.
Finishing Touches: Post-sanding Practices
After sanding with a Dremel, it’s crucial to pay attention to the finishing touches to achieve the desired results. Here are some important post-sanding practices to follow:
Cleaning And Polishing
Use a clean cloth to remove any dust or debris left behind from sanding. Apply a polishing compound to enhance the surface shine.
Assessing The Smoothness
Run your fingers across the sanded area to check for any remaining rough spots. Address any imperfections with additional sanding if needed.
Maintenance Of Your Dremel
Keeping your Dremel tool well-maintained is crucial for ensuring its longevity and optimal performance.
Cleaning The Tool Post-use
- After using your Dremel, wipe it down with a clean, dry cloth to remove dust and debris.
- Use a small brush to clean hard-to-reach areas where residue may accumulate.
- Regularly check the vents to prevent clogging and ensure proper airflow for cooling.
Replacing Worn Bits
- Inspect your bits regularly for signs of wear or damage.
- Replace worn bits promptly to prevent damage to your workpiece or the tool itself.
- Store your bits properly to prevent them from becoming dull or damaged over time.
Projects To Test Your Sanding Skills
Diy Crafts
From wooden signs to jewelry boxes, sanding with a Dremel can add a professional touch to your DIY crafts. The versatility of the Dremel allows you to smooth out rough edges and create intricate designs with ease.
Home Improvement Tasks
When it comes to home improvement, using a Dremel for sanding tasks can make a world of difference. Whether refinishing furniture or smoothing out patches on walls, the precision of the Dremel can help you achieve a polished result.
Troubleshooting Common Sanding Issues
Overcoming Uneven Surfaces
Use a small sanding bit for precision on uneven surfaces.
Dealing With Sanding Bit Slippage
Secure the bit tightly in the collet to prevent slippage.
Expanding Your Dremel Skills
Learning how to sand with a Dremel opens up a world of possibilities for your crafting and DIY projects. To take your skills to the next level, let’s explore some advanced sanding techniques and how you can combine sanding with other Dremel functions.
Advanced Sanding Techniques
- Experiment with different sanding band grits for varying levels of abrasion.
- Try using sanding drums or flap wheels for precise and detailed sanding.
- Practice feathering edges and blending surfaces for seamless finishes.
Combining Sanding With Other Dremel Functions
- Engrave and Sand: Utilize engraving attachments to add intricate designs before sanding for a unique look.
- Polish and Sand: Achieve a smooth and glossy finish by polishing surfaces after sanding.
- Cut and Sand: Combine cutting and sanding attachments for multi-step projects with precision.

Frequently Asked Questions
Can You Use A Dremel As A Sander?
Yes, a Dremel can be used as a sander by attaching sanding accessories to the tool.
How To Attach Sandpaper To A Dremel?
To attach sandpaper to a Dremel, use a small screw to attach the sandpaper disc to the mandrel. Tighten the screw securely, then insert the mandrel into the Dremel chuck and tighten. Make sure the sandpaper is centered and secure before using.
Which Dremel Is Best For Sanding?
The Dremel 4300 is the best option for sanding. It has a powerful motor, variable speed, and easy accessory changes.
The EZ Twist nose cap allows for quick and effortless switching between sanding attachments. Overall, the Dremel 4300 is the ideal tool for sanding projects.
What Grit Is Dremel Sandpaper?
Dremel sandpaper comes in various grits, ranging from coarse to fine. The grit options include 60, 120, and 240 grit, catering to different sanding needs.
Conclusion
Mastering the art of sanding with a Dremel can open up a world of possibilities for your DIY projects. With the right techniques and tools, you can achieve smooth and precise results on various materials. Keep practicing and experimenting to unlock the full potential of this versatile tool in your crafting endeavors.