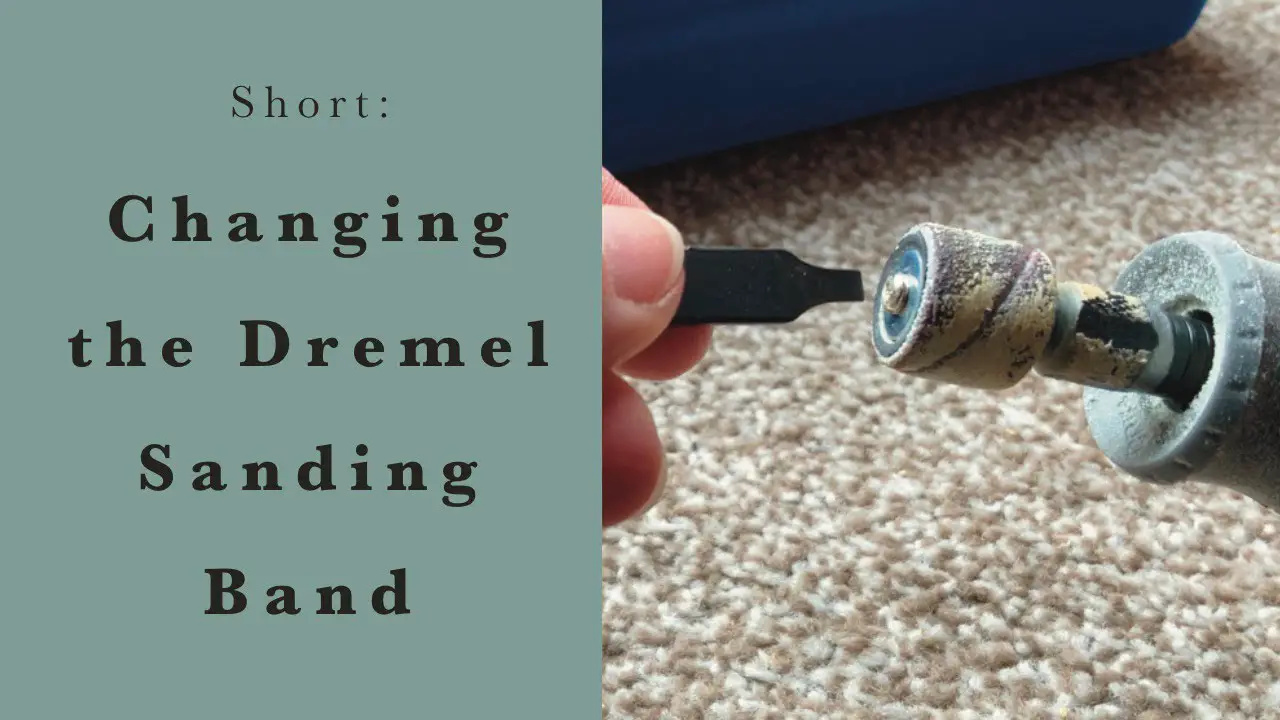
To change a Dremel sanding band, twist the screw at the top of the mandrel to release the old band. Slide off the old band, then slide on a new one and tighten the screw to secure it.
Changing Dremel sanding bands is a simple process that allows you to continue your woodworking, metalworking, or crafting projects without interruption.
Whether you’re smoothing rough edges, shaping materials, or removing old paint, having a fresh sanding band ready to go ensures that your Dremel rotary tool remains a versatile and effective tool in your workshop.
By following a few quick steps, you can easily swap out the sanding band and get back to creating with precision and ease.
Contents
- Introduction To Dremel Tool Uses
- Identifying When To Change The Sanding Band
- Types Of Sanding Bands
- Safety Precautions Before Changing The Band
- Step-by-step Guide To Changing The Sanding Band
- Troubleshooting Common Issues
- Maintenance Tips For Sanding Bands
- Enhancing Sanding Efficiency
- Frequently Asked Questions
- Conclusion
Introduction To Dremel Tool Uses
Learn how to effortlessly swap out Dremel sanding bands for versatile tool applications. Master the art of changing Dremel sanding bands hassle-free.
Popular Projects Involving Dremel
Essential Dremel Accessories
Introduction to Dremel Tool Uses:
Dremel tools are versatile and can be used for a variety of projects.
Popular projects include engraving, polishing, and cutting materials like wood and metal.
Dremel accessories such as sanding bands, cutting wheels, and polishing pads are essential for different tasks.
These tools are commonly used by DIY enthusiasts, crafters, and hobbyists.
Whether you’re a beginner or an experienced user, understanding the uses of a Dremel tool is key.
| Project | Uses |
|---|---|
| Engraving | Personalizing items, creating intricate designs |
| Polishing | Restoring shine to metals, jewelry making |
| Cutting | Trimming, shaping materials like wood, plastic |
- Engraving: Add a personal touch to gifts or create unique decorations.
- Polishing: Bring old metal objects back to life with a shiny finish.
- Cutting: Precision cutting for crafting or DIY home projects.
- Sanding bands: Essential for smoothing rough edges and surfaces.
- Cutting wheels: Ideal for precise cuts in various materials.
- Polishing pads: Helps achieve a glossy finish on metals and plastics.
Identifying When To Change The Sanding Band
When the sanding band becomes worn, it may appear frayed or have a reduced sanding surface.
Quality of the sanding may decrease, resulting in longer project completion times and less refined finishes.
As the sanding band wears out, it may cause uneven sanding and leave behind rough surfaces.
These issues can affect the overall quality of your project, leading to rework and decreased precision.
Types Of Sanding Bands
Discover various types of sanding bands for your Dremel tool and learn how to easily change them for different projects. Upgrade your DIY game with these versatile sanding band options.
When it comes to Dremel sanding bands, there are a few different types you can choose from depending on the task at hand. In this section, we’ll explore the different material varieties and grit options available to help you choose the right sanding band for your project.
Material Varieties
The material of your sanding band can play a big role in its effectiveness. Here are a few of the most common material varieties you’ll encounter:
- Aluminum oxide: This is a versatile material that can be used on a variety of surfaces. It’s a good choice for general sanding and shaping tasks.
- Silicon carbide: This material is harder and more durable than aluminum oxide, making it a good choice for tougher materials like stone and glass.
- Zirconia alumina: This is the most durable material available and is best suited for heavy-duty sanding tasks on tough materials like metal.
Choosing The Right Grit
The grit of your sanding band determines how abrasive it is. Different grits are better suited for different tasks. Here’s a quick guide to choosing the right grit for your project:
- Coarse grits: Grits between 60 and 100 are best for removing material quickly, like shaping and rough sanding tasks.
- Medium grits: Grits between 120 and 150 are good for smoothing rough edges and preparing surfaces for finishing.
- Fine grits: Grits between 220 and 400 are best for finishing tasks, like buffing and polishing surfaces.
Remember, when changing your sanding band, always make sure to follow the manufacturer’s instructions carefully to avoid injury. With the right material and grit, you can get the most out of your Dremel sanding bands and achieve professional-level results.
Safety Precautions Before Changing The Band
Before you start changing the sanding band on your Dremel tool, it’s crucial to ensure that you’re taking the necessary safety precautions. By following these guidelines, you can help prevent accidents and ensure a smooth and secure band replacement process.
Securing The Dremel Tool
Before you begin, make sure your Dremel tool is turned off and unplugged. Secure it in a vise or clamp to keep it steady while you work. This will prevent any unexpected movement and reduce the risk of injury.
Personal Protective Equipment
Prior to changing the sanding band, it’s essential to wear the appropriate personal protective equipment (PPE). This includes safety glasses to protect your eyes from any debris or particles and gloves to shield your hands from any sharp edges or hot components.
Step-by-step Guide To Changing The Sanding Band
Are you looking to change the sanding band on your Dremel tool but not sure how to go about it? Don’t worry, we’ve got you covered with this step-by-step guide.
Changing the sanding band on your Dremel tool is a simple process that can be done in just a few minutes. Follow these easy steps to ensure a smooth and hassle-free band replacement.
Removing The Old Band
Before you begin, make sure your Dremel tool is turned off and unplugged to avoid any accidents. To remove the old sanding band, follow these simple steps:
- Hold the Dremel tool firmly with one hand and use your other hand to rotate the collet nut counterclockwise, loosening it.
- Once the collet nut is loose, carefully slide the old sanding band off the drum and remove it from the tool.
- Inspect the drum and clean any debris or residue before fitting the new sanding band.
Fitting The New Band
Now that you’ve removed the old sanding band, it’s time to fit the new one onto your Dremel tool. Follow these steps to ensure a secure and proper fit:
- Slide the new sanding band onto the drum, making sure it fits snugly and evenly.
- Hold the Dremel tool and tighten the collet nut by rotating it clockwise, securing the new sanding band in place.
- Once the collet nut is tightened, give the sanding band a gentle tug to ensure it is securely in place.

Troubleshooting Common Issues
To change a Dremel sanding band, first unplug the tool and loosen the screw on top. Slide off the old band, replace it with a new one, and tighten the screw.
Ensure it’s secure before use. This simple troubleshooting step can keep your Dremel running smoothly for your projects.
Band Slippage
Band slippage is a common issue when changing a Dremel sanding band. If the band slips, it will not only affect the quality of the sanding job, but it can also be dangerous.
Here are some reasons why the band may slip and how to solve the issue:
- The sanding band is too loose. In this case, tighten the screw on the sanding drum.
- The sanding band is worn out. Replace the sanding band with a new one.
- The sanding drum is worn out. Replace the sanding drum with a new one.
Uneven Wear
Another common issue when changing a Dremel sanding band is uneven wear. Uneven wear can be caused by several factors, such as applying too much pressure or using the wrong speed setting.
Here are some solutions to this issue:
- Reduce the speed of the Dremel tool. If the speed is too high, it can cause the sanding band to wear out quickly.
- Apply even pressure to the sanding band. Uneven pressure can cause the sanding band to wear out faster in certain areas.
- Use the correct sanding band for the material you are working on. Using the wrong sanding band can cause uneven wear and damage to the material.
- Rotate the sanding band frequently. This will prevent uneven wear and ensure that the sanding band lasts longer.
By following the above troubleshooting tips, you can easily change your Dremel sanding band without any issues.
Remember to always use the correct sanding band for the material you are working on and to rotate the sanding band frequently to prevent uneven wear.
Maintenance Tips For Sanding Bands
To change a Dremel sanding band, first, ensure the tool is turned off and unplugged. Then, loosen the screw on the drum, slide off the old band, and replace it with a new one. Tighten the screw securely and you’re ready to continue your sanding project.
Regularly inspect the sanding bands for wear and tear to ensure optimal performance.
Maintenance Tips for Sanding Bands Changing the sanding band on your Dremel tool is a crucial part of its maintenance. Regularly replacing the sanding band ensures optimal performance and safety. In addition to this, proper storage, cleaning, and care are essential for extending the lifespan of your sanding bands.
Here are some maintenance tips to help you keep your Dremel sanding bands in top condition. Storage Solutions Proper storage is key to maintaining the quality of your sanding bands. Consider using a small storage container with individual compartments for each grit of sanding band. This will prevent them from getting tangled or damaged.
Additionally, storing them in a cool, dry place away from direct sunlight will help to preserve their integrity. Cleaning and Care After each use, it’s important to clean the sanding bands to remove any debris or residue. You can use a small brush or compressed air to remove particles from the band.
For more stubborn debris, gently scrub the band with a toothbrush and soapy water. Once clean, allow the bands to dry completely before storing them. Regularly inspect the bands for signs of wear or damage, and replace them as needed to prevent any compromise in performance or safety.
By following these maintenance tips, you can ensure that your Dremel sanding bands remain in excellent condition, providing consistent and effective results for your projects.
Enhancing Sanding Efficiency
To change a Dremel sanding band efficiently, first, power off the tool and remove the drum. Slide off the old band and replace it with a new one, ensuring a snug fit. Finally, secure the drum back in place and power on the Dremel for smooth sanding.
Techniques For Smooth Sanding
When changing a Dremel sanding band, ensure the tool is unplugged and cool to touch.
Adjusting Speed Settings
Set the Dremel to a low speed before changing sanding bands for safety.
Improving sanding efficiency with proper techniques is essential for a successful project.
Start by selecting the appropriate grit sanding band for the material being worked on.
Ensure the sanding band is securely installed on the Dremel for smooth operation.
Frequent checks on the sanding band alignment can prevent slips or uneven sanding.
Regularly clean the sanding band to prevent clogging and maintain optimal performance.

Frequently Asked Questions
How Do I Change The Attachment On My Dremel Tool?
To change the attachment on your Dremel tool, first, unplug it for safety. Then, loosen the collet nut, remove the current attachment, insert the new one, and tighten the nut securely.
How To Attach A Sanding Pad To A Dremel?
To attach a sanding pad to a Dremel, align the holes on the pad with the spindle. Secure it by twisting the collet nut clockwise until tight.
How To Attach A Sanding Band?
To attach a sanding band, slide it onto the drum and tighten the screw. Ensure it’s secure before use.
How Do I Get My Dremel Sanding Bands To Stay On?
To get your Dremel sanding bands to stay on, make sure the band is the correct size for your tool. Tighten the screw or latch to secure the band in place.
Avoid applying too much pressure on the band and use a light touch when sanding. Clean the tool and sanding band after use to prevent buildup.
Conclusion
Mastering the process of changing Dremel sanding bands is key to enhancing your DIY projects.
By following these steps, you can seamlessly replace sanding bands and continue creating with precision and ease. Remember, practice makes perfect, so keep honing your skills and enjoy your crafting journey.