To use a Ryobi Weed Wacker, first, ensure it is assembled correctly following the manual. Next, insert the battery, adjust the handle, and press the trigger to start trimming.
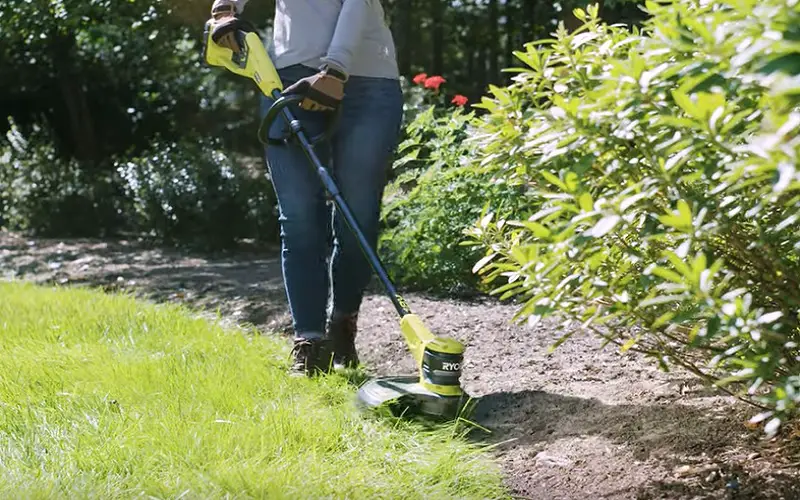
Ryobi Weed Wacker is a versatile tool for maintaining your lawn. Whether you are a seasoned gardener or a beginner, this equipment is user-friendly and efficient. With its lightweight design and adjustable features, the Ryobi Weed Wacker makes lawn care a breeze.
By understanding the basics of operating this tool, you can easily keep your garden looking neat and well-maintained. Let’s explore the simple steps to effectively use the Ryobi Weed Wacker for a beautifully manicured lawn.

Contents
- Introduction To Ryobi Weed Wackers
- Safety First: Preparing To Use Your Weed Wacker
- Assembly And Setup
- Starting Your Ryobi Weed Wacker
- Effective Trimming Techniques
- Maintenance And Care
- Troubleshooting Common Issues
- Advanced Tips For Experienced Users
- Environmental Considerations
- Getting The Most Out Of Your Ryobi Weed Wacker
- Frequently Asked Questions
- Conclusion
Introduction To Ryobi Weed Wackers
Ryobi Weed Wackers are versatile tools designed for easy lawn maintenance. They are popular for their efficiency and user-friendly features.
Why Choose A Ryobi Weed Wacker
- Powerful Performance: Ryobi Weed Wackers deliver consistent cutting power.
- Ease of Use: Lightweight design and ergonomic handles make them comfortable to operate.
- Versatility: They can trim grass, weeds, and even tough brush with ease.
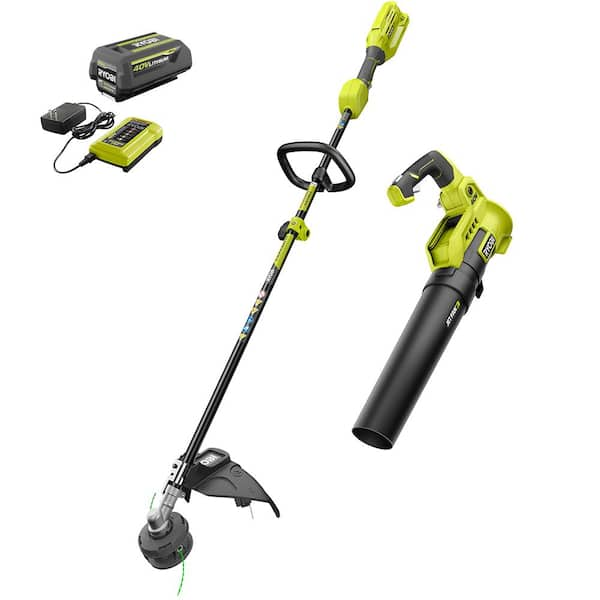
Key Features Of Ryobi Weed Wackers
| Battery Options | Choose between corded electric, battery-powered, or gas models. |
| Cutting Width | Adjustable cutting width for precision trimming. |
| Shaft Length | Telescopic shafts for customizable length based on user’s height. |
| Safety Features | Features like guard shields and safety switches for user protection. |
Safety First: Preparing To Use Your Weed Wacker
Personal Protective Equipment
Wearing appropriate gear is crucial when operating a weed wacker.
- Protective eyewear shields your eyes from debris.
- Ear protection guards against loud noise levels.
- Gloves provide a better grip and protect your hands.
- Long pants and closed-toe shoes prevent injuries from debris.
Understanding The Safety Mechanisms
Familiarize yourself with the safety features of your Ryobi weed wacker.
- Read the manual to understand the functions and safety precautions.
- Ensure the guard is intact to shield against flying debris.
- Inspect the cutting head to ensure it is secure and functioning properly.
Assembly And Setup
When it comes to using a Ryobi weed wacker, proper assembly and setup are crucial for optimal performance. In this section, we’ll guide you through the essential steps to ensure that your weed wacker is assembled correctly and ready for use.
Attaching The Cutting Head
To begin, assemble the cutting head by aligning the arrows on the cap and spool. Push the spool onto the shaft until it clicks into place.
Then, thread the line through the eyelets and trim it to the proper length. Finally, twist the cap back onto the cutting head, securing it in position.
Fueling And Battery Tips
Before fueling the weed wacker, make sure to consult the user manual for the correct fuel type and mixing ratios.
When using a battery-powered model, ensure that the battery is fully charged before starting. Always use the recommended fuel and charge the battery according to the manufacturer’s instructions.
Starting Your Ryobi Weed Wacker
Cold Start Procedure
To start your Ryobi weed wacker from cold, follow these simple steps:
- Turn the switch to the ON position.
- Prime the engine by pressing the primer bulb 3-5 times.
- Set the choke to the START position.
- Hold the throttle trigger and pull the starter rope until the engine starts.
- Once the engine starts, move the choke to the RUN position.
Warm Start Tips
For a warm start, use these tips to get your Ryobi weed wacker running smoothly:
- Turn the switch to the ON position.
- Prime the engine by pressing the primer bulb once or twice.
- Make sure the choke is in the RUN position.
- Hold the throttle trigger and pull the starter rope to start the engine.
Effective Trimming Techniques
When it comes to achieving a well-manicured lawn, mastering the use of a Ryobi Weed Wacker is essential. By implementing effective trimming techniques, you can ensure a neat and tidy yard that enhances the overall appearance of your outdoor space.
Best Angles For Cutting
The best angle for cutting with a Ryobi Weed Wacker is to hold it at a slight angle, approximately 30 degrees, to the ground. This allows the trimmer line to effectively cut through the grass and weeds without causing damage to the surrounding plants and landscaping.
Dealing With Tough Weeds
Tough weeds can pose a challenge when using a weed wacker. To effectively tackle these stubborn plants, it’s important to approach them from a lower angle, almost parallel to the ground. This allows the trimmer line to make direct contact with the tough weeds, ensuring a clean and precise cut.
Maintenance And Care
Maintenance and care are essential for ensuring the longevity and optimal performance of your Ryobi Weed Wacker. By regularly cleaning, inspecting, and replacing components as needed, you can keep your weed wacker in top condition and ready for use whenever necessary.
In this section, we’ll cover the key aspects of maintaining and caring for your Ryobi Weed Wacker, including cleaning the weed wacker and replacing the string or blade.
Cleaning The Weed Wacker
To maintain the efficiency and functionality of your Ryobi Weed Wacker, it’s crucial to clean it after each use. Here’s a simple guide to cleaning your weed wacker:
- First, turn off the weed wacker and unplug it from the power source.
- Use a brush or compressed air to remove debris, grass clippings, and dirt from the cutting head, guard, and motor housing.
- Inspect the air filter and clean or replace it if necessary to ensure proper airflow.
- Wipe down the entire unit with a damp cloth to remove any remaining dirt and grime.
Replacing The String Or Blade
Over time, the cutting string or blade of your weed wacker will wear down and require replacement. Here’s how to replace the string or blade on your Ryobi Weed Wacker:
- Turn off the weed wacker and unplug it from the power source.
- Remove the spool cover and take out the old string spool or blade.
- Install a new string spool or blade according to the manufacturer’s instructions, ensuring it is securely in place.
- Replace the spool cover and ensure it is properly secured before using the weed wacker again.
Troubleshooting Common Issues
When using your Ryobi Weed Wacker, you may encounter some common issues that can hinder its performance. By troubleshooting these problems, you can quickly get back to maintaining your yard with ease.
Engine Troubles
If your Ryobi Weed Wacker’s engine is not starting, check the fuel levels and spark plug connection for any issues.
Feeding Line Problems
Ensure the cutting line is properly installed and not tangled. Clear any debris blocking the line for smooth operation.
Advanced Tips For Experienced Users
For users with some experience using the Ryobi Weed Wacker, there are advanced techniques that can help enhance efficiency and productivity.
Customizing Your Weed Wacking Experience
- Adjust the handle and shaft for comfortable operation.
- Experiment with different line thicknesses for various tasks.
- Utilize attachments like edgers for versatility.
Time-saving Techniques
- Edge before mowing to save time and effort.
- Maintain a consistent speed for even cutting.
- Overlap each pass slightly for complete coverage.
Environmental Considerations
When using a Ryobi Weed Wacker, it’s essential to consider the environmental impact. By following eco-friendly practices and proper waste disposal, you can minimize your carbon footprint and contribute to a healthier planet.
Eco-friendly Usage
When operating the Ryobi Weed Wacker, ensure that you use it responsibly to minimize environmental impact. This includes being mindful of the amount of fuel and oil you use.
Opt for biodegradable and eco-friendly oils to reduce harm to the environment. Additionally, consider the time of day when operating the tool to minimize noise pollution, especially in residential areas.
Disposal Of Waste
After using the weed wacker, it’s crucial to dispose of the waste properly. Make sure to collect and bag any clippings or debris, and dispose of them in designated green waste bins or at recycling centers.
Avoid dumping waste in natural habitats, as it can disrupt ecosystems and harm wildlife. Consider composting grass clippings to reduce waste and create natural fertilizer for your garden.

Getting The Most Out Of Your Ryobi Weed Wacker
Optimize the performance of your Ryobi Weed Wacker by following these tips: adjust the cutting height, maintain the trimmer line tension, and store it properly after use. Keep your yard looking neat and tidy with these simple yet effective strategies.
Summary Of Best Practices
Using a Ryobi weed wacker can make lawn maintenance a breeze. However, to get the most out of your tool, there are a few best practices to keep in mind. Here is a summary of what you should do:
- Wear protective gear like gloves, long pants, and safety glasses.
- Make sure your Ryobi weed wacker is assembled correctly and fueled up.
- Use the right attachment for the job at hand.
- Hold your weed wacker at a 30-degree angle for the best results.
- Move in a sweeping motion to cut down weeds and grass.
Weed wacking mastery is not an overnight achievement. It takes time, patience, and practice to get the hang of using a Ryobi weed wacker.
But with the tips and tricks outlined in this guide, you can be well on your way to becoming a weed wacking pro. Remember to take breaks when needed, stay hydrated, and always prioritize safety.
Frequently Asked Questions
How Do You Wind The String On A Ryobi Weedeater?
To wind the string on a Ryobi Weedeater, follow these steps: Feed the line through the holes in the trimmer head, wind it evenly, and secure the ends.
How To Unlock Ryobi Trimmer Head?
To unlock the Ryobi trimmer head, first, turn off the device and unplug it. Then, locate the locking mechanism on the trimmer head, press it down, and rotate the head counterclockwise to remove it. Follow the manufacturer’s instructions for further guidance.
Why Won’t My Ryobi Weed Wacker String Feed?
The Ryobi weed wacker string may not feed due to tangled string, worn-out spool, or improper installation. Check for tangles, replace the spool if needed, and ensure correct installation for smooth feeding.
How To Feed A Ryobi Trimmer?
To feed a Ryobi trimmer, align arrows on the spool with eyelet holes, thread the line through, and push spool back in. Make sure it’s securely in place. Cut any excess line.
Conclusion
To sum up, using a Ryobi weed wacker is a simple and effective way to keep your lawn looking its best. By following the steps outlined in this guide, you can ensure that your weed wacker is used safely and efficiently.
Always remember to wear protective gear, keep the area clear of debris, and use the right technique for the job. With these tips in mind, you’ll be able to tackle even the toughest weeds with ease. So go ahead and give your lawn the attention it deserves – you won’t be disappointed!