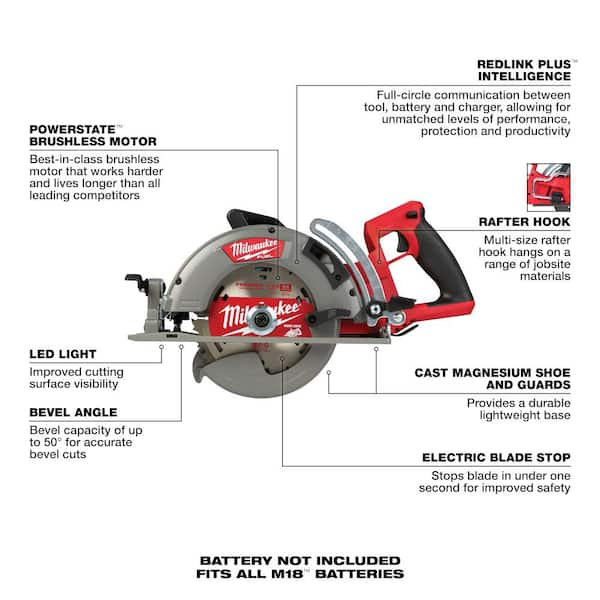
To take the blade off a Milwaukee circular saw, first, unplug the saw for safety. Then, use a wrench to loosen the bolt, and remove the blade carefully.
Are you looking to change the blade on your Milwaukee circular saw? Taking off the blade may seem like a daunting task, but with the right steps, it can be done quickly and safely.
We will guide you through the process of removing the blade from your Milwaukee circular saw. Whether you’re a DIY enthusiast or a professional contractor, knowing how to take the blade off your saw can save you time and ensure that your tools are always in good working condition.
So, let’s dive in and learn how to take the blade off a Milwaukee circular saw.

Contents
Safety Precautions
Safety precautions are crucial when working with a Milwaukee circular saw. Before attempting to take the blade off, it’s essential to follow specific safety measures to prevent accidents and injuries.
Disconnect The Saw From The Power Source
Before starting any maintenance or blade removal process, it’s imperative to disconnect the Milwaukee circular saw from the power source. This ensures that the saw won’t accidentally start during the procedure, reducing the risk of injuries.
Wear Protective Equipment
When handling power tools, wearing the appropriate protective gear is non-negotiable. Ensure you wear safety goggles to protect your eyes from any debris that may dislodge during the blade removal process.
Heavy-duty gloves are also crucial to protect your hands from sharp edges and potential cuts. Additionally, ear protection is essential to guard against the high noise levels generated by the saw.
Preparing The Saw
Before attempting to take off the blade from your Milwaukee circular saw, it’s important to properly prepare the saw for the task at hand. This involves removing the blade bolt cover and loosening the blade bolt.
Remove The Blade Bolt Cover
To begin, locate the blade bolt cover on the saw. This cover is typically located on the side of the saw near the blade.
Use a screwdriver to carefully remove the screws securing the cover in place. Once the screws are removed, carefully lift off the cover to expose the blade bolt beneath.
Loosen The Blade Bolt
Now, it’s time to loosen the blade bolt. Ensure that the saw is unplugged before proceeding. Use a wrench to hold the blade in place while using another wrench to turn the blade bolt counterclockwise. This will release the tension on the bolt, allowing you to remove the blade from the saw.
Removing The Blade
When it comes to maintaining your Milwaukee circular saw, knowing how to remove the blade is an essential skill.
Whether it’s time for a blade replacement or you need to clean the saw, taking off the blade is a straightforward process that you can easily learn.
In this guide, we’ll walk you through the steps to safely remove the blade from your Milwaukee circular saw.
Hold The Blade In Place
Before you start the process of removing the blade, it’s crucial to ensure that the blade is held securely in place.
This step is necessary to prevent any accidents or mishaps during the removal process. Take the necessary precautions to guarantee that the blade won’t move unexpectedly while you work on it.
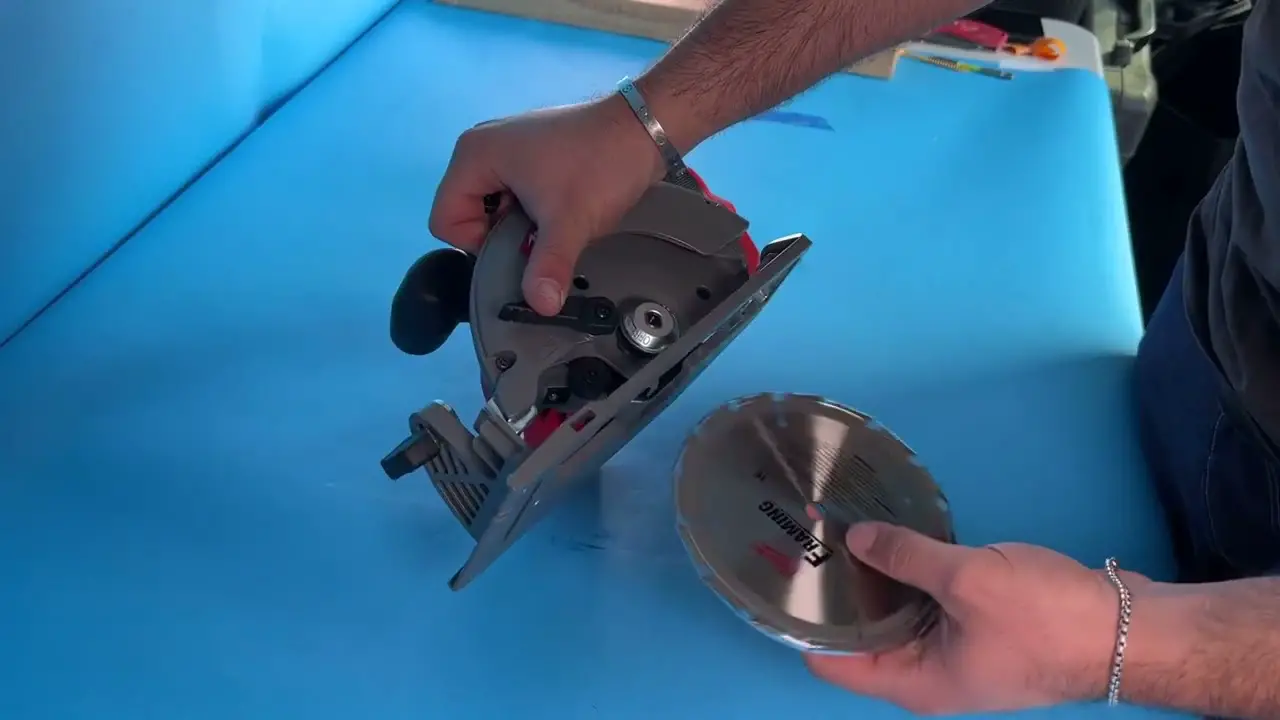
Remove The Blade From The Saw
Now that you’ve secured the blade, it’s time to proceed with the removal process. Follow these steps to safely take off the blade from your Milwaukee circular saw:
- Unplug the saw from the power source to ensure safety.
- Locate the blade lock button on the saw. Depress the lock button to hold the blade in place.
- Use the provided wrench to loosen the arbor nut that holds the blade in place. Turn the wrench counterclockwise to loosen the nut.
- Once the arbor nut is sufficiently loose, carefully remove it along with the outer washer.
- Slide the blade off the arbor and remove it from the saw.
By following these steps, you can successfully remove the blade from your Milwaukee circular saw, allowing you to proceed with any necessary maintenance or blade replacement.
Cleaning And Maintenance
When it comes to your Milwaukee circular saw, regular cleaning and maintenance are essential to ensure the tool operates at its best.
Proper maintenance not only extends the lifespan of your saw but also enhances its performance and safety. In this guide, we’ll walk you through the steps for cleaning and maintaining your circular saw, focusing on the crucial aspects of blade maintenance.
Clean The Blade
One of the most important steps in maintaining your Milwaukee circular saw is to keep the blade clean.
Resin, pitch, and debris can build up on the blade, affecting its cutting performance. To clean the blade:
- Use a stiff-bristled brush to remove any loose debris from the blade.
- Apply a blade cleaning solution or denatured alcohol to dissolve any stubborn residue.
- Wipe the blade with a clean, dry cloth to remove the cleaning solution and residue.
Inspect The Blade And Saw For Damage
Regular inspections are crucial to identify any potential issues with the blade or saw. Inspect the blade and saw for:
- Cracks or chips on the blade.
- Worn or damaged teeth on the blade.
- Loose or damaged components on the saw.
If any damage is found, it’s important to address it immediately to prevent further issues and maintain the safety of the saw.
Replacing The Blade
To remove the blade from your Milwaukee Circular Saw, first unplug the saw for safety. Locate the blade lock button and press it while using a wrench to loosen the arbor nut.
Carefully remove the old blade and replace it with a new one, ensuring it is securely tightened before use. Milwaukee circular saws are powerful tools that can cut through various materials with ease.
However, over time, the blade can become dull or damaged and will need to be replaced. In this guide, we will show you how to replace the blade on your Milwaukee circular saw.
Install The New Blade
Installing a new blade on your Milwaukee circular saw is a simple process that can be completed in just a few steps.
Here’s how you can do it:
- First, unplug the saw from the power source to ensure your safety.
- Next, locate the blade lock button on the saw’s housing and push it in to lock the blade in place.
- Use the wrench that came with your saw to loosen the blade bolt by turning it counterclockwise.
- Remove the old blade and replace it with the new one, ensuring that the teeth of the blade are facing the right direction.
- Tighten the blade bolt by turning it clockwise with the wrench until it is snug.
- Release the blade lock button and rotate the blade by hand to make sure it spins freely.
Tighten The Blade Bolt
After installing the new blade, you need to make sure that the blade bolt is tightened properly to avoid any accidents.
Here’s how you can do it:
- Use the wrench to tighten the blade bolt by turning it clockwise.
- Make sure that the blade bolt is tightened securely, but do not overtighten it.
- Check the blade bolt periodically to ensure that it remains tight during use.
- If the blade bolt becomes loose during use, turn off the saw and tighten it before continuing.
Now that you know how to replace the blade on your Milwaukee circular saw, you can easily keep your saw in good working condition. Remember to always follow safety guidelines when working with power tools and wear appropriate protective gear.

Frequently Asked Questions
How To Remove Blade From Circular Saw?
To remove blade from circular saw, unplug the saw first. Loosen the blade nut with a wrench. Remove the outer washer, then pull off the blade.
How To Change Blade In Milwaukee?
To change blade in Milwaukee, first, unplug the tool for safety. Loosen the blade clamp screw. Remove the old blade and insert the new one, ensuring it is secure. Tighten the blade clamp screw and plug in the tool to test.
How To Change Blade On Milwaukee Hack Saw?
To change the blade on a Milwaukee hack saw, first, loosen the blade tension knob. Then, remove the old blade and insert the new one, making sure it’s properly aligned. Finally, tighten the blade tension knob and you’re good to go.
How Do You Release A Saw Blade?
To release a saw blade, first, unplug the saw. Then, locate the blade release lever or screw. Finally, follow the manufacturer’s instructions to safely remove the blade.
Conclusion
Mastering the process of removing the blade from your Milwaukee circular saw is crucial. By following the steps outlined in this guide, you can safely and efficiently change the blade whenever needed. Keep your tools in top condition for optimal performance.