To restring a Makita weed eater, first, remove the spool cover and take out the old line. Then, insert the new trimmer line following the arrow directions.
Maintaining your Makita weed eater is essential for optimal performance. One crucial aspect of upkeep is knowing how to restring the trimmer. By following a few simple steps, you can easily replace the trimmer line and ensure that your weed eater is ready for efficient operation.
In this guide, we will walk you through the process of restringing a Makita weed eater, so you can keep your yard looking neat and tidy all season long.
Contents
- Introduction To Makita Weed Eaters
- Identifying When To Restring
- Tools And Materials Needed
- Safety Precautions
- Removing The Spool From The Weed Eater
- Winding The String Onto The Spool
- Reassembling The Spool And Weed Eater
- Testing And Troubleshooting
- Maintenance Tips For Longevity
- Advanced Tips For Professional Use
- Frequently Asked Questions
- Conclusion
Introduction To Makita Weed Eaters
Makita weed eaters are renowned for their durability, power, and precision, making them a popular choice among homeowners and professional landscapers alike. With a reputation for quality and performance, these tools have become a staple in the world of yard maintenance.
Popularity Of Makita Brand
Makita has earned a strong reputation for producing high-quality outdoor power equipment, including their line of weed eaters. The brand’s commitment to innovation and customer satisfaction has solidified its position as a trusted choice for outdoor power tools.
Benefits Of Regular Maintenance
Regular maintenance of your Makita weed eater is essential for ensuring optimal performance and longevity. By taking care of your equipment, you can prevent costly repairs and extend its lifespan, ultimately saving time and money in the long run.
Identifying When To Restring
Signs Of A Worn String
Look for fraying or breakage in the string. Check for decreased cutting efficiency.
- String appears worn or damaged
- Decreased cutting power
- Inconsistent trimming results
Impact Of String Quality On Performance
Using high-quality string improves cutting efficiency and extends trimmer life.
- High-quality string lasts longer
- Enhances cutting performance
- Reduces wear on trimmer
Tools And Materials Needed
To restring a Makita weed eater, gather nylon line, gloves, safety goggles, and pliers. Follow manufacturer instructions for smooth restringing. Remember to turn off the tool before starting.
Tools and Materials Needed Restringing a Makita weed eater can seem like a daunting task, but with the right tools and materials, it can be done quickly and easily.
It’s important to select the right string, as using the wrong size can damage your weed eater. Check the owner’s manual or manufacturer’s specifications for the correct diameter of trimmer line to use. When it comes to tools, safety should be your top priority.
Wear safety glasses and work gloves to protect your eyes and hands from any flying debris. You’ll also need scissors or a utility knife to cut the trimmer line, as well as a replacement spool or reel to hold the line. Depending on the model of your Makita weed eater, you may need a screwdriver or wrench to remove the spool cover and access the spool.
Check the owner’s manual or manufacturer’s specifications to determine which tool you will need. Now that you have all the necessary tools and materials, you’re ready to restring your Makita weed eater.
Follow the steps in the owner’s manual or watch a tutorial video to ensure you do it correctly and safely. With a little practice, you’ll be able to restring your weed eater quickly and easily whenever needed.
Safety Precautions
Before you begin restringing your Makita weed eater, it’s crucial to prioritize safety. Following safety precautions can help prevent accidents and ensure a smooth restringing process. Here are some important safety measures to keep in mind:
Protective Gear
Wear appropriate protective gear before working on your Makita weed eater. This includes safety goggles to protect your eyes from debris, sturdy gloves to shield your hands, and long pants to safeguard your legs from flying debris. Additionally, ear protection is recommended to minimize exposure to loud noise.
Preparation Steps
Prior to restringing your Makita weed eater, take preparation steps to ensure a safe working environment. Start by inspecting the tool for any damage or wear, and make sure it’s turned off before beginning the restringing process. Clear the work area of any obstacles and ensure good lighting for better visibility.
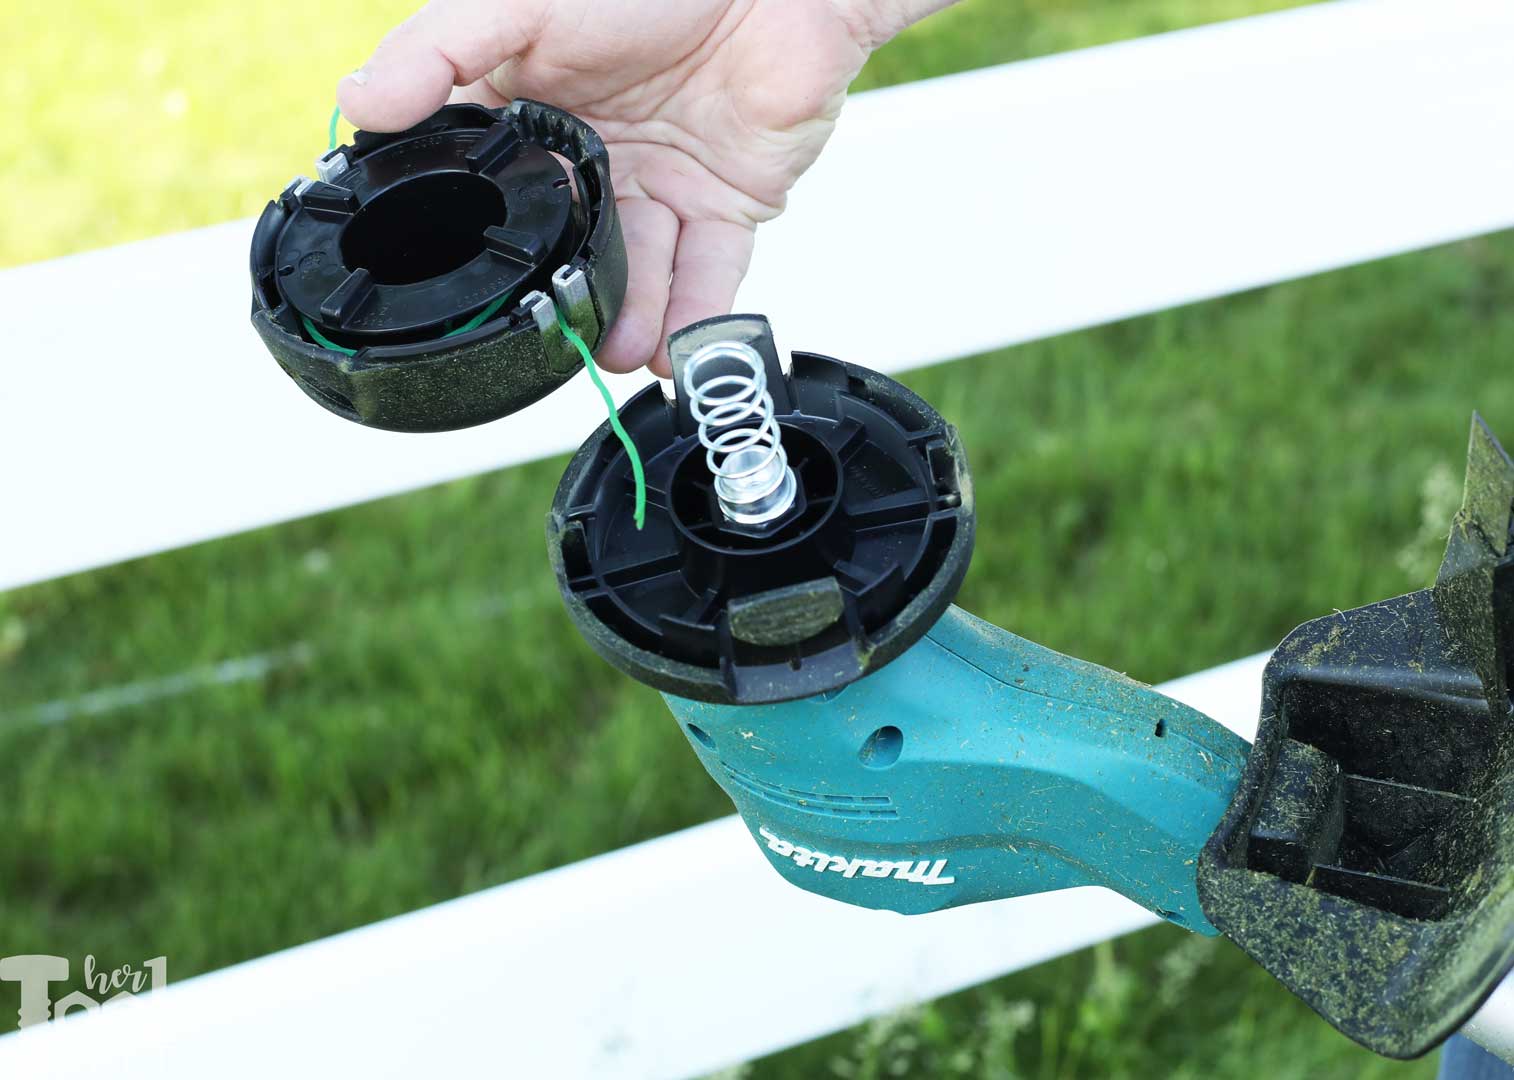
Removing The Spool From The Weed Eater
Removing the spool from the weed eater is an essential step in the restringing process. To ensure a smooth and efficient process, it’s important to follow the disassembly process carefully and troubleshoot any common issues that may arise.
Disassembly Process
To begin the disassembly process, first, turn off the weed eater and disconnect the spark plug to prevent any accidental starts. Then, locate the spool housing, typically found at the bottom of the weed eater.
Once located, carefully remove the spool housing by unscrewing it from the weed eater. Some models may have tabs that need to be pressed to release the spool housing.
After removing the spool housing, gently lift the spool out of the housing. Take note of the orientation of the spool and any springs or other components that may be present.
Troubleshooting Common Issues
If you encounter resistance when trying to remove the spool housing, check for any hidden screws or locking mechanisms that may be securing it in place.
Additionally, ensure that the weed eater is completely powered off and the spark plug is disconnected before attempting to disassemble the spool housing.
If the spool is stuck or difficult to remove, try gently tapping the housing to loosen it. Avoid using excessive force to prevent damage to the weed eater.
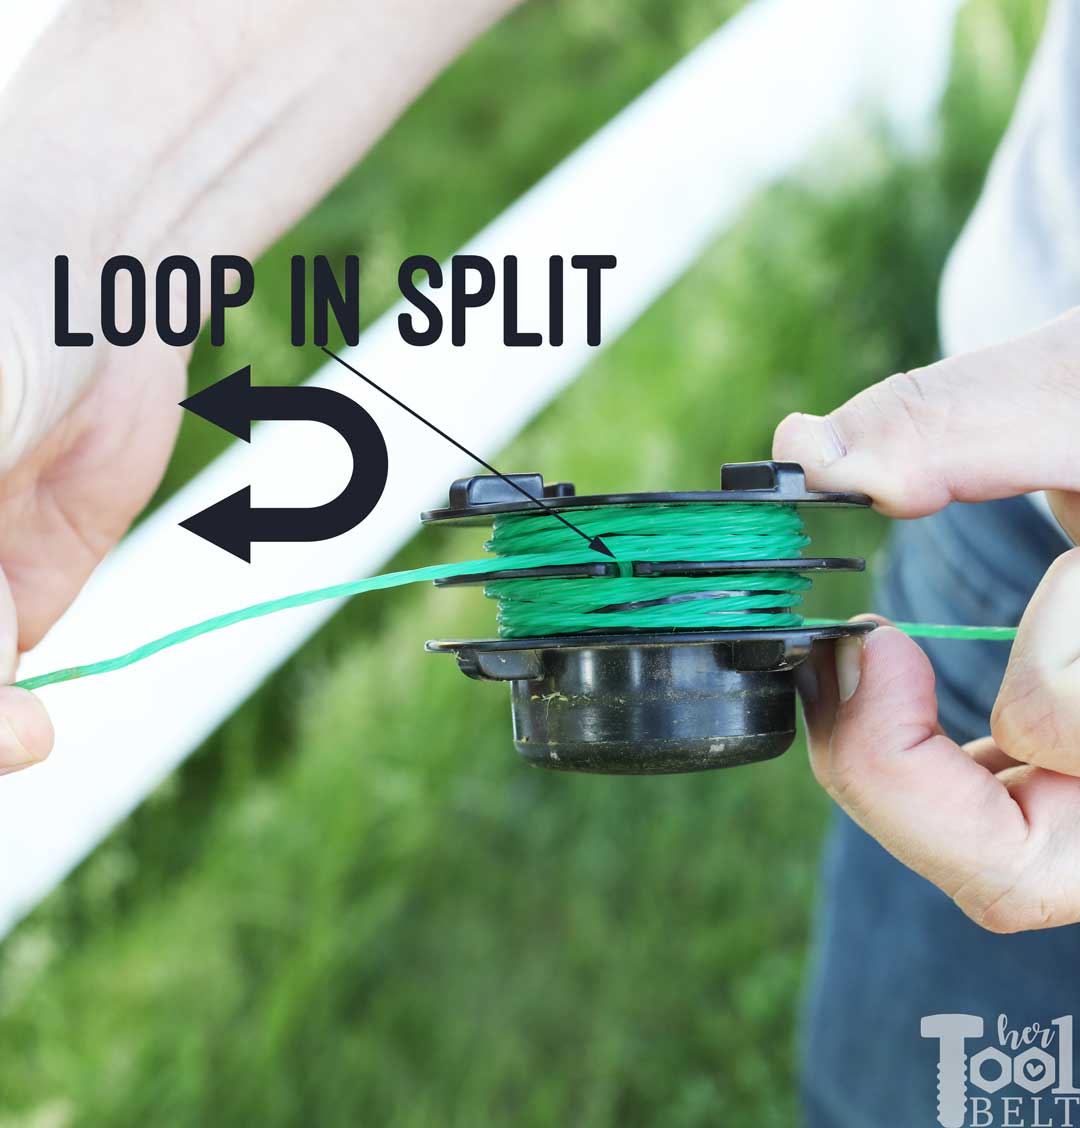
Winding The String Onto The Spool
To restring a Makita weed eater, start by winding the string onto the spool in even layers. Ensure the string is tightly wound to prevent tangling during use, allowing for smooth operation when cutting through tough vegetation. This simple step is crucial for efficient and effective weed eating.
Winding the string onto the spool is a crucial step when restringing a Makita weed eater. Correct winding techniques will ensure that the string is secure and won’t come loose during use.
However, it’s easy to make common mistakes that can lead to frustration and wasted time. In this section, we’ll discuss the correct winding techniques and how to avoid common mistakes.
Correct Winding Techniques
To wind the string onto the spool, follow these steps:
- Remove the spool from the weed eater and clean it of any debris or old string.
- Cut a length of string that is appropriate for your weed eater, usually around 8 feet.
- Locate the arrows on the spool indicating the direction in which the string should be wound. It’s important to follow these arrows to ensure that the string feeds correctly.
- Insert the end of the string into the hole on the spool and wind it in the direction indicated by the arrows. Keep the string taut as you wind it to ensure that it doesn’t overlap or bunch up.
- Leave about 6 inches of string unwound, and then thread it through the eyelets on the spool.
- Replace the spool back onto the weed eater, making sure that the string feeds out in the correct direction.
Avoiding Common Mistakes
There are a few common mistakes that people make when winding the string onto the spool.
Here are some tips to avoid these mistakes:
- Don’t wind the string too tightly, as this can cause it to overlap or bunch up.
- Make sure that the string is wound in the correct direction, as indicated by the arrows on the spool.
- Don’t forget to thread the string through the eyelets on the spool, as this will prevent it from coming loose during use.
- If you’re having trouble getting the string to feed correctly, try winding it in the opposite direction or adjusting the tension on the spool.
By following these correct winding techniques and avoiding common mistakes, you’ll be able to restring your Makita weed eater quickly and easily. With a properly wound spool, you’ll be able to tackle even the toughest weeds and grass with ease.
Reassembling The Spool And Weed Eater
After successfully restringing the Makita weed eater, the next crucial step is to reassemble the spool and the weed eater itself. This process ensures that the weed eater is ready for use and operates smoothly. Let’s walk through the steps to securely attach the spool and conduct final assembly checks.
Securing The Spool
To secure the spool in place, carefully insert it back into the weed eater head. Make sure it fits snugly and aligns correctly to prevent any tangling issues. Check that the spool rotates smoothly and freely before proceeding.
Final Assembly Checks
- Verify that the spool is securely fastened to the weed eater head.
- Inspect the string to ensure it is properly wound around the spool.
- Check that the cutting head is reattached securely.
- Test the weed eater to ensure proper functionality before use.
| Final Checks | Actions |
|---|---|
| Spool Security | Ensure spool is tightly secured |
| String Inspection | Check string winding on spool |
| Cutting Head | Confirm cutting head is properly attached |
| Functionality Test | Test weed eater functionality before use |

Testing And Troubleshooting
When it comes to restringing a Makita weed eater, testing and troubleshooting are crucial steps to ensure the job is done correctly. By performing a function test and addressing any post-restringing issues, you can ensure that your weed eater is in optimal working condition. Let’s take a closer look at these important steps.
Performing A Function Test
Before delving into using the restringed weed eater, it’s essential to perform a function test to ensure everything is in order. Start by visually inspecting the restringed line to make sure it’s properly installed and secured.
Then, power on the weed eater and allow it to run for a few moments. Listen for any unusual sounds or vibrations that could indicate an issue with the restringing process.
Additionally, engage the trimmer head to see if the line feeds properly and the trimmer operates smoothly. If everything checks out, your function test is successful, and you can proceed with confidence.
Addressing Post-restringing Issues
Even with careful restringing, there may be post-restringing issues that need to be addressed. Common issues include the line not feeding properly, the trimmer head not spinning, or excessive line breakage.
If you encounter any of these problems, it’s important to troubleshoot and make necessary adjustments.
Check for any tangles or jams in the line, and ensure that the spool and trimmer head are properly aligned and installed. If the issues persist, it may be necessary to recheck the restringing process and make corrections as needed.
Maintenance Tips For Longevity
To restring a Makita weed eater for longevity, start by turning off the engine and removing the spool cover. Unwind the old line, replace with new trimmer line, and secure it properly to ensure efficient cutting performance and durability. Regularly inspect and maintain the trimmer for optimal functionality.
Maintenance Tips for Longevity Regular Cleaning Routines Regular cleaning is essential for the longevity of your Makita weed eater. After each use, remove any grass or debris from the cutting head, trimmer guard, and air filter.
This prevents clogging and ensures optimal performance. Use a soft brush or cloth to gently wipe away any dirt, being careful not to damage any components. Proper Storage Practices Proper storage is crucial to keep your weed eater in top condition.
Before storing, ensure the fuel tank is empty to prevent stale fuel from clogging the carburetor. Store your weed eater in a dry, well-ventilated area, away from direct sunlight and moisture.
Consider using a protective cover to shield it from dust and debris. Remember these tips to keep your Makita weed eater in peak condition and extend its lifespan.
Advanced Tips For Professional Use
When maintaining a Makita weed eater for professional use, advanced tips can enhance performance and durability. Here are some expert recommendations to optimize your Makita weed eater.
Customizing String Length
Adjust string length based on the type of vegetation being trimmed. For heavy-duty cutting, use longer string lengths.
Upgrade Options For Heavy-duty Use
Consider upgrading to a premium trimmer line for enhanced durability and cutting power. Look for reinforced lines for tough vegetation.

Frequently Asked Questions
How Do You Put The Wire In A Makita Weed Wacker?
To put the wire in a Makita weed wacker, follow these steps:
1. Turn off the weed wacker and disconnect the spark plug.
2. Remove the spool cover and take out the spool.
3. Wind the new trimmer line onto the spool according to the arrow direction.
4. Reassemble and you’re ready to go.
How To Change Makita Trimmer Head?
To change the Makita trimmer head, first, turn off the trimmer. Then, press the tabs on the side of the head and remove the spool.
Next, insert the new spool and line up the tabs to lock it in place. Finally, twist the head to secure it.
How To Replace Trimmer Line Bump Feed?
To replace trimmer line bump feed, follow these steps:
1. Turn off the trimmer and disconnect power.
2. Remove the spool cover and take out the old line.
3. Insert new trimmer line following arrow directions.
4. Secure the spool cover back on.
How To Load A Line Into A Weed Eater?
To load a line into a weed eater, follow these steps:
1. Turn off the weed eater and disconnect it from the power source.
2. Remove the spool cover and take out the empty spool.
3. Cut a length of trimmer line and insert it into the spool, following the arrows on the spool for direction.
4. Wind the line onto the spool tightly, leaving a little bit of line unwound at the end.
5. Reattach the spool cover and connect the weed eater to the power source.
Conclusion
To wrap up, maintaining your Makita weed eater by restringing it is crucial for optimal performance. By following the simple steps outlined in this guide, you can easily ensure that your tool remains in top condition. Regular maintenance will extend the life of your weed eater and keep your yard looking tidy.