To reset a Ryobi garage door opener, locate the “Learn” button on the opener unit. Press and hold the button until the LED light blinks, indicating a successful reset.
Are you experiencing issues with your Ryobi garage door opener and need to reset it? Resetting the opener can help resolve common problems and get it back in working order efficiently.
In this guide, we will walk you through the simple steps to reset your Ryobi garage door opener. By following these instructions, you can quickly troubleshoot any issues and restore the functionality of your garage door opener.
Let’s delve into the process of resetting your Ryobi garage door opener to ensure smooth operation and convenience.
Contents
- Introduction To Ryobi Garage Door Openers
- Identifying The Need For A Reset
- Preparation For Resetting Your Opener
- Step-by-step Resetting Process
- Troubleshooting Post-reset Issues
- Maintenance Tips To Avoid Future Resets
- Technical Support For Ryobi Openers
- Enhancing Garage Security Post Reset
- Conclusion: Ensuring Smooth Operation
- Frequently Asked Questions
- Conclusion
Introduction To Ryobi Garage Door Openers
To reset your Ryobi garage door opener, start by unplugging the power cord for 30 seconds, then plug it back in. Next, press and hold the ‘Learn’ button until the LED light blinks. Finally, test the remote to ensure the reset was successful.
The Importance Of Proper Maintenance
Ryobi garage door openers are reliable devices that require regular maintenance to ensure smooth operation.
Common Issues Requiring Resets
Understanding the common issues that may require a reset can help troubleshoot and resolve problems quickly.
Identifying The Need For A Reset
To reset your Ryobi garage door opener, start by identifying the need for a reset. Locate the reset button on the motor unit and follow the manufacturer’s instructions for a successful reset process. Resetting the opener can help resolve issues and ensure smooth operation.
Symptoms Of Malfunction
If you are experiencing difficulty in opening or closing your garage door, it may be time to reset your Ryobi garage door opener.
Some common signs of malfunction include the door not responding to the remote control, the door not opening or closing all the way, or the opener making unusual noises. If you notice any of these symptoms, it is important to address them promptly to avoid further damage.
Safety Precautions Before Resetting
Before resetting your Ryobi garage door opener, it is important to take certain safety precautions. First, make sure that the door is in the fully closed position.
Next, unplug the opener from the power source to avoid any electrical shocks. Finally, disconnect the door from the opener by pulling the emergency release cord. This will allow you to manually open and close the door if necessary.
Resetting Your Ryobi Garage Door Opener
To reset your Ryobi garage door opener, follow these steps:
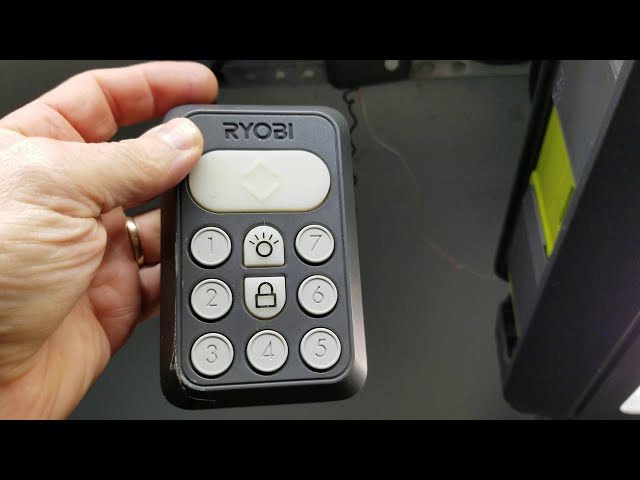
- Locate the “Learn” button on the opener. This is typically located on the back or side of the unit.
- Press and hold the “Learn” button until the LED light on the opener begins to blink.
- Press and release the button on your remote control. The LED light on the opener should stop blinking and remain steady.
- Press the “Learn” button again to complete the reset process. The LED light on the opener should turn off.
- Test the opener by pressing the button on your remote control. The door should now open and close properly.
By following these simple steps, you can reset your Ryobi garage door opener and get it working like new again. Remember to always take the necessary safety precautions before attempting any repairs or maintenance on your garage door opener.
Preparation For Resetting Your Opener
Resetting your Ryobi garage door opener requires a few simple steps. Begin by unplugging the opener for 30 seconds, then reconnect. Next, press and hold the “Learn” button until the LED light blinks. Finally, test the remote to ensure successful reset.
Tools And Materials Needed
Before resetting your Ryobi garage door opener, gather the following tools and materials:
- Step ladder
- Mobile device with Wi-Fi connectivity
- Ryobi garage door opener remote
- Pen and paper for noting down settings
Understanding Your Opener’s Model
It’s crucial to understand your Ryobi garage door opener’s model to ensure a successful reset. Refer to the user manual or the manufacturer’s website to find the model number and specific reset instructions for your opener.
Step-by-step Resetting Process
When it comes to resetting your Ryobi garage door opener, following a step-by-step process can help you get the job done efficiently. By understanding the specific steps involved, you can ensure that your garage door opener is reset properly and functions smoothly.
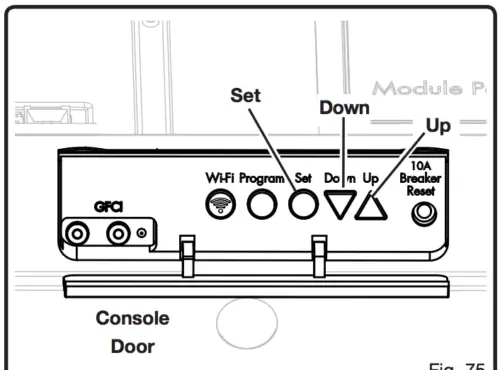
Locating The Reset Button
To begin the reset process, start by locating the reset button on your Ryobi garage door opener. The reset button is typically found on the main unit of the opener.
It may be a small, recessed button that requires a tool such as a paperclip to press. Refer to your Ryobi garage door opener’s manual for the exact location of the reset button.
Executing The Reset Sequence
Once you have located the reset button, it’s time to execute the reset sequence. Follow these steps carefully:
- Ensure the garage door is closed and the opener is powered on.
- Press and hold the reset button for approximately 6-10 seconds. This will initiate the reset process.
- Release the reset button once the LED light on the opener begins to blink, indicating that the reset has been successful.
- Test the garage door opener to confirm that it is functioning properly.
Troubleshooting Post-reset Issues
After resetting your Ryobi garage door opener, it’s possible to encounter some post-reset issues. Troubleshooting these issues is essential to ensure your opener is functioning properly. Let’s dive into some common issues and their solutions.
When The Opener Won’t Respond
If your Ryobi garage door opener fails to respond after a reset, check the power source and ensure it’s properly connected. Inspect the opener’s control panel for any visible damage or loose connections.
Additionally, check the remote control’s batteries and replace them if necessary. If the issue persists, consult the user manual for further troubleshooting steps or consider contacting Ryobi customer support.
Adjusting The Settings After Reset
After a reset, you may need to adjust the settings of your Ryobi garage door opener. This can include recalibrating the door’s travel limits or reprogramming the remote control. Refer to the user manual for specific instructions on reconfiguring the settings.
Moreover, ensure that the safety sensors are properly aligned and free from any obstructions. Regularly test the opener to confirm that it operates smoothly after making adjustments.
Maintenance Tips To Avoid Future Resets
To avoid the need for future resets, it’s important to regularly maintain your Ryobi garage door opener. Keep the opener clean and lubricated, check for loose parts, and test the safety sensors.
Following these maintenance tips can help prevent the need for frequent resets and ensure smooth operation of your garage door opener.
Technical Support For Ryobi Openers
As a proud owner of a Ryobi garage door opener, you might encounter a situation where you need technical support.
Fortunately, Ryobi provides excellent customer service to assist you with any issues you may face.
In this section, we will discuss when to contact customer service, warranty, and repair information for your Ryobi opener.
When To Contact Customer Service?
If you experience any technical difficulties with your Ryobi garage door opener, you should contact customer service. Some common issues include:
- The garage door opener is not working properly
- The opener is making unusual noises
- The remote control is not working
- The garage door opener is not responding to your commands
When you contact customer service, be sure to have your model number and serial number ready. The representative will help you troubleshoot the problem and provide you with a solution.
Warranty And Repair Information
If your Ryobi garage door opener is still under warranty, you may be eligible for a repair or replacement. Ryobi offers a limited lifetime warranty for the motor and belt, and a 3-year warranty for all other components. To learn more about the warranty and repair options, visit the Ryobi website or contact customer service.
If your Ryobi garage door opener is not under warranty, you can still have it repaired by a certified technician. Ryobi provides a list of authorized repair centers on their website. You can also purchase replacement parts directly from Ryobi.
Now that you know about the technical support, warranty, and repair options for your Ryobi garage door opener, you can rest assured that you are covered if any issues arise.
Contact customer service if you need assistance, and always follow the manufacturer’s instructions to ensure proper operation of your garage door opener.
Enhancing Garage Security Post Reset
Resetting your Ryobi garage door opener enhances security. Follow these steps to ensure your garage remains safe and protected.
Updating Security Features
Resetting your Ryobi garage door opener is the first step to enhancing your garage security post-reset.
Incorporating Smart Technology
Integrating smart technology into your garage door opener system is crucial for improved security.
Conclusion: Ensuring Smooth Operation
To ensure smooth operation, follow these steps to reset your Ryobi garage door opener effortlessly. By carefully resetting the opener according to the manufacturer’s guidelines, you can quickly restore its functionality and maintain optimal performance for seamless garage door operation.
Recap Of Key Steps
Step 1: Press and hold the “Learn” button on the motor unit until the indicator light turns off.
Step 2: Release the button and the light should turn back on.
Step 3: Press the remote control button you want to program three times.
Step 4: Your remote should now be successfully reset and ready for use.
The Value Of Being Proactive
Proactively resetting your Ryobi garage door opener can prevent issues and ensure smooth functionality.
Regular maintenance like this helps avoid unexpected problems and extends the lifespan of your opener.
By taking simple steps like this, you can enjoy a reliable and efficient garage door opener for years to come.

Frequently Asked Questions
How To Reprogram Ryobi Garage Door Opener?
To reprogram a Ryobi garage door opener, first, locate the “Learn” button on the back of the opener’s motor unit. Press and hold the button until the LED light turns off, then release it.
Next, press the “Learn” button again and within 30 seconds, press the button on the remote that you wish to program. The LED light on the motor unit will blink once, indicating that the programming is complete.
How Do I Reset My Garage Door Opener?
To reset your garage door opener, locate the “reset” button on the opener unit. Press and hold this button until the light flashes.
Release the button, and the opener is reset. If your opener doesn’t have a reset button, consult the manual or contact the manufacturer for specific instructions.
How Do I Reset The Limit On My Ryobi Garage Door Opener?
To reset the limit on your Ryobi garage door opener, locate the limit adjustment screws on the opener. Turn the screws using a screwdriver to adjust the limit settings.
Test the door to ensure it stops and closes properly. Repeat the process if necessary until the desired limits are set.
Does The Ryobi Garage Door Opener Have A Learn Button?
Yes, the Ryobi garage door opener has a learn button. It is used to program the remote control and connect it to the opener.
Conclusion
Resetting your Ryobi garage door opener is a simple process that can be done in just a few steps. By following the manufacturer’s instructions and using the right tools, you can quickly and easily reset your opener to its original settings.
Remember to always prioritize safety and follow the guidelines provided in the user manual. With these tips, you can ensure that your garage door opener is functioning properly and securely.