Are you frustrated with your Ryobi battery not holding a charge? You’re not alone.
Many Ryobi users face the same issue, and the good news is that you don’t have to rush out and buy a new one just yet. Imagine the satisfaction of bringing your battery back to life and saving money in the process.
What if you could effortlessly power your tools again without interruption? In this guide, you’ll discover simple, effective steps to repair your Ryobi battery and get back to your projects with ease. Curious about how you can achieve this? Let’s dive into the details and empower you to take control of your tools today.
Contents
Common Ryobi Battery Issues
Ryobi batteries are popular for their reliability and power. Yet, even these batteries can face issues. Understanding common problems helps in maintaining their performance. This section explores frequent troubles Ryobi users encounter.
Battery Not Charging
Many Ryobi users face charging issues. The battery may not charge despite being connected. Check the charger and power source first. Sometimes, dirt or debris blocks the connection. Clean the terminals gently with a dry cloth. Inspect the charger for damages. Replacing a faulty charger often solves the issue.
Short Battery Life
Short battery life frustrates many users. This happens when the battery loses charge quickly. Avoid overcharging the battery. Overcharging reduces its lifespan. Store batteries in a cool, dry place. Extreme temperatures affect battery performance. Regularly calibrating the battery can extend its life. Run the battery down completely before recharging.
Overheating Problems
Overheating is a common issue with Ryobi batteries. High temperatures can harm the battery. Ensure the battery is in a well-ventilated area during charging. Avoid using the battery immediately after charging. Let it cool down first. If overheating persists, inspect for signs of damage. Consider replacing the battery if it shows wear and tear.

Credit: www.youtube.com
Safety Precautions
Ensure safety by wearing protective gloves and goggles before handling Ryobi batteries. Work in a well-ventilated area to avoid harmful fumes. Disconnect power sources to prevent electrical shocks during the repair process.
Before you dive into repairing your Ryobi battery, it’s crucial to consider safety precautions. While fixing a battery can save you money and extend the life of your tools, it also comes with risks. Ensuring your safety should be your top priority, so let’s explore the essential steps you should take.Essential Tools And Equipment
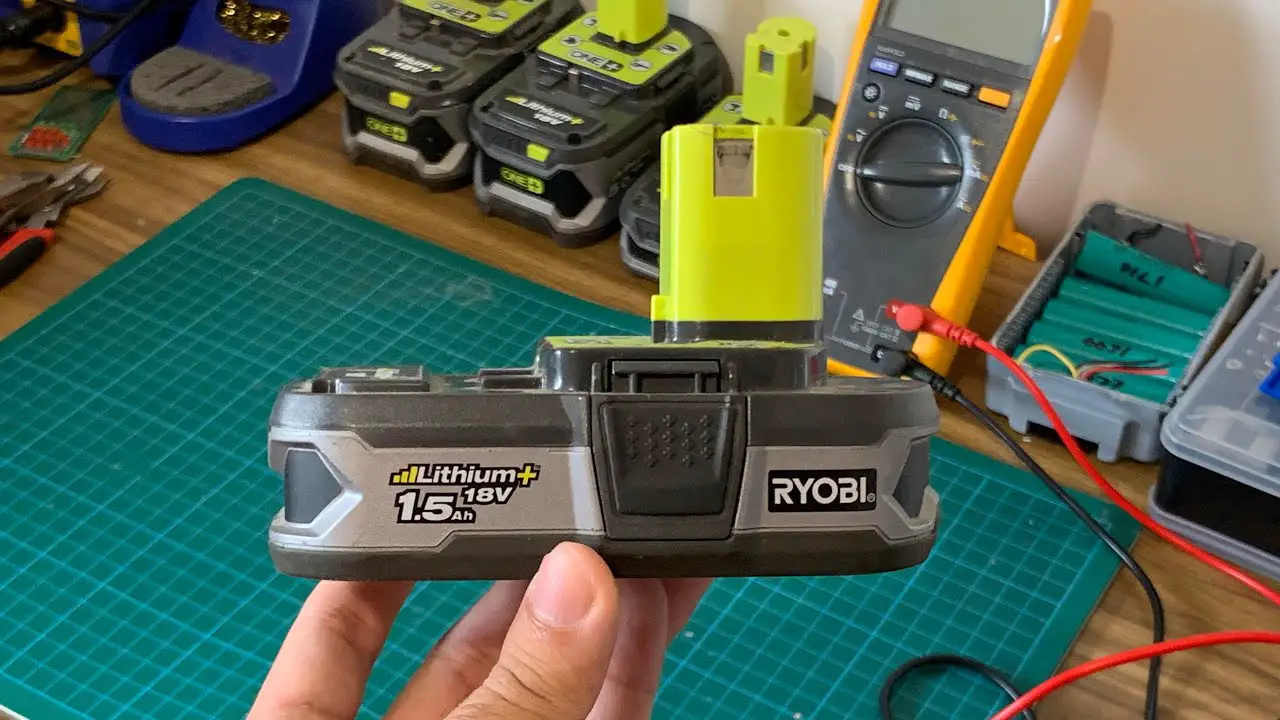
Having the right tools on hand can make all the difference. You’ll need a multimeter to test the battery’s voltage. It’s also wise to have insulated gloves to protect your hands from any electrical discharge. A small screwdriver set will help you open the battery casing without damaging it. Lastly, safety goggles are a must to shield your eyes from potential chemical splashes. Each tool plays a crucial role in keeping the process safe and efficient.Handling Battery Safely
Handling a battery might seem straightforward, but it requires caution. Always work in a well-ventilated area to avoid inhaling harmful fumes. Avoid contact with the terminals to prevent electric shock. Never attempt a repair if the battery casing is swollen or leaking. This could indicate serious internal damage and pose a safety hazard. If unsure, consult a professional for further advice. Have you ever thought about the potential dangers lying in a seemingly harmless battery? Taking these safety measures seriously can make all the difference. Your safety is worth the extra effort.Diagnosing The Problem
Identifying issues in a Ryobi battery begins with checking for visible damage and ensuring proper connection. Consider testing voltage using a multimeter to confirm battery functionality. This helps pinpoint the exact problem, guiding effective repairs.
Diagnosing the problem is the first step in repairing your Ryobi battery. Without understanding the root cause, any fix is just a guess. By following a structured approach, you can identify the issue and potentially save yourself time and money.Visual Inspection
Begin with a simple visual inspection. Check for any visible damage, such as cracks or leaks. Look at the battery terminals for any signs of corrosion. A battery with obvious physical damage might be beyond repair. However, minor issues like dirt on the terminals can be easily cleaned. Have you ever found a battery with a strange smell? This could indicate internal damage. Always trust your senses in these situations.Using A Multimeter
A multimeter is your best friend for diagnosing electrical issues. Set your multimeter to the correct voltage range and measure the battery’s output. Does the voltage reading match the battery’s rated voltage? If not, the battery might be undercharged or faulty. Testing the battery under load can reveal more about its health. A significant drop in voltage might indicate internal resistance problems.Checking Connections
Inspect the connections between the battery and the device. Loose or dirty connections can mimic battery failure. Ensure that all terminals and connectors are clean and secure. Use a small brush to remove any debris or dirt. Are the connections tight? A poor connection can prevent the battery from delivering power effectively. By systematically diagnosing the problem, you can pinpoint the issue and take the right steps to repair your Ryobi battery. Understanding the problem not only saves you effort but also prolongs the life of your battery.Cleaning Battery Contacts
Cleaning battery contacts can restore your Ryobi battery’s performance. Dirt and grime can block the flow of energy. This simple task might solve charging issues.
Supplies Needed
Gather a few essential items. You will need a small brush. A soft cloth is also necessary. Don’t forget isopropyl alcohol. These supplies will help clean the contacts.
Step-by-step Cleaning Guide
Start by removing the battery from the tool. Safety first, so ensure it’s powered off. Use the brush to remove visible dirt. Be gentle to avoid damaging the contacts.
Next, dampen the cloth with alcohol. Wipe the contacts thoroughly. Make sure all grime is gone. Allow the contacts to dry completely.
Place the battery back into the tool. Check if the issue is resolved. Clean contacts improve energy transfer. Your Ryobi battery might just need this simple fix.
Reviving A Dead Battery
Reviving a Ryobi battery can extend its life and save money. Start by checking for visible damage. Then, clean the contacts using a dry cloth. If it still doesn’t work, try jump-starting it with another battery. Always follow safety guidelines to prevent accidents.
Reviving a dead Ryobi battery can seem daunting, but it’s often simpler than you think. With a few straightforward methods, you might breathe new life into what you thought was a lost cause. If you’re dealing with a Ryobi battery that won’t charge, it’s time to roll up your sleeves and explore some practical solutions. ###Jump-starting Method
Have you ever used jumper cables on a car battery? A similar concept works for your Ryobi battery. First, gather a fully charged Ryobi battery of the same voltage. Ensure both batteries are out of the tool and not connected to a charger. Using metal wire or even paper clips, connect the terminals: positive to positive, negative to negative. This creates a temporary circuit that can charge the dead battery just enough to get it recognized by the charger. Be cautious and only do this for a few seconds. Safety first—always wear gloves and eye protection. ###Charging With Alternative Charger
Sometimes, all your battery needs is a different perspective—literally. You might find success using a charger from another brand, as long as it’s compatible in terms of voltage and amperage. Many users report that universal smart chargers can detect and charge batteries that standard chargers overlook. Before you try this, double-check compatibility to avoid damaging your battery or charger. If you have a friend with a different charger, consider borrowing it to see if it can bring your battery back to life. Remember, these methods are not guaranteed. But they offer a chance to revive your battery without the cost of a replacement. Have you tried any other unconventional methods to fix your battery? Share your experiences in the comments!
Credit: www.reddit.com
Repairing Battery Cells
Repairing battery cells can extend the life of your Ryobi battery. It’s crucial to know how to identify and replace faulty cells. This process can save you money and ensure your tools remain powered. Follow these simple steps to repair battery cells effectively.
Identifying Faulty Cells
First, test the battery voltage using a multimeter. A healthy cell should read around 3.7 volts. If any cell shows a lower voltage, it’s likely faulty. Mark these cells for replacement. Safety is paramount, so wear gloves and goggles.
Replacing Damaged Cells
Start by carefully removing the battery casing. This exposes the internal cells. Use a soldering iron to detach the faulty cell from the pack. Replace it with a new, identical cell. Solder the connections securely. Ensure all cells are aligned correctly. Close the battery casing and test the voltage again. Ensure all cells are functioning properly.
Preventive Maintenance
Preventive maintenance extends the life of your Ryobi battery. It ensures reliable performance. Regular care can prevent many common issues. This section explores storage and usage tips. These practices help maintain your battery’s health.
Proper Storage Techniques
Always store your Ryobi battery in a cool, dry place. Extreme temperatures can damage it. Avoid leaving the battery in direct sunlight. This can cause overheating. Ensure the storage area is well-ventilated. This prevents moisture buildup.
Remove the battery from tools before storing. It reduces unnecessary power drain. Keep the battery terminals clean. Dirt can affect performance. Use a dry cloth to wipe them regularly.
Regular Usage Tips
Use your Ryobi battery regularly. Frequent use keeps it active. Avoid letting the battery fully discharge. This can shorten its lifespan. Charge it when the power drops to 20%. This maintains optimal health.
Don’t overcharge the battery. Disconnect it once fully charged. Overcharging can cause overheating. Follow the manufacturer’s charging instructions. It ensures the correct power supply.

Credit: www.oldecastlebar.com
When To Seek Professional Help
Struggling to fix a Ryobi battery might signal the need for expert assistance. Persistent issues often require professional tools and expertise. Seeking help ensures safety and restores battery efficiency.
When attempting to repair a Ryobi battery, understanding when to seek professional help can save you time, money, and potential safety hazards. You might feel tempted to tackle every issue independently, especially with the wealth of DIY information available online. However, knowing your limits is crucial. Recognizing when a problem is beyond your expertise not only protects your investment but also ensures your safety.Recognizing Irreparable Damage
Some battery issues are a simple fix, but others are beyond repair. Look out for signs like excessive heat, swelling, or leaking. These indicate severe internal damage and are often irreparable at home. A friend once tried to fix a leaking battery himself, only to end up with a bigger mess and wasted time. If you notice these issues, it’s best to consult a professional rather than risk further damage or even injury. Have you ever wondered why certain problems persist despite your best efforts? It could be due to internal components that require specialized tools and expertise.Finding A Qualified Technician
Once you decide professional help is necessary, finding a qualified technician is the next step. Begin by checking reviews and recommendations online. This offers insight into their reliability and expertise. Ask questions about their experience with Ryobi products specifically. Not all technicians are familiar with the nuances of different brands. Consider reaching out to the manufacturer for recommendations. They may have a list of certified technicians or authorized service centers. This ensures you’re getting service from someone who truly understands the intricacies of your Ryobi battery. Remember, seeking professional help doesn’t mean you’ve failed. It’s a smart choice that often leads to a better outcome.Frequently Asked Questions
How To Identify A Faulty Ryobi Battery?
To identify a faulty Ryobi battery, check for visible damage or corrosion. Test the battery’s voltage using a multimeter. If the voltage is below the specified range, it may be faulty. Additionally, if the battery doesn’t hold a charge or charges too quickly, it could be defective.
Why Won’t My Ryobi Battery Charge?
A Ryobi battery may not charge due to dirty or corroded contacts. Ensure they are clean. Check the charger for functionality. If the charger works with other batteries, the issue may be with the battery itself. Consider testing with a different charger or battery to diagnose the problem.
Can I Fix A Ryobi Battery Myself?
Yes, some Ryobi battery issues can be fixed at home. Clean the battery contacts and ensure they are free of corrosion. If the battery won’t charge, try resetting it by inserting it into the charger multiple times. For complex issues, consider consulting a professional for repair.
What Are Common Ryobi Battery Problems?
Common Ryobi battery problems include failure to charge, short runtime, and overheating. Corroded contacts or a faulty charger can cause charging issues. Overuse or improper storage might lead to reduced battery life. Always follow proper care guidelines to minimize these issues.
Conclusion
Repairing a Ryobi battery can be straightforward. Follow the steps to save money and time. Ensure safety by wearing gloves and goggles. Clean battery contacts regularly to avoid issues. Test the battery after repairs to confirm success. Seek professional help if problems persist.
Using a multimeter can assist in diagnosing issues. Regular maintenance can extend battery life. Stay informed about battery care. Simple actions can prevent future repairs. Enjoy reliable power for your Ryobi tools. Keep learning and experimenting for effective results. Your tools deserve the best care.