To install a riving knife on a Dewalt table saw, first, ensure the saw is turned off and unplugged. Then, remove the blade guard and insert the riving knife into the slot with the designated bolt or lever, and align it with the blade.
When it comes to woodworking safety, one essential feature of a table saw is a riving knife, which helps prevent kickback and ensures smooth cuts.
The Dewalt table saw is a popular choice among woodworkers, and adding a riving knife to it can enhance the safety and performance of the saw.
In this guide, we will walk you through the process of installing a riving knife on a Dewalt table saw, ensuring that you can work safely and efficiently with your equipment.
Contents
Safety Measures
Safety is paramount when it comes to operating a Dewalt table saw, especially during the installation of the riving knife.
Understanding The Risks
- Improper installation can lead to kickbacks.
- Incorrectly installed riving knives may cause injuries.
Required Safety Gear
- Protective eyewear
- Gloves
- Hearing protection
Always wear safety glasses and gloves when handling the riving knife during installation. Hearing protection is also essential. Ensure tight fittings of the riving knife to reduce risks.

Preparation Steps
When preparing to install a riving knife on your Dewalt table saw, it’s crucial to undergo proper preparation steps to ensure a safe and efficient process.
By following these careful steps, you can ensure that the installation is successful and maximizes the safety features of your table saw.
Gathering Tools And Materials
Before you begin, it’s essential to gather the necessary tools and materials to complete the riving knife installation. This includes:
- Adjustable wrench
- Phillips-head screwdriver
- Replacement riving knife
- Safety glasses
- Gloves
Table Saw Inspection
Prior to installation, conduct a thorough inspection of your Dewalt table saw to ensure that it is in optimal condition.
This includes:
- Checking for any signs of damage or wear on the existing riving knife
- Ensuring that the blade guard and anti-kickback pawls are functioning properly
- Verifying that the table saw is unplugged to avoid any accidental activation during the installation process
Installation Process
Installing a riving knife on your Dewalt table saw is a crucial step in ensuring your safety and achieving accurate cuts.
The riving knife serves as a key safety feature, preventing kickback and blade binding during operation. Follow these simple steps to properly install a riving knife on your Dewalt table saw.
Removing The Existing Blade Guard
The first step of the installation process is to remove the existing blade guard from your Dewalt table saw.
The blade guard is typically attached to the saw’s arbor assembly and can be easily removed using the following steps:
- Switch off the table saw and unplug it from the power source for safety.
- Locate the blade guard assembly, which is usually positioned above the saw blade.
- Using a screwdriver or wrench, remove the screws or bolts securing the blade guard to the arbor assembly.
- Carefully lift the blade guard assembly away from the saw blade, ensuring not to damage any other components.
With the blade guard successfully removed, you can proceed with attaching the riving knife.
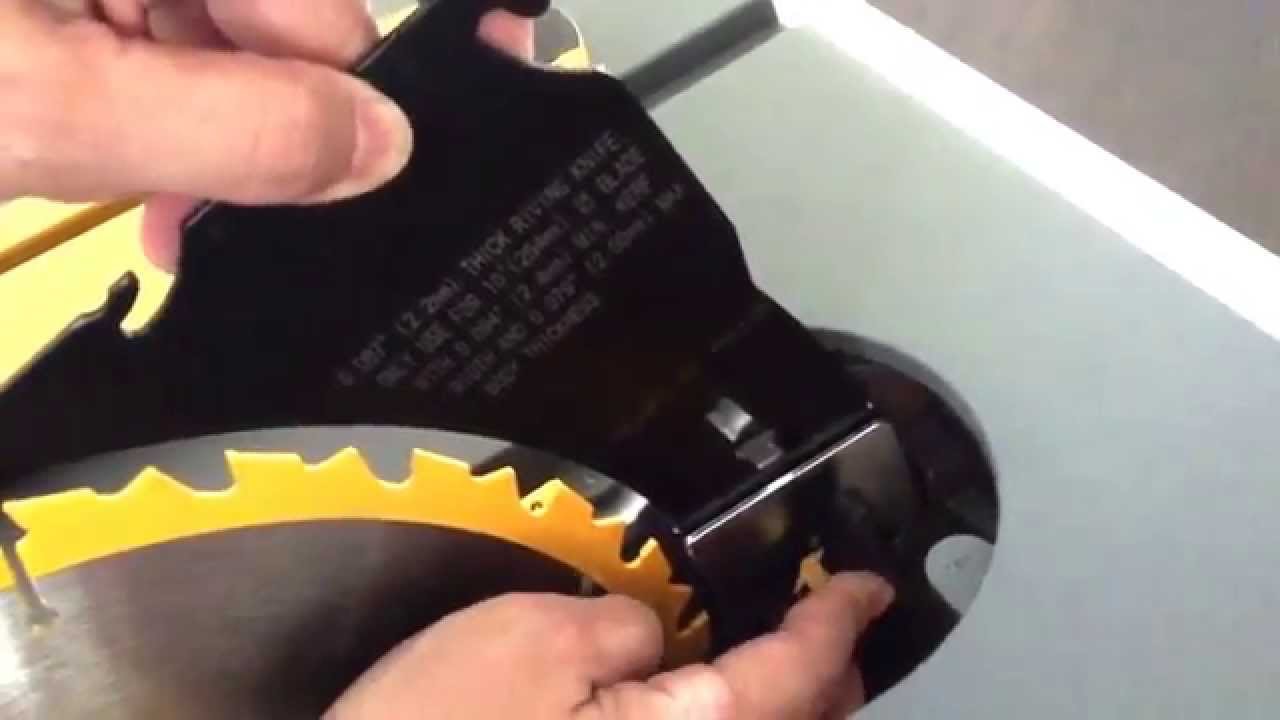
Attaching The Riving Knife
Attaching the riving knife to your Dewalt table saw requires precision and attention to detail.
Follow these steps to ensure a proper installation:
- First, locate the slot on the table saw’s arbor assembly designed for the riving knife.
- Align the riving knife with the slot, ensuring it is properly oriented to match the direction of the blade rotation. This is crucial for the riving knife to function effectively.
- Insert the riving knife into the slot, gently pushing it in until it seats securely.
- Tighten any screws or bolts provided with the riving knife to secure it in place. Ensure the knife is stable and does not move once attached.
Once the riving knife is securely attached, your Dewalt table saw is now equipped with an essential safety feature that facilitates smoother and safer cutting operations.
Note: Always refer to the manufacturer’s instructions and guidelines specific to your Dewalt table saw model for the proper installation process.

Aligning And Testing
When it comes to aligning and testing the riving knife on your Dewalt table saw, it’s essential to ensure that it is properly set up to maximize safety and cutting accuracy.
In this guide, we’ll walk you through the steps to adjust the riving knife position and perform test cuts and adjustments to guarantee optimal performance.
Adjusting The Riving Knife Position
Proper alignment of the riving knife is crucial to prevent kickback and ensure smooth cuts.
Follow these steps to adjust the riving knife position:
- Turn off the table saw and unplug it to prevent any accidental start-ups.
- Loosen the riving knife locking mechanism using the appropriate tool provided with the saw.
- Slide the riving knife to align it with the blade, ensuring that it maintains a consistent distance from the blade teeth.
- Tighten the locking mechanism to secure the riving knife in the adjusted position.
- Visually inspect the alignment and make any necessary adjustments to ensure a flush and parallel alignment with the saw blade.
Test Cuts And Adjustments
After aligning the riving knife, it’s crucial to perform test cuts and make any necessary adjustments to ensure its effectiveness.
Follow these steps:
- Select a scrap piece of wood and make a test cut to observe the performance of the riving knife.
- Check for any signs of binding, burning, or uneven cuts, which may indicate improper riving knife alignment.
- If adjustments are necessary, repeat the alignment process and testing until the riving knife consistently produces clean and smooth cuts.
Troubleshooting
If you encounter issues during the installation of a riving knife on your Dewalt table saw, this troubleshooting guide will help you resolve common problems and ensure proper alignment.
Common Installation Issues
- Loose Fitting: Ensure the riving knife is securely attached to the saw’s arbor assembly.
- Misalignment: Check for any obstructions or debris that may be preventing the riving knife from aligning correctly.
- Compatibility: Verify that the riving knife is designed for your specific model of Dewalt table saw.
Resolving Alignment Problems
- Clear Obstructions: Remove any debris or sawdust that may be blocking the riving knife’s path.
- Adjustment: Use the saw’s adjustment mechanisms to fine-tune the alignment of the riving knife.
- Professional Help: If alignment issues persist, consult a professional to ensure correct installation.
Maintenance Tips
Learn how to properly install a riving knife on your Dewalt table saw with these essential maintenance tips. Ensure safety and precision in your woodworking projects.
Frequently Asked Questions
How To Lower Riving Knife On Dewalt Table Saw?
To lower the riving knife on a Dewalt table saw, follow these steps:
1. Turn off the saw and unplug it for safety.
2. Locate the riving knife adjustment mechanism on the back of the saw.
3. Use the appropriate tool to loosen the adjustment screws.
4. Lower the riving knife to the desired position.
5. Tighten the adjustment screws to secure the knife in place.
How Do You Remove The Riving Knife From A Dewalt Dwe7485?
To remove the riving knife from a Dewalt dwe7485, loosen the two screws on the throat plate, then pull out the riving knife.
Do I Really Need A Riving Knife?
Yes, a riving knife is crucial for table saw safety by preventing kickback and ensuring smooth, accurate cuts.
Where Is The Riving Knife Mounted?
The riving knife is mounted behind the saw blade to prevent kickback and ensure cutting accuracy.
Conclusion
Installing a riving knife on your Dewalt table saw is a crucial safety measure. It helps prevent kickback and ensures smooth and accurate cuts.
By following the step-by-step instructions provided in this guide, you can enhance the efficiency and safety of your woodworking projects. Don’t delay – prioritize safety and precision in your workshop today.