To change the blade on a Ryobi 10 Miter Saw, loosen the blade bolt, remove the outer washer, and then replace the blade with a new one. Changing the blade on a Ryobi 10 Miter Saw is a simple process that can be done in a few easy steps.
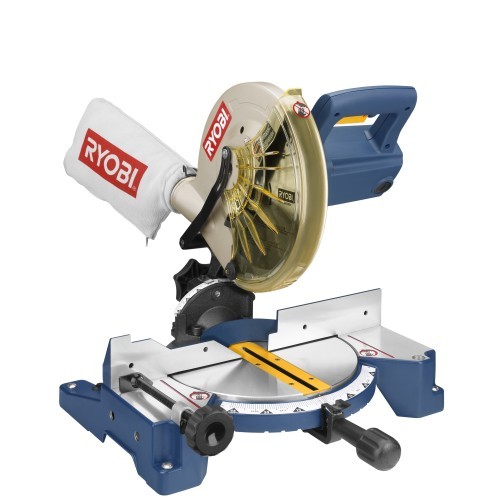
The Ryobi 10 Miter Saw is a versatile tool that can be used for a variety of DIY and professional projects. However, over time, the blade may become dull and need to be replaced.
Changing the blade on a Ryobi 10 Miter Saw is a quick and easy process that can be done with just a few basic tools. We will guide you through the step-by-step process of changing the blade on your Ryobi 10 Miter Saw.
Contents
- Introduction To Ryobi 10 Miter Saw
- Tools And Materials Needed
- Powering Down And Safety Measures
- Accessing The Blade
- Removing The Old Blade
- Installing The New Blade
- Reassembling The Saw Components
- Safety Check And Testing
- Maintenance Tips For Longevity
- Troubleshooting Common Issues
- Enhancing Your Woodworking
- Frequently Asked Questions
- Conclusion
Introduction To Ryobi 10 Miter Saw
Importance Of Sharp Blades
Having sharp blades on your Ryobi 10 miter saw is crucial for achieving clean and precise cuts. Dull blades can result in rough edges and splintered wood, compromising the quality of your woodworking projects. Regular blade maintenance ensures that your saw performs at its best and delivers professional-level results.
Safety First: Preparing For Blade Replacement
Prior to replacing the blade on your Ryobi 10 miter saw, it’s imperative to ensure safety measures are in place.
This includes disconnecting the saw from the power source, wearing protective gloves, and using the appropriate tools for the task. Following safety protocols minimizes the risk of accidents and ensures a smooth blade replacement process.
Tools And Materials Needed
Before changing the blade on your Ryobi 10 miter saw, gather the necessary tools and materials to ensure a smooth and safe process. Here is a list of items you will need:
List Of Necessary Items
- Safety goggles: Protect your eyes during the blade change.
- Gloves: Ensure a secure grip and protect your hands.
- Hex wrench: Required to loosen the blade bolt.
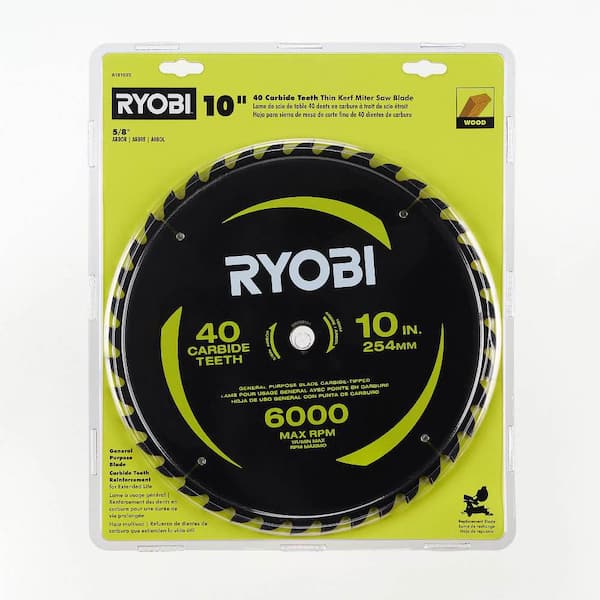
- New blade: Ensure it is compatible with your Ryobi 10 miter saw.
- Owner’s manual: Refer to it for specific instructions.
Optional Accessories For Enhanced Safety
- Push stick: Helps to keep your hands at a safe distance from the blade.
- Workbench: Provides a stable surface for the saw and materials.
- Dust mask: Protects your lungs from sawdust particles.
- Ear protection: Guards against loud noise generated by the saw.
Powering Down And Safety Measures
When changing the blade on your Ryobi 10 Miter Saw, it’s crucial to prioritize safety. Taking the necessary precautions can prevent accidents and ensure a smooth blade replacement process.
In this section, we’ll cover the essential steps for powering down the saw and implementing safety measures before proceeding with the blade replacement.
Unplugging The Saw
Before anything else, unplug the saw from the power source. This simple yet critical step eliminates the risk of accidental activation while you are working on the blade. Double-check the power cord to ensure it’s completely disconnected from the outlet.
Securing The Saw Before Blade Removal
Next, it’s important to secure the saw to prevent any movement during the blade replacement. Use clamps or a stable work surface to keep the saw steady and immobilized.
This precautionary measure helps to minimize the risk of injury and ensures a safe environment for the blade replacement process.
Accessing The Blade
When it comes to making precise cuts, a sharp blade is essential for your Ryobi 10 miter saw. Accessing the blade for replacement or maintenance is a straightforward process that can be done in a few simple steps. Here’s how to access the blade on your Ryobi 10 miter saw.
Removing Blade Guard
To access the blade on your Ryobi 10 miter saw, the first step is to remove the blade guard. This safety feature protects you from the spinning blade during operation.
The blade guard is typically held in place with a screw or latch. Use a screwdriver or the provided tool to loosen the screw and carefully remove the blade guard, exposing the blade and its components.
Locking The Blade And Spindle
Before proceeding further, it’s important to lock the blade and spindle to prevent any movement during the blade changing process. Locate the spindle lock button, usually positioned near the blade.
Depress the spindle lock to immobilize the blade and spindle. This step ensures that the blade remains stationary, allowing for safe and efficient blade replacement.
Removing The Old Blade
Before you can install a new blade on your Ryobi 10 miter saw, you need to safely remove the old blade. This process requires careful handling and attention to detail to ensure a smooth transition. In this section, we will guide you through the steps for removing the old blade.
Loosening The Arbor Nut
Begin by disconnecting the power source to ensure safety. Once the saw is powered off, use a wrench to loosen the arbor nut that secures the blade in place. Turn the wrench counterclockwise to loosen the nut. Remember to hold the blade in place to prevent it from spinning as you loosen the nut.
Careful Handling Of The Used Blade
After removing the arbor nut, carefully remove the washer and the old blade. Make sure to handle the blade with caution to avoid any accidental cuts or injuries. It’s essential to dispose of the used blade properly. Keep it in a safe place away from children and pets until it can be disposed of safely.
Installing The New Blade
To install the new blade on your Ryobi 10 Miter Saw, follow the steps outlined below to ensure proper alignment and secure tightening of the arbor nut.
Aligning The Blade Properly
Before installing the new blade, ensure that the saw is unplugged. Loosen the arbor nut using the wrench provided, and remove the outer blade washer and the old blade.
Position the new blade onto the saw’s arbor, making sure that the teeth are facing in the right direction. Once the blade is in place, reattach the outer blade washer and tighten the arbor nut securely.
Tightening The Arbor Nut
Use the wrench to tighten the arbor nut, ensuring that it is securely fastened. This is crucial for the safe and efficient operation of the miter saw. Double-check the blade alignment and the tightness of the arbor nut before plugging the saw back in and resuming operations.
Reassembling The Saw Components
When reassembling the saw components after changing the blade on your Ryobi 10 Miter Saw, it is crucial to follow the correct steps to ensure the saw operates safely and efficiently.
Reattaching Blade Guard
1. Position the blade guard over the blade.
2. Align the screw holes on the guard with the corresponding holes on the saw.
3. Secure the blade guard in place by tightening the screws with a screwdriver.
Ensuring All Parts Are Secure
1. Double-check that all components, including the blade, blade guard, and bolts, are securely tightened.
2. Verify that the blade is properly aligned and seated on the arbor.
3. Test the saw by making a few cuts on scrap wood to ensure everything is functioning correctly.
Safety Check And Testing
When it comes to using power tools, safety is of utmost importance. Before starting any project or making adjustments to your Ryobi 10 Miter Saw, it’s crucial to conduct a thorough safety check and perform testing to ensure everything is in proper working order.
This not only protects you from potential accidents but also ensures that your saw will function optimally. Let’s dive into the essential steps for safety inspection and testing of your Ryobi 10 Miter Saw.
Performing A Safety Inspection
Before changing the blade on your Ryobi 10 Miter Saw, it’s imperative to conduct a comprehensive safety inspection. This involves checking various components of the saw to ensure they are in good condition and functioning properly.
- Inspect the power cord for any signs of damage, such as cuts or exposed wires.
- Check the blade guard for proper operation and ensure it moves freely without any obstructions.
- Examine the blade for any chips, cracks, or dullness, as a damaged blade can pose a safety hazard during operation.
- Verify that the blade is securely attached to the arbor and there are no loose or missing components.
Making Test Cuts
Once the safety inspection is complete and you’ve changed the blade on your Ryobi 10 Miter Saw, it’s essential to perform test cuts to ensure the saw is cutting accurately and safely.
- Adjust the miter and bevel angles to your desired settings, ensuring the saw is properly calibrated for the intended cuts.
- Secure a scrap piece of wood firmly against the fence and make a test cut to evaluate the accuracy and smoothness of the cut.
- Inspect the cut piece for any splinters, uneven edges, or burning, which may indicate issues with the new blade or saw alignment.
- Repeat the test cuts with different angles and materials to thoroughly assess the performance of the saw and the newly installed blade.
Maintenance Tips For Longevity
To change the blade on your Ryobi 10 Miter Saw, first unplug the saw and remove the old blade by loosening the arbor nut. Install the new blade, making sure it is properly aligned and tightened securely. Regularly changing the blade and keeping it clean will help prolong the life of your saw.
Regular Cleaning
To ensure your Ryobi 10 Miter Saw operates smoothly, regular cleaning is crucial. Use a soft brush to remove dust and debris from the blade, motor, and other components.
Blade Sharpening Vs. Replacement
When the blade starts to dull, consider blade sharpening as a cost-effective option. However, if the blade is damaged or worn beyond repair, opt for a replacement to maintain cutting precision.
Troubleshooting Common Issues
To change the blade on a Ryobi 10 Miter Saw, first unplug the saw for safety. Loosen the blade bolt, remove the old blade, and install the new blade following the manufacturer’s instructions. Ensure the blade is securely tightened before use.
Wobbly Blade Fixes
If your Ryobi 10 Miter Saw blade is wobbling, follow these steps to troubleshoot the issue:
- Tighten the blade bolt securely with a wrench.
- Check the blade for any damages or warping.
- Ensure the blade is properly aligned on the arbor.
Solutions For Inaccurate Cuts
If you are experiencing inaccurate cuts with your Ryobi 10 Miter Saw, try the following solutions:
- Calibrate the miter angle for precision cutting.
- Adjust the bevel angle to the correct setting.
- Check the fence alignment for straight cuts.
Enhancing Your Woodworking
Enhance your woodworking skills by learning how to efficiently change the blade on your Ryobi 10 Miter Saw. This simple maintenance task ensures precision and safety in your cutting projects, allowing you to achieve professional results effortlessly.
If you’re a woodworking enthusiast, you know the importance of having the right tools. One of the most important tools in your arsenal is a miter saw. And when it comes to miter saws, the Ryobi 10 Miter Saw is one of the best on the market.
However, like any other tool, it requires proper maintenance to ensure it lasts for years to come. In this blog post, we’ve covered how to change the blade on your Ryobi 10 Miter Saw. Now, let’s recap the steps, and discuss how proper maintenance habits can enhance your woodworking experience.
Recap Of Steps
To change the blade on your Ryobi 10 Miter Saw, follow these simple steps:
- Unplug the saw
- Loosen the blade bolt
- Remove the blade guard
- Remove the blade
- Install the new blade
- Reattach the blade guard
- Tighten the blade bolt
Encouraging Proper Maintenance Habits
Now that you know how to change the blade on your Ryobi 10 Miter Saw, it’s important to develop proper maintenance habits to keep it in good working condition. Here are a few tips:
- Regularly clean the saw and blade
- Check the blade for damage or wear and tear
- Keep the blade sharp
- Store the saw in a dry place
- Follow the manufacturer’s instructions for use and maintenance
By following these simple maintenance tips, you can ensure that your Ryobi 10 Miter Saw lasts for years to come, and that you get the most out of your woodworking projects.
Frequently Asked Questions
How To Change The Blade On Ryobi Miter Saw?
To change the blade on a Ryobi miter saw, unplug the saw, raise the blade guard, and remove the bolt with a wrench. Swap the blade, reattach the bolt, and lower the blade guard. Always follow the manufacturer’s instructions for safety.
How To Change A 10 Inch Miter Saw Blade?
To change a 10-inch miter saw blade, unplug the saw, loosen the bolt, remove the old blade, replace it with a new one, tighten the bolt, and plug in the saw.
How To Change Blade On Ryobi Saw?
To change the blade on a Ryobi saw, follow these steps: 1. Unplug the saw for safety. 2. Loosen the blade nut with a wrench. 3. Remove the old blade. 4. Install the new blade, making sure it’s facing the right way.
5. Tighten the blade nut securely.
How To Unlock Ryobi Miter Saw Blade?
To unlock a Ryobi Miter Saw blade, locate the blade lock button and hold it down. Use the wrench to loosen the arbor nut, then remove the blade. Remember to wear gloves for safety.
Conclusion
Changing the blade on your Ryobi 10 miter saw can be a simple task with the right steps. By following our guide, you can safely and efficiently replace the blade on your saw. Remember to always prioritize safety and refer to your saw’s manual for specific instructions.