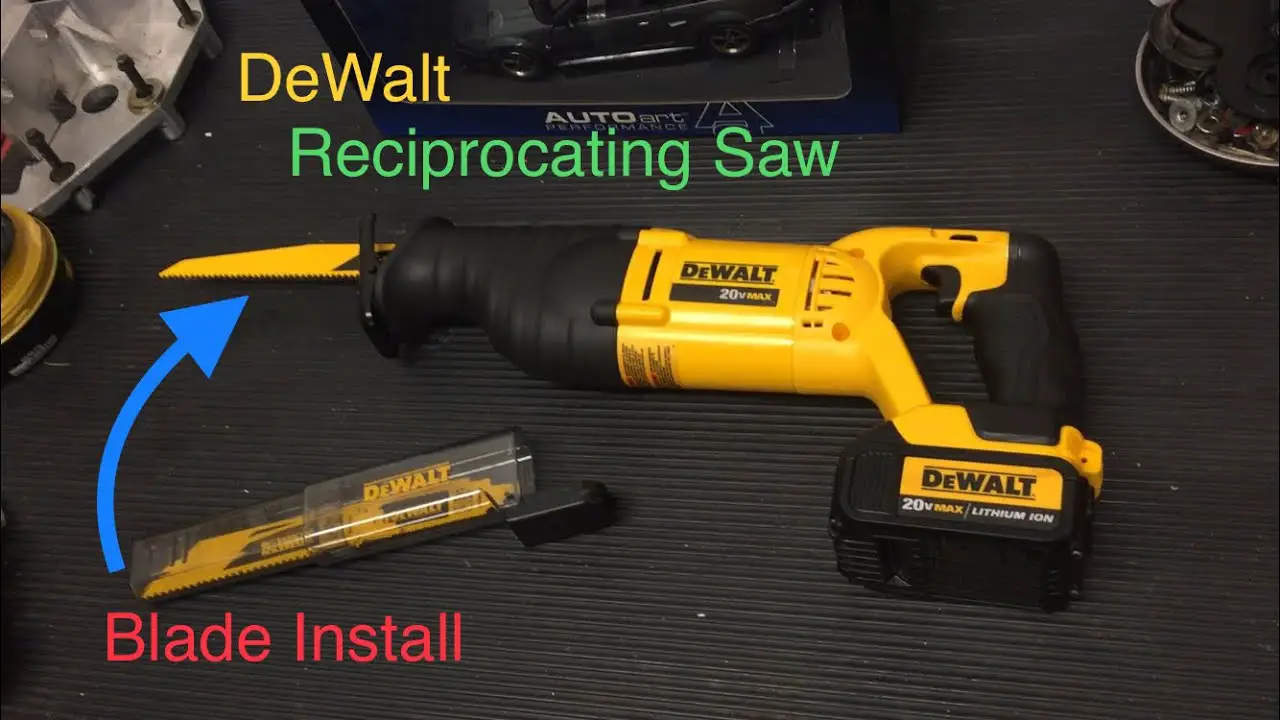
To change a blade on a Dewalt reciprocating saw, follow these steps: Release the blade clamp, remove the old blade, and then insert and secure the new blade. Changing the blade on your Dewalt reciprocating saw is a simple task that can be completed in just a few minutes, allowing you to quickly get back to your cutting work.
Whether you’re a DIY enthusiast or a professional tradesperson, knowing how to change the blade on your saw is an essential skill.
In this guide, we’ll provide you with easy-to-follow steps to ensure you can efficiently and safely replace the blade on your Dewalt reciprocating saw.
By the end of this tutorial, you’ll be equipped with the knowledge and confidence to tackle this maintenance task with ease.
Contents
Safety Precautions
Before changing the blade on your Dewalt Reciprocating Saw, it is important to follow these safety precautions to prevent any accidents or injuries.
Wear Protective Gear
Ensure to wear appropriate protective gear such as safety glasses and gloves to protect yourself from any flying debris during the blade changing process.
Disconnect Power Source
Always remember to disconnect the power source by removing the battery or unplugging the saw before attempting to change the blade to avoid any electrical mishaps.

Gathering Essential Tools
When it comes to changing the blade on a Dewalt reciprocating saw, gathering the essential tools is the first step towards a successful blade replacement.
Having the right tools on hand will make the process efficient and convenient, allowing you to complete the task with ease.
Required Tools For Blade Change
Before you begin, ensure you have the following tools ready to facilitate the blade change process:
- Dewalt reciprocating saw
- Replacement blade compatible with your saw model
- Allen wrench or screwdriver (depending on the saw model)
- Safety gloves
- Safety goggles
Step 1: Preparation
Before changing the blade on your Dewalt reciprocating saw, it is important to make sure you are properly prepared. This will not only ensure your safety but will also make the process smoother and more efficient. Follow these essential steps to get started:
Switching Off The Saw
Before doing anything else, locate the on/off switch and make sure that the saw is completely turned off. This will prevent any accidental start-ups and reduce the risk of injury during the blade changing process.
Inspecting The Area
2. Inspect the area: Prior to changing the blade, visually inspect the surrounding area to identify any potential hazards. Look for objects that may obstruct your movement or cause accidents. Ensure that there are no loose materials or debris that could interfere with the blade changing process.
3. Clear the workspace: Clear away any unnecessary tools, materials, or clutter from your workspace. This will provide you with ample room to safely perform the blade change and prevent any accidents or damage to your equipment.
4. Prepare a stable surface: Find a stable surface such as a workbench or table to place your Dewalt reciprocating saw. Having a solid and secure surface will ensure that the saw remains stable and steady during the blade changing process.
5. Wear protective gear: Safeguard yourself by wearing appropriate personal protective equipment (PPE) such as safety glasses and work gloves. This will protect your eyes from any potential debris and your hands from sharp edges or accidents during the blade changing process.
6. Unplug the saw: If your Dewalt reciprocating saw is corded, unplug it from the power source to eliminate any electrical hazards. If your saw is cordless, ensure that the battery is removed to prevent any accidental startups.
7. Read the owner’s manual: Familiarize yourself with the Dewalt reciprocating saw’s owner’s manual, paying special attention to the section on blade changing. This will provide you with specific instructions and safety guidelines unique to your model of saw.
8. Gather the necessary tools: Collect the required tools for the blade changing process. Typically, you will need a hex wrench or blade clamp to release the old blade and secure the new one. Having these tools handy will save you time and frustration when it comes to changing the blade.
By following these steps, you will ensure that you are well-prepared and ready to change the blade on your Dewalt reciprocating saw. Taking the time to adequately prepare will not only make the process go more smoothly but will also reduce the risk of accidents and injury.
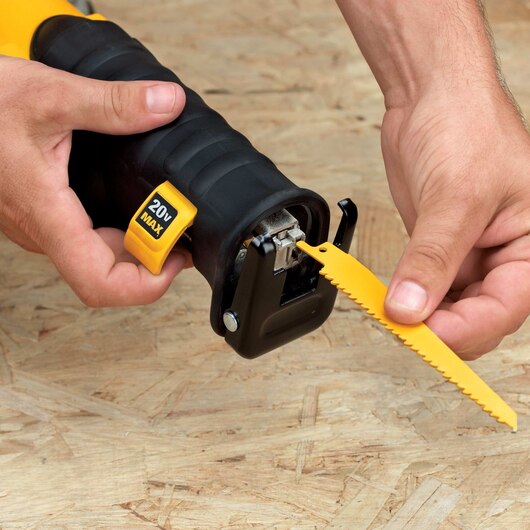
Step 2: Removing The Old Blade
Releasing The Blade Clamp
In order to change the blade on your Dewalt Reciprocating Saw, the first step is to release the blade clamp.
Extracting The Blade
Next, carefully extract the old blade from the saw by following these steps:
- Press the blade release button if your saw has one.
- Loosen the blade clamp screw counterclockwise to disengage the old blade.
- Remove the old blade from the clamp, ensuring not to touch the hot blade surfaces.
With these simple steps, you can easily remove the old blade from your Dewalt Reciprocating Saw.
Step 3: Installing The New Blade
When it’s time to swap out the blade on your Dewalt reciprocating saw, the process is simpler than you might expect. Step 3 involves installing the new blade correctly, and it’s crucial to ensure the saw operates safely and effectively. Here’s a guide to completing this step flawlessly.
Choosing The Correct Blade
Before diving into the installation process, it’s important to select the right blade for the task at hand. Blades come in various lengths, materials, and tooth designs, each suited to different cutting applications.
For example, a bi-metal blade is versatile and durable, suitable for cutting through wood, metal, or plastic. Selecting the appropriate blade ensures efficient and precise cutting results.
Securing The New Blade
- First, switch off the saw and wait for the blade to come to a complete stop.
- Press the blade release to eject the old blade, taking care to handle it by the blunt end to avoid injury.
- Insert the new blade into the blade clamp, making sure the teeth face forward.
- Ensure the blade is fully engaged in the clamp, and release the blade clamp to secure the new blade in place.
- Test the blade by gently pulling on it to ensure it’s properly secured before operating the saw.
With the new blade securely in place, your Dewalt reciprocating saw is ready to tackle the next cutting task with precision and efficiency.
Step 4: Testing The Replacement Blade
When replacing the blade on a Dewalt reciprocating saw, it is important to test the new blade before use. This ensures proper installation and functionality for a safer and more efficient cutting experience.
After correctly installing the new blade on your Dewalt reciprocating saw, it’s essential to run a test cut to ensure everything is functioning as it should.
Running A Test Cut
Begin by selecting a piece of scrap material that is similar to what you’ll be cutting in your project. Position the saw over the material and make a short, controlled cut to test the blade’s performance.
- Check the smoothness of the cut to ensure the blade is sharp and properly aligned.
- Observe the speed and accuracy of the cut to determine if the blade is cutting efficiently.
- Listen for any unusual noises that could indicate a problem with the blade or its installation.
Ensuring Proper Installation
After running the test cut, it’s crucial to confirm that the replacement blade is securely and correctly installed in the saw.
- Ensure the blade lock mechanism is engaged to prevent the blade from coming loose during operation.
- Check for any visible signs of misalignment or damage to the blade or the saw itself.
By following these steps and testing the replacement blade on your Dewalt reciprocating saw, you can be confident in its performance and safety for your cutting tasks.
Frequently Asked Questions
How To Insert Blade Into Reciprocating Saw?
To insert the blade into a reciprocating saw, follow these steps:
1. Loosen the blade clamp by turning it counterclockwise.
2. Insert the blade into the saw’s blade clamp, making sure it locks securely.
3. Tighten the blade clamp by turning it clockwise.
4. Test the blade by gently pulling on it to ensure it is properly inserted.
5. You’re now ready to use the reciprocating saw with the inserted blade.
How Do You Change The Blade On A Dewalt 20v?
To change the blade on a Dewalt 20v, first, disconnect the battery. Then, press the blade release button and remove the old blade.
Next, insert the new blade and release the blade release button. Reconnect the battery before using the saw.
How Do You Open A Dewalt Blade Case?
To open a Dewalt blade case, press the release button and slide the lock to open the case.
How To Change Blade Dewalt Table Saw?
To change blade on DeWalt table saw, unplug, remove throat plate, loosen arbor nut, swap blade, reassemble.
Conclusion
Changing the blade on your Dewalt reciprocating saw is a simple task with the right techniques.
By following these step-by-step instructions, anyone can quickly and safely replace the blade, ensuring the saw’s efficiency and longevity.
With these tips, you can confidently tackle any project with your Dewalt reciprocating saw.