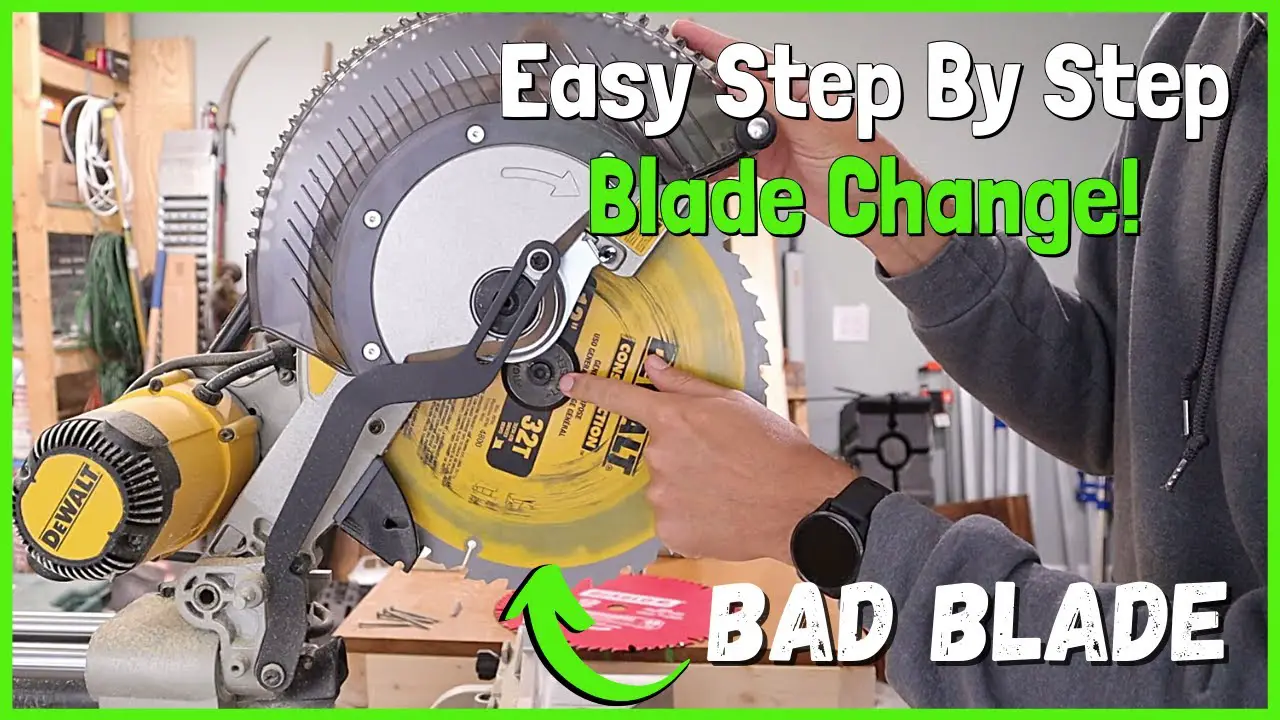
Changing the blade on a Dewalt Miter Saw is simple. First, disconnect the power, then remove the blade guard and unscrew the blade.
Before proceeding, ensure you have the correct replacement blade and follow the manufacturer’s instructions for installation. If you’re a DIY enthusiast or a professional woodworker, learning how to change the blade on your Dewalt Miter Saw is essential.
Whether you need to replace a dull blade or switch to a different type for specific cutting tasks, knowing the process will save time and keep your projects running smoothly.
In this guide, we’ll walk you through the step-by-step process of safely changing the blade on your Dewalt Miter Saw, ensuring you have the knowledge and confidence to do it yourself. Let’s get started!

Contents
Choosing The Right Blade
Learn the step-by-step process to change the blade on your Dewalt Miter Saw with ease. Discover the right techniques and precautions to ensure a smooth transition and optimal performance.
Choosing the right blade for your Dewalt miter saw is crucial for achieving precise and clean cuts. Understanding Blade Types is essential before making a decision.
Understanding Blade Types
Different blades are designed for specific cutting tasks such as wood, metal, or plastic.
Factors To Consider
- Type of Material being Cut
- Tooth Configuration
- Blade Size When changing the blade, make sure to follow the manufacturer’s guidelines for safety.
Type of Material being Cut: Choose a blade optimized for the material you are cutting to ensure efficiency.
Tooth Configuration: Consider the number of teeth on the blade for smoothness and speed of cuts.
Blade Size: Ensure the new blade fits your saw’s specifications for compatibility. Ensure the blade is securely tightened before using the miter saw again.
Preparing For The Upgrade
When it comes to upgrading the blade on your DeWalt miter saw, proper preparation is crucial for a smooth and safe process.
Before diving into the blade replacement, it’s essential to take care of a few key aspects to ensure a successful upgrade. Let’s go through the necessary steps to prepare for changing the blade on your DeWalt miter saw.
Safety Precautions
Before starting any work on your miter saw, prioritize safety. Follow these essential safety precautions to prevent accidents and ensure a secure working environment:
- Disconnect the saw from the power source to avoid accidental starts.
- Wear protective gear such as safety glasses and gloves to shield yourself from any debris.
- Ensure the blade guard is in place and functioning correctly to avoid direct contact with the blade.
- Keep the work area well-lit and clear of any obstacles to maintain a safe working space.
Gathering Necessary Tools
Before getting started, gather the required tools to streamline the blade replacement process.
You’ll need the following items:
- Replacement blade compatible with your DeWalt miter saw
- Allen wrench or socket wrench to loosen the blade nut
- Protective gloves for added safety
- Workbench or stable surface for the saw
Step-by-step Blade Replacement
Changing the blade on your Dewalt miter saw is a simple process that can be done in just a few steps. By following this step-by-step guide, you’ll be able to replace the blade efficiently and get back to your projects in no time.
Disconnecting Power Source
- Begin by disconnecting the power source of your Dewalt miter saw.
- Unplug the saw from the power outlet to ensure your safety throughout the blade replacement process.
Removing The Existing Blade
- Locate the arbor lock button situated on the back of the saw’s blade guard.
- Press and hold the arbor lock button to lock the blade in place.
- Using a wrench, rotate the blade bolt counterclockwise to loosen it.
- Once the bolt is loose, carefully remove it along with the outer washer.
- Hold the blade with one hand while removing the inner washer and the old blade with the other hand.
Installing The New Blade
- With the old blade removed, take your new blade and align the mounting hole with the arbor.
- Place the inner washer onto the arbor, followed by the new blade.
- Secure the new blade by placing the outer washer and the blade bolt back into position.
- Use a wrench to tighten the blade bolt securely and ensure it is properly in place.
Once the new blade is securely installed, you can now reconnect the power source and test your Dewalt miter saw.
It’s important to always follow safety precautions and refer to the manufacturer’s instructions when working with power tools.
By following these simple steps, you’ll be able to change the blade on your Dewalt miter saw without any hassle.

Testing The New Blade
Changing the blade on your Dewalt miter saw is essential for maintaining its efficiency and safety. Once the new blade is installed, it is crucial to properly test it to ensure smooth operation and accuracy.
- Start by checking the alignment of the new blade to avoid any wobbling or misalignment issues.
- Turn on the saw and observe if the blade runs smoothly without any abnormal vibrations.
Safety Checks
- Before proceeding, ensure all safety precautions are in place, such as wearing protective gear.
- Perform a final safety check to confirm all components are secure and functioning correctly.
Testing the new blade on your Dewalt miter saw is a critical step to guaranteeing its performance and your safety. By ensuring proper alignment and conducting thorough safety checks, you can be confident in utilizing your miter saw for various cutting tasks.
Maintaining Your Blade
Cleaning And Storing The Blade
Cleaning and storing your Dewalt miter saw blade is crucial for extending its longevity and ensuring smooth operation. After using the saw, wipe down the blade with a clean cloth to remove any sawdust or debris.
Avoid using harsh chemicals that can damage the blade’s coating. Once clean, ensure the blade is completely dry before storing it to prevent rusting.
Regular Inspection
Regular inspection of your miter saw blade is essential for ensuring its performance and safety. Prior to each use, visually inspect the blade for any signs of wear, chipping, or dullness.
Replace the blade if you notice any damage to prevent compromising the quality of your cuts and avoiding potential safety hazards.
Troubleshooting Common Issues
Learn how to easily change the blade on your Dewalt Miter Saw with these step-by-step instructions. Keep your saw running smoothly and efficiently by troubleshooting common blade issues.
Blade Wobbling
Check blade installation for tightness. Confirm blade is secured properly to avoid wobbling.
Poor Cutting Performance
Inspect blade for dullness or damage. Replace if necessary for optimal cutting performance.
Ensure material is properly supported during cutting. Unstable support can lead to cutting issues.
Frequently Asked Questions
How Do You Unlock The Blade On A Dewalt Miter Saw?
To unlock the blade on a Dewalt miter saw, first, unplug the saw. Then, lower the blade guard and hold it in place.
Use a wrench to turn the arbor nut counterclockwise to loosen and remove it. After that, carefully lift off the blade and replace if necessary.
How To Change Blade On Dewalt Miter Saw Dw715?
To change the blade on Dewalt miter saw DW715, first, unplug the saw for safety. Loosen the blade screw with a wrench. Remove the blade guard and old blade.
Install the new blade, tighten the screw, and replace the guard. Plug in and test the saw.
How Do You Change The Blade On A Dewalt Dw777?
To change the blade on a Dewalt dw777, loosen the bolt using the provided wrench, remove the old blade, and install the new blade securely.
How To Change Blade On Dws773?
To change the blade on the DWS773, follow these steps:
1. Unplug the saw and secure it on a stable surface.
2. Loosen the blade nut with a wrench.
3. Remove the outer blade washer and the old blade.
4. Place the new blade on the arbor, ensuring it is correctly aligned.
5. Replace the outer blade washer and tighten the blade nut securely.
Conclusion
In order to ensure safety and precision, it’s crucial to follow the proper steps when changing the blade on your Dewalt Miter Saw.
By carefully adhering to the manufacturer’s guidelines, you can maintain the functionality of your saw and guarantee accurate cuts for your projects.
Remember to prioritize safety and take your time to complete the process accurately. Mastering this skill will enable you to maximize the potential of your tools and achieve professional-grade results.