To wind a Makita string trimmer, first, turn off the trimmer and disconnect the spark plug. Then, remove the spool and wind the new string onto it, following the arrows for the correct direction.
After that, secure the string in the spool’s notch and reassemble the trimmer. Properly wound string ensures efficient trimming and prevents tangles, allowing for smooth operation of the trimmer. A well-maintained string trimmer is essential for keeping your lawn tidy and well-groomed.
Makita string trimmers are known for their durability and performance, but to achieve optimal results, it’s crucial to ensure that the trimmer’s string is properly wound.
In this guide, we’ll walk you through the simple yet vital process of winding the string on a Makita string trimmer, helping you maintain a well-kept and manicured lawn effortlessly.
Contents
- Introduction To Makita String Trimmers
- Identifying Your Makita Model
- Preparation Steps Before Winding
- Removing The Spool From The Trimmer
- The Anatomy Of A Trimmer Spool
- Winding The String Onto The Spool
- Reassembling The Trimmer Head
- Testing And Troubleshooting
- Maintenance Tips For Longevity
- Advanced Winding Techniques
- Best Practices For Winding
- Frequently Asked Questions
- Conclusion
Introduction To Makita String Trimmers
Makita string trimmers are essential tools for keeping your lawn neat and tidy.
The Importance Of Proper Winding
Proper winding of the trimmer line ensures smooth operation and efficient cutting.
Tools Needed For The Job
To wind a Makita string trimmer, you will need:
- Replacement trimmer line
- Protective gloves
- Scissors or wire cutters
Identifying Your Makita Model
To identify your Makita model for winding the string trimmer, locate the model number on the trimmer’s housing or handle. You can also refer to the owner’s manual or check the manufacturer’s website for guidance.
Identifying the model is crucial for finding the right replacement parts and understanding the specific features of your trimmer.
Different Models And Their Spool Types
Before winding your Makita string trimmer, it’s important to identify the specific model you have. Makita has several models of string trimmers, and each model has a specific spool type. Some popular Makita string trimmer models include the XRU02Z, XRU09Z, and XRU15Z.
To wind the trimmer correctly, you need to know which type of spool your Makita model uses. Some models use a single-line spool, while others use a dual-line spool. Additionally, some spools are pre-wound, while others require you to wind the string yourself. Knowing your Makita model and its spool type is crucial for proper winding and trimming.
Why Model Identification Matters?
Identifying your Makita model is essential for several reasons. Firstly, it ensures that you wind your trimmer correctly. Different spool types require different winding techniques, and improper winding can cause the string to break or feed incorrectly.
Secondly, it helps you find the correct replacement spool when needed. Makita offers replacement spools for all their models, but these spools are not interchangeable. Knowing your model ensures that you purchase the correct replacement spool for your trimmer.
In conclusion, identifying your Makita model is the first step in winding your string trimmer correctly. Understanding the spool type of your trimmer model helps you wind the spool correctly, avoid string breakage, and find the correct replacement spool.
Preparation Steps Before Winding
Before winding the Makita string trimmer, ensure the engine is off and the spark plug wire is disconnected for safety. Then, carefully wind the trimmer line in the direction indicated on the spool, ensuring it’s evenly distributed to avoid tangles during use.
Safety First: Precautions To Take
Wear protective gloves and goggles.
Ensure the trimmer is turned off.
Work in a well-lit and ventilated area.
Gathering Your Materials
Required materials:
- Replacement trimmer line
- Compatible Makita string trimmer
- Scissors or wire cutters
Place all materials on a clean, flat surface.
Before winding the trimmer line, it’s essential to take some preparation steps to ensure a safe and efficient process. Safety should always be the top priority when working with power tools. Begin by wearing protective gloves and goggles to shield your hands and eyes from any potential debris.
Next, make sure that the trimmer is turned off to prevent any accidental starts. Choose a well-lit and ventilated area for your work to enhance visibility and air circulation. When you have your safety measures in place, gather the necessary materials for winding the Makita string trimmer.
You will need a replacement trimmer line that is compatible with your Makita string trimmer, as well as a pair of scissors or wire cutters for cutting the line to the desired length. Organize these items on a clean, flat surface to have everything within reach during the winding process.
Removing The Spool From The Trimmer
When it’s time to replace the string on your Makita string trimmer, the first step is to remove the spool from the trimmer head. Follow the step-by-step process below to do this effectively.
Step-by-step Removal Process
- First, switch off the trimmer and disconnect it from the power source to ensure safety.
- Turn the trimmer upside down to access the spool.
- Press the tabs on the sides of the spool to release it from the trimmer head. The tabs are usually located at the base of the spool.
- Once the tabs are pressed, lift the spool out of the trimmer head carefully. Take note of the orientation of the spool and any springs or other components attached to it.
Troubleshooting Common Issues
If you encounter difficulties during the spool removal process, here are some common issues to troubleshoot:
- Stuck Spool: If the spool is stuck, ensure that the trimmer is switched off and try pressing the tabs again with a firm but gentle force.
- Tangled Line: In case the line is tangled around the spool, carefully untangle it before attempting to remove the spool from the trimmer head.
- Broken Tabs: If the tabs on the spool are damaged or broken, it may be necessary to replace the spool with a new one to ensure proper functionality.
The Anatomy Of A Trimmer Spool
Understanding Spool Components
The spool of a string trimmer is a crucial component that holds the trimmer line. It consists of several parts that work together to ensure the proper functioning of the trimmer. These components include the spool housing, the spool itself, the trimmer line, and the spring that provides tension to the line.
How Spool Design Affects Winding?
The design of the spool directly impacts the process of winding the trimmer line. The size and shape of the spool, as well as the placement of the line notches, determine how the line should be wound onto the spool. Understanding the spool design is essential for achieving optimal performance from the string trimmer.
Winding The String Onto The Spool
When winding the string onto the spool of your Makita string trimmer, it’s crucial to follow proper techniques for optimal performance.
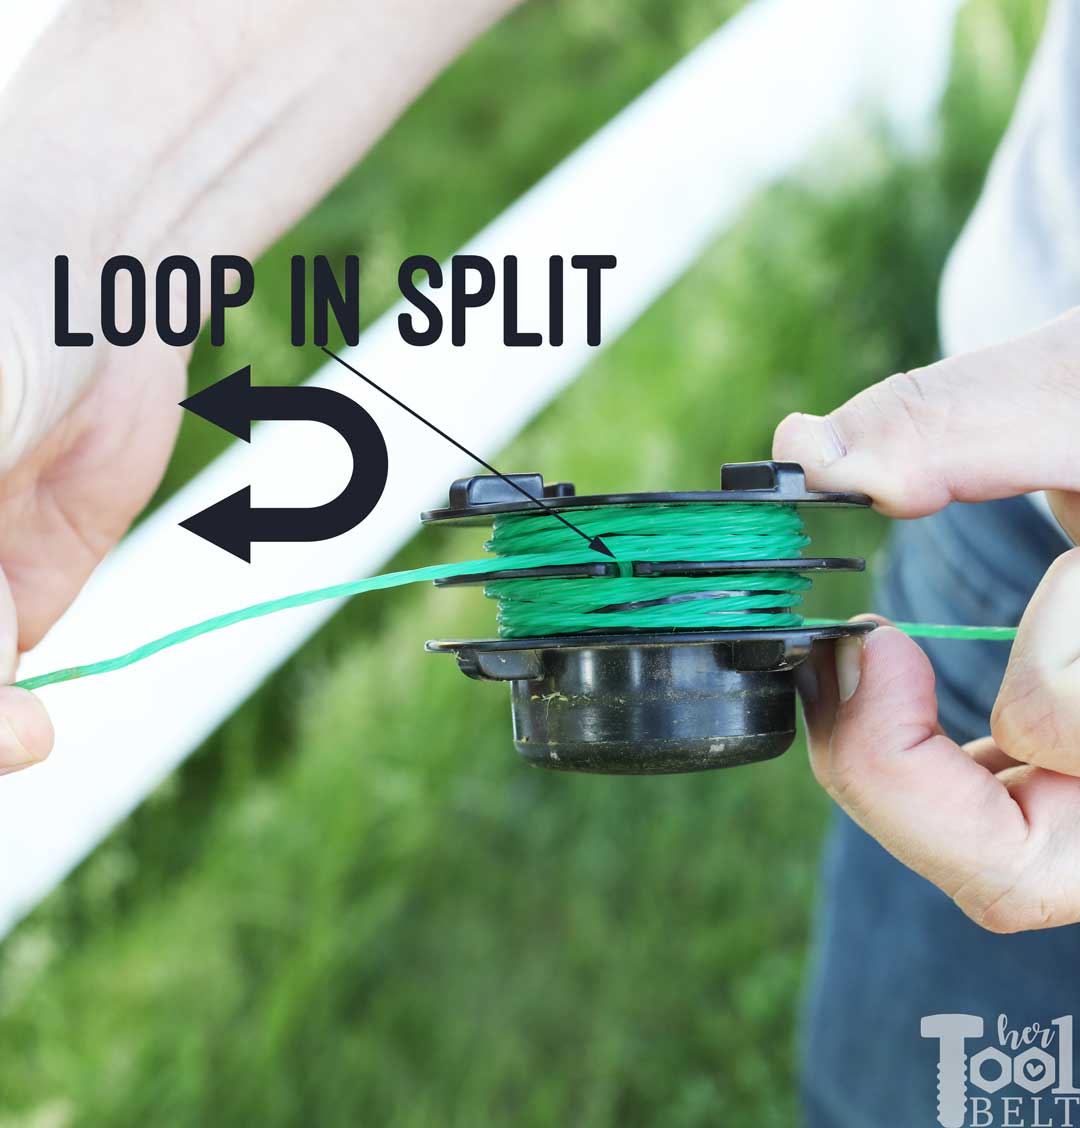
Techniques For Even Winding
1. Hold the spool firmly to prevent tangling.
2. Wind the string evenly in neat rows.
3. Avoid overlapping to prevent jams.
4. Maintain consistent tension while winding.
How Much String To Use
1. Refer to your trimmer manual for recommended string length.
2. Cut the string to the specified size.
3. Avoid excess string to prevent issues during operation.
Reassembling The Trimmer Head
To reassemble the trimmer head and wind a Makita string trimmer, start by carefully following the manufacturer’s instructions. Secure the trimmer head, wind the string in the correct direction, and ensure a tight and even wind for optimal performance. Then, reattach the trimmer head securely before testing the trimmer.
After winding the string onto the spool, it’s time to reassemble the trimmer head. This step is crucial to ensure that the string is properly fed and the trimmer functions efficiently. Here’s how to do it:
Securing The Spool
The first step in reassembling the trimmer head is to secure the spool. Take the spool and place it into the head, making sure that it fits snugly.
Then, pull the string through the hole in the trimmer head. Next, secure the spool by placing the bump knob onto the head. Twist the bump knob clockwise until it clicks into place. This will ensure that the spool is securely fastened to the head.
Final Checks Before Use
Before using the trimmer, it’s essential to perform some final checks. First, make sure that the string is properly fed through the head. Pull on the string to ensure that it’s securely in place. Next, check the bump knob to ensure that it’s tight and won’t come loose during use.
Finally, turn on the trimmer and test it out to ensure that everything is working correctly. In conclusion, reassembling the trimmer head is an essential step in the process of winding the string onto the spool. By following these simple steps, you can ensure that your Makita string trimmer is functioning efficiently and effectively.
Testing And Troubleshooting
Before testing, ensure Makita string trimmer is properly assembled.
Check fuel, oil levels, and spark plug for optimal functionality.
Inspect trimmer head and string for any visible damage.
- String not feeding properly: check for tangles or jams.
- String breaking frequently: use correct thickness and type.
- Uneven cutting: check for uneven string length.
| Problem | Solution |
|---|---|
| String not feeding | Inspect for tangles or jams |
| String breaking | Use correct thickness and type |
| Uneven cutting | Check for uneven string length |
Test Makita string trimmer after addressing any issues.
Maintenance Tips For Longevity
To wind a Makita string trimmer properly for longevity, ensure to follow these maintenance tips: Gently feed the trimmer line, avoid overfilling the spool, and secure the line tightly. Periodically check for wear and tear to prevent damage during operation.
Regularly clean the spool area for optimal performance.
Maintaining your Makita string trimmer is crucial for ensuring its longevity and optimal performance. Proper maintenance practices can help you get the most out of your tool. Below are some essential maintenance tips to keep your Makita string trimmer in top shape.
Regular Cleaning And Storage
Keep your Makita string trimmer clean to prevent debris buildup. Store it in a dry place to avoid rust.
When To Replace The String
Replace the trimmer string when it becomes worn or breaks to maintain cutting efficiency. Regularly cleaning your Makita string trimmer and storing it properly can prolong its lifespan. Make sure to replace the string when it shows signs of wear to ensure optimal performance.
Advanced Winding Techniques
When it comes to winding the string on your Makita string trimmer, mastering advanced winding techniques can save you time and frustration.
By understanding speed winding methods and how to deal with stubborn spools, you can ensure a smooth and efficient winding process that will keep your trimmer operating at its best.
Speed Winding Methods
Speed winding methods can help you efficiently and quickly wind the string on your Makita string trimmer. One effective technique is to pre-cut the trimmer line into equal lengths before winding. This allows for a smooth and even distribution of the line on the spool, reducing the likelihood of tangles and snags during use.
Another speed winding method involves using a winding tool or guide to assist in evenly wrapping the string onto the spool. This can help you maintain a consistent and tight wind, ensuring optimal performance when using the trimmer.
Dealing With Stubborn Spools
If you encounter stubborn spools that are difficult to wind, there are several strategies you can employ to overcome this challenge. First, ensure that the spool is properly secured and aligned before beginning the winding process. This can prevent uneven winding and tangling of the string.
Next, consider using a lubricant or wax on the spool to reduce friction and allow the string to wind more smoothly. Additionally, applying gentle pressure while winding can help guide the string into place, particularly when dealing with resistant spools.
Best Practices For Winding
To wind a Makita string trimmer, follow these best practices: First, remove the spool from the trimmer head and cut a length of line.
Next, wind the line tightly and evenly onto the spool, being careful not to overlap the line. Finally, reattach the spool to the trimmer head and test the trimmer before use.
Summarizing Key Takeaways
After learning the process of winding a Makita string trimmer, it’s essential to summarize the key takeaways to ensure a clear understanding of the best practices.
By following these key points, you can effectively maintain your trimmer for optimal performance:
- Ensure the trimmer is powered off before winding the string.
- Follow the specific winding pattern recommended by Makita for your trimmer model.
- Use high-quality trimmer line to minimize breakage and enhance cutting efficiency.
- Inspect the wound string to guarantee it is evenly distributed and securely fastened.
Encouragement For Diy Maintenance
Engaging in DIY maintenance for your Makita string trimmer not only saves time and money but also empowers you to have a deeper understanding of your equipment
By following the winding process and conducting regular maintenance, you can prolong the lifespan of your trimmer and ensure consistent performance.
Remember, with a little effort, you can keep your trimmer in top condition, ready to tackle any yard work effectively.

Frequently Asked Questions
Which Way Do You Wind A String Trimmer?
To wind a string trimmer, follow the arrow on the spool for the correct direction.
How Do You Wind Trimmer Line Onto A Spool?
To wind trimmer line onto a spool, first, cut the line to the required length. Then, insert each end into the spool’s slots and wind the line evenly in the direction indicated on the spool. Make sure it’s tightly wound and doesn’t overlap.
How To Change Makita Trimmer Head?
To change the Makita trimmer head, first, remove the spool by pressing the tabs. Then, unscrew the spool cap. Next, remove the old head and replace it with the new one. Finally, secure the spool cap back in place.
Why Won’t My Makita Line Trimmer Start?
Possible reasons for a Makita line trimmer not starting include a clogged carburetor, old fuel, or a faulty spark plug. Check these components for issues and replace or clean as needed.
Conclusion
Learning how to wind a Makita string trimmer is essential for maintaining its efficiency. By following these steps, you can ensure a smooth and hassle-free trimming experience.
Regular maintenance and proper winding techniques will prolong the life of your trimmer and keep your yard looking pristine. Mastering this skill will save you time and frustration in the long run.