To remove a Dewalt trimmer head, first, turn off the trimmer and disconnect the spark plug. Then, loosen the trimmer head bolt and remove the head from the trimmer.
Maintaining your gardening equipment is crucial to ensure its efficiency and longevity. When it comes to Dewalt trimmers, knowing how to effectively remove the trimmer head is essential for replacing trimmer lines or performing maintenance.
By following the proper steps, you can easily remove the trimmer head and keep your equipment in top condition.
We’ll guide you through the process of removing a Dewalt trimmer head, providing you with the knowledge and confidence to maintain your gardening tools effectively.
Contents
Safety Precautions
Preparing For Trimmer Head Removal
Before removing the DeWalt trimmer head, ensure to follow these essential safety precautions:
- Unplug the trimmer from any power source to prevent accidental activation.
- Allow the trimmer to cool down if it has been in use recently.
- Read the user manual to understand the specific instructions for your DeWalt model.
Safety Gear
Prioritize your safety by wearing the appropriate gear such as:
- Safety goggles to protect your eyes from debris or flying objects.
- Gloves to shield your hands from sharp edges and moving parts.
- Long sleeves and pants to safeguard your skin from scratches or cuts.
By adhering to these safety measures, you can reduce the risk of accidents and injuries during the DeWalt trimmer head removal process.
Tools Required
When it comes to removing the Dewalt trimmer head, having the right tools is essential. In this section, we will outline the tools required to successfully remove the trimmer head.
Having the proper tools on hand will make the task much easier and ensure a smooth process.
Essential Tools For The Job
Before you begin, gather the following tools to help you in removing the Dewalt trimmer head:
- Adjustable Wrench: Needed to loosen and remove the trimmer head bolt.
- Flathead Screwdriver: Useful for prying off any retaining clips or covers.
- Work Gloves: To protect your hands during the removal process.
- Clean Cloth: To wipe off any dirt or debris from the trimmer head and surrounding area.
- Replacement Trimmer Line: If needed, ensure you have new trimmer line on hand for reassembly.
With these tools ready, you’ll be well-prepared to tackle the task of removing the Dewalt trimmer head.
Step-by-step Guide
Learn how to effortlessly remove the Dewalt trimmer head with this step-by-step guide. Follow these simple instructions to ensure a smooth process without any hassles.
Removing the trimmer head of your Dewalt trimmer may seem like a complex task, but with a step-by-step approach, it can be done effortlessly.
In this guide, we will walk you through the process of removing the Dewalt trimmer head in three simple steps, ensuring a smooth and hassle-free experience. So, let’s grab our tools and get started!
Step 1: Detaching The Trimmer Head Cover
To begin the process, the first step is to detach the trimmer head cover. This cover protects the inner components of the trimmer head and needs to be removed before proceeding further. Follow these steps:
- Tilt the trimmer head: Hold the trimmer head in one hand and tilt it slightly towards the ground. This will allow you easy access to the trimmer head cover.
- Locate the tabs: Look for the tabs on the sides of the trimmer head cover. These tabs usually have a latch mechanism that holds the cover in place.
- Press the tabs: Press the tabs simultaneously to release the latch and unlock the cover. This may require a bit of force but be gentle to avoid any damage.
- Remove the cover: Once the tabs are released, lift the trimmer head cover upwards to detach it completely from the trimmer head.
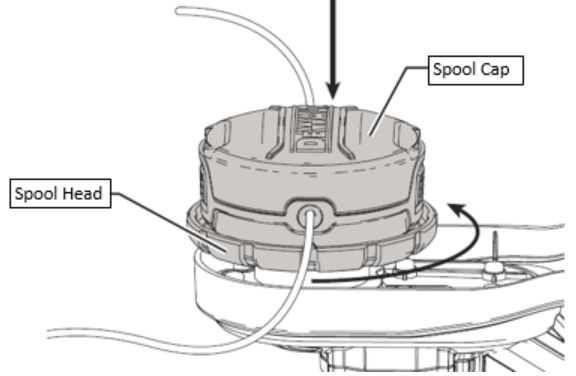
Step 2: Removing The Spool
With the trimmer head cover removed, the next step is to take out the spool. The spool holds the trimmer line and needs to be taken out before accessing the trimmer head. Follow these steps:
- Locate the spool: Look inside the trimmer head for the spool. It is usually a cylindrical-shaped plastic component.
- Hold the spool: Grasp the spool firmly with one hand to prevent it from rotating during removal.
- Unwind the trimmer line: Carefully unwind the trimmer line from the spool until it is completely free. If necessary, trim any tangled or damaged sections of the trimmer line.
- Remove the spool: Once the trimmer line is removed, gently pull the spool upwards to detach it from the trimmer head.
Step 3: Unthreading The Trimmer Head
The final step in the process is to unthread the trimmer head and detach it from the trimmer completely. Follow these steps:
- Find the locking mechanism: Look for the locking mechanism on the bottom side of the trimmer head. This is typically a round knob or a similar component.
- Hold the locking mechanism: Grasp the locking mechanism firmly to prevent it from rotating as you unthread the trimmer head.
- Rotate counterclockwise: Twist the trimmer head counterclockwise with your other hand to loosen it from the trimmer.
- Continue unscrewing: Keep rotating the trimmer head counterclockwise until it is completely unscrewed from the trimmer.
- Remove the trimmer head: Once the trimmer head is unscrewed, lift it upwards to detach it from the trimmer.
With these three simple steps, you have now successfully removed the trimmer head from your Dewalt trimmer. You can now proceed with any maintenance or replacement tasks that require access to the trimmer head.
Remember to follow proper safety precautions and consult the user manual for detailed instructions specific to your Dewalt trimmer model.

Cleaning And Maintenance
Proper cleaning and maintenance of your Dewalt trimmer head is essential to ensure its longevity and optimal performance.
By regularly inspecting and cleaning the head components, you can prevent debris buildup and potential damage, extending the lifespan of your trimmer head. Here are the steps for cleaning and maintaining your Dewalt trimmer head:
Inspecting The Trimmer Head
Before starting any cleaning or maintenance, it’s important to inspect the trimmer head for any signs of wear and tear, such as fraying lines or damaged components.
This step allows you to identify any issues that may require repair or replacement before proceeding with cleaning.
Cleaning The Head Components
To begin the cleaning process, remove the trimmer head from the trimmer and disassemble it according to the manufacturer’s instructions.
Clean each component using a mild detergent and water, ensuring that all dirt, grime, and debris are thoroughly removed.
- Inspect the trimmer head for wear and tear
- Disassemble the head components
- Clean each component using mild detergent and water
- Thoroughly remove dirt, grime, and debris
After cleaning, thoroughly dry each component to prevent any potential rust or damage.
Once dry, reassemble the trimmer head according to the manufacturer’s instructions, ensuring that all components are securely in place for optimal performance.
Replacing The Trimmer Head
To replace the Dewalt trimmer head, follow these simple steps to ensure a smooth transition.
Selecting A Replacement Head
- Measure the diameter of the trimmer head to ensure compatibility.
- Choose a replacement head that matches the make and model of your Dewalt trimmer.
- Refer to the user manual for specific recommendations on replacement heads.
Attaching The New Head
- Align the tabs on the new head with the slots on the trimmer.
- Insert the new head firmly into place and securely tighten any fastening bolts.
- Ensure the head is properly attached before turning on the trimmer.
- Test the new head by engaging the trimmer to check for any issues.
Troubleshooting Tips
Common Issues And Solutions
Issue: Trimmer head is stuck and won’t rotate.
Solution: Check for debris or tangles and clean the head thoroughly.
Issue: Trimmer line keeps breaking during use.
Solution: Ensure you are using the correct size and type of trimmer line.
Additional Troubleshooting Tips
- Keep the trimmer head well-lubricated to prevent sticking.
- Inspect the trimmer head regularly for wear and tear.
- Refer to the user manual for specific troubleshooting steps.
Frequently Asked Questions
How To Take Off A Trimmer Head?
To remove a trimmer head, first, disconnect the spark plug. Then, locate and remove the retaining bolt or nut holding the head in place.
Use a wrench or pliers to loosen and remove it. Once the bolt is removed, you can simply pull the trimmer head away from the shaft.
How Do You Remove The Spool On A Dewalt 60v Trimmer?
To remove the spool on a Dewalt 60v trimmer, locate the spool release button and press it. While pressing the button, pull the spool straight off.
How To Replace String In Dewalt String Trimmer?
To replace string in Dewalt string trimmer, follow these steps:
1. Turn off the trimmer.
2. Remove the spool cover.
3. Take out the old string.
4. Insert new string through the holes.
5. Reattach the spool cover.
How To Rewind A Dewalt 20v Trimmer?
To rewind a Dewalt 20V trimmer, press the lock button and pull the trigger at the same time.
Release the lock button, then slowly release the trigger. The trimmer line will automatically rewind.
Conclusion
Removing the Dewalt trimmer head is a simple process that can easily be accomplished at home.
By following the steps outlined in this guide, you can keep your trimmer in top condition and ensure that it continues to work effectively.
Don’t let a tricky trimmer head get in the way of your yard work – use these tips to make maintenance a breeze.