Views: 32
Imagine the convenience of pulling into your driveway and, with a simple press of a button, watching your garage door glide open smoothly. No more fumbling for keys or getting out of your car in bad weather.
This is the magic of a Ryobi garage door opener remote. But what happens when it stops working, or you need to program a new one? That’s where you come in. This guide will make sure you can easily program your Ryobi garage door opener remote without any hassle.
You’ll feel empowered as you take control, knowing you can handle this simple task. With just a few steps, you’ll be on your way to seamless garage access. Read on to discover how you can do this quickly and efficiently.
Contents
Gather Necessary Tools
Programming a Ryobi garage door opener remote requires preparation. Gathering the right tools is crucial. It ensures a smooth and efficient process. Missing tools can delay and frustrate.
Before programming, collect all needed items. You will need the Ryobi remote. Also, have the garage door opener manual. This manual guides the programming steps. A ladder might be necessary for reaching the opener. Ensure the ladder is stable and safe. Batteries are essential for powering the remote. Check if the remote’s battery is fresh. A pen and paper can help note settings. Keep all items nearby for easy access.
Tools Checklist
Create a checklist of tools. This prevents forgetting crucial items. Include the remote, manual, and batteries. A ladder and pen should also be on the list. Check off each item as you gather it. This ensures you are fully prepared.
Why Tools Matter
Having the right tools makes programming easier. It reduces errors and saves time. Missing tools can lead to repeated attempts. This frustrates and wastes effort. Being prepared leads to a smoother process.
Credit: veterangaragedoor.com
Identify The Learn Button
Programming your Ryobi garage door opener remote starts with identifying the learn button. This button is essential for syncing the remote with the door opener. It’s usually located on the opener unit itself. Understanding its location and function is the first step in programming your remote.
Locate The Learn Button
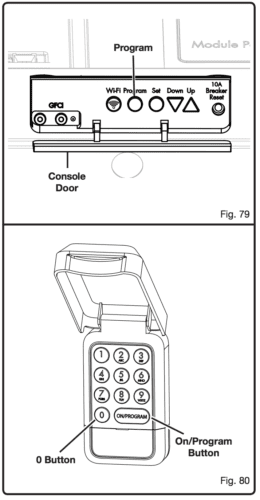
Find the learn button on the Ryobi garage door opener. This button is typically found on the back or side of the opener unit. It might be hidden under a small panel or cover. Look for a small square or round button labeled “Learn” or “Program.” You might need a flashlight to see it clearly.
Check The Color And Shape
The learn button’s color varies by model. Common colors include red, yellow, green, or purple. The shape is usually circular or square. Identifying the color helps ensure correct programming. This is important because different colors may signify different programming steps.
Inspect Surrounding Area
Examine the area around the learn button. You may find helpful labels or instructions. These can guide you through the programming process. Some models have LED indicators near the button. These lights provide feedback during programming. They may blink or change color to signal success.
Prepare To Press The Button
Get ready to press the learn button. Once located, ensure your remote is within reach. Timing is crucial during programming. Pressing the button activates the learning mode. This allows the remote to sync with the garage door opener. Make sure your remote has fresh batteries for best results.
Prepare The Remote
Programming your Ryobi Garage Door Opener Remote begins with preparation. A well-prepared remote ensures smooth operation and avoids issues. This section outlines essential steps to prepare your remote.
Check Battery
The first step is checking the battery. The remote needs a fresh battery for optimal performance. A weak battery can cause poor signal transmission. Replace the battery if it’s drained or old. Use the correct type for your remote. This ensures the device functions properly.
Clear Previous Codes
Clearing previous codes is crucial for a clean slate. Old codes might interfere with new programming. Locate the ‘clear’ button on your remote. Press and hold it until the light blinks. This indicates successful clearance. A cleared remote is ready for new codes.

Credit: www.youtube.com
Programming The Remote
Programming your Ryobi garage door opener remote can seem daunting. But, it’s a straightforward process. You’ll need to press the learn button and sync the remote. Follow these simple steps and gain control over your garage door.
Press The Learn Button
First, locate the learn button on your garage door opener. It’s usually on the back or side of the unit. Press this button gently. This activates the programming mode. You’ll see a light blink on the opener. This means it’s ready to sync with the remote.
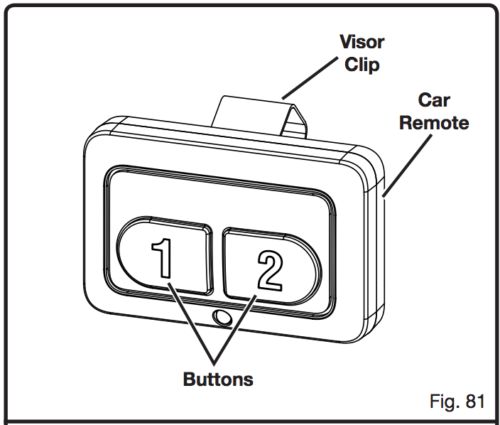
Sync The Remote
Next, grab your remote and press the designated button. Hold it until the light on the opener stops blinking. This indicates successful syncing. Test the remote by pressing the button again. Your garage door should respond by opening or closing. If it doesn’t work, repeat the steps. Ensure that the learn button light blinks during programming.
Remember, each remote has a unique syncing process. Check your manual if you’re unsure. Programming your Ryobi remote is quick and easy. Enjoy the convenience it brings.
Test The Remote Functionality
Testing your Ryobi garage door opener remote ensures it works smoothly. After programming, it’s crucial to confirm every function. This step helps catch any issues early. You’ll avoid future frustrations. Let’s explore how to test the remote efficiently.
Check The Remote Range
Stand outside your garage. Press the remote button. The door should respond immediately. Move further away and test again. Ensure it works from a reasonable distance. This verifies the remote’s range is sufficient.
Verify Button Functionality
Press each button on the remote. Check that each one operates correctly. The door should open and close smoothly. If a button doesn’t work, recheck the programming steps.
Observe The Door Motion
Watch the garage door as it moves. Listen for unusual sounds. Ensure it moves without jerking. If anything seems off, inspect the door mechanism. This ensures safe and smooth operation.
Confirm Safety Features
Test the safety sensors. Block the door’s path with an object. The door should stop and reverse. This ensures the safety features are active. Always prioritize safety in your testing process.
Repeat The Test Periodically
Regular testing maintains remote functionality. Set reminders for periodic checks. This keeps your garage door system reliable. Consistent testing prevents future issues.
Troubleshooting Common Issues
Programming a Ryobi garage door opener remote can be tricky. Start by holding the remote near the opener. Press the learn button, then activate the remote. If issues persist, check battery status or consult the user manual for detailed troubleshooting steps.
Programming your Ryobi garage door opener remote can be a straightforward process. But, what happens when things don’t go as planned? Troubleshooting common issues can save you from unnecessary stress and trips to the hardware store. Knowing some of the common problems and their solutions can get your garage door opener back on track in no time.Weak Signal
A weak signal is a frequent issue when dealing with garage door openers. You might be pressing the button, but nothing is happening, or maybe the door only works when you’re standing close to it. Does this sound familiar? Firstly, check the remote’s battery. A fresh battery can make all the difference. If the battery is new, ensure the antenna on the garage door opener is hanging down and not damaged. You should also consider any obstacles between your remote and the garage door opener. Even a parked car can interfere with the signal.Interference Problems
Interference can be another headache. Imagine pressing the remote and seeing the door hesitate or not budge at all. Devices like Wi-Fi routers, cordless phones, and even fluorescent lights can mess with your garage door opener’s signal. Try turning off nearby electronics one by one to identify the culprit. If you live in an area with many wireless devices, consider changing the frequency on your Ryobi garage door opener. Consult your manual for instructions on how to do this. Have you ever experienced a sudden malfunction only to realize it was due to interference? Share your story or tips with others who might be facing the same issue. Remember, a little troubleshooting can go a long way. What’s your go-to fix for these common problems?Maintaining The Remote
Maintaining your Ryobi garage door opener remote ensures its long life. It helps in smooth operation and prevents unexpected failures. Regular care keeps it ready to perform when needed. Focus on two key areas for maintenance: battery replacement and regular testing.
Battery Replacement
The battery in your remote is vital for its function. A weak battery can cause the remote to fail. Check the battery’s condition every few months. Replace it promptly if the remote response is slow or fails. Use the right type of battery for your model. This ensures optimal performance and prevents damage.
Regular Testing
Test your remote regularly to ensure it works well. Press the button and observe the garage door’s response. If the door opens and closes smoothly, the remote is in good shape. Any delay or failure needs attention. Regular testing helps spot issues early. It ensures your remote is always ready for use.
Additional Features And Settings
Explore the additional features and settings of the Ryobi garage door opener remote. Easily program your remote for seamless operation. Adjust settings to customize your garage door experience.
Programming your Ryobi garage door opener remote doesn’t just stop at making it operational. There’s a host of additional features and settings that can enhance your overall experience. These features can add convenience, improve security, and even make your life a little easier.Light Control
One of the nifty features of the Ryobi garage door opener is its light control. You can program the remote to turn on the garage lights with a simple button press. This is especially handy if you’re coming home late and need to navigate a dark garage. Consider how often you find yourself juggling groceries while trying to find the light switch. With this feature, you can step into a well-lit garage effortlessly. What other ways could this small convenience improve your daily routine?Security Features
Security is paramount, and the Ryobi garage door opener has you covered with advanced security features. You can program rolling code technology into your remote, which changes the code each time you use it. This makes it significantly harder for anyone to hack into your system. Think about the peace of mind knowing your home is better protected. Have you ever worried about someone gaining access to your garage? With these security settings, you can rest easier and focus on what truly matters.Exploring these additional features and settings on your Ryobi garage door opener remote can transform how you interact with your home. It’s not just about opening and closing; it’s about enhancing your life in small, meaningful ways. What feature will you try first?

Credit: www.youtube.com
Frequently Asked Questions
How Do I Reset My Ryobi Garage Door Opener Remote?
To reset your Ryobi garage door opener remote, locate the “Learn” button on the motor unit. Press and hold it until the LED light turns off. This will erase all codes. Then, press the “Learn” button again and press the remote button to reprogram it.
Why Is My Ryobi Remote Not Working?
Your Ryobi remote might not work due to dead batteries, interference, or a programming issue. First, replace the batteries. Next, ensure there’s no interference from nearby electronic devices. Finally, reprogram the remote by following the manufacturer’s instructions.
How Can I Reprogram My Ryobi Remote?
To reprogram your Ryobi remote, press the “Learn” button on the opener. Within 30 seconds, press the button on your remote. The opener light will blink, indicating successful programming. If it doesn’t work, repeat the process, ensuring you’re within range.
What Battery Does A Ryobi Remote Use?
Ryobi garage door opener remotes typically use a CR2032 lithium battery. To replace it, open the battery compartment on the back of the remote. Insert the new battery, ensuring the positive side is facing up. Check functionality after replacing the battery.
Conclusion
Programming your Ryobi garage door opener remote is simple. Follow the steps carefully. Your remote will work smoothly, ensuring secure access. Remember, patience is key. Double-check each step. Make sure batteries are fresh. A well-programmed remote saves time. It also offers peace of mind.
Always test the remote after programming. Confirm it opens and closes properly. Troubleshooting tips can help if issues arise. Consult your manual for specific guidance. Enjoy the convenience of a reliable garage door opener. Keep your home secure and accessible.
Happy programming and safe travels!