To cut acrylic with a Dremel, use a high-speed cutter or a multipurpose cutting bit. Secure the acrylic and start cutting slowly to avoid melting the material.
Acrylic sheets can be easily cut with a Dremel rotary tool, making it a versatile option for various DIY projects. Whether you’re a beginner or a seasoned crafter, learning how to cut acrylic with a Dremel can be a valuable skill to have.
By following some simple steps and taking necessary safety precautions, you can achieve precise and clean cuts on acrylic materials. Let’s explore the process of cutting acrylic with a Dremel in more detail to help you master this technique effectively.

Contents
Introduction To Acrylic And Dremel Tools
Discover the art of cutting acrylic with a Dremel tool – a versatile technique for precise and clean cuts. Master the process with our step-by-step guide for creating flawless acrylic projects effortlessly.
Properties Of Acrylic
Acrylic, also known as plexiglass, is a versatile material that is lightweight and durable.
It is transparent like glass but has higher impact resistance, making it ideal for various applications.
Acrylic is UV-resistant, scratch-resistant, and weather-resistant, making it suitable for both indoor and outdoor use.
Overview Of Dremel Tools
Dremel tools are versatile, high-speed rotary tools that can be used for various tasks including cutting, grinding, and polishing.
They are equipped with different attachments and accessories to suit different applications.
Dremel tools are compact, easy to handle, and offer precision control, making them a popular choice for DIY enthusiasts and professionals alike.
Essential Tools And Materials
When it comes to cutting acrylic with a Dremel, having the right tools and materials is crucial for achieving clean and precise results. In this section, we’ll explore the essential tools and materials you’ll need to successfully cut acrylic using a Dremel.
From choosing the right Dremel model to selecting the appropriate safety gear and accessories, ensuring you have the necessary equipment is the first step to a successful acrylic cutting project.
Choosing The Right Dremel Model
Before embarking on an acrylic cutting project, it’s important to select the right Dremel model for the job. Ensure that the Dremel tool you choose is equipped with a high-speed rotary cutter or a cutting wheel designed specifically for acrylic.
Models such as the Dremel 3000 or the Dremel 4000 are popular choices for acrylic cutting due to their precision and versatility.
Safety Gear And Accessories
When working with acrylic and a Dremel, safety should always be a top priority. Invest in a pair of safety goggles to protect your eyes from any flying debris during the cutting process.
Additionally, consider using a dust mask or respirator to prevent inhalation of acrylic dust. Furthermore, using a clamp or a vise to secure the acrylic piece in place can help ensure stability and accuracy during cutting.
Preparation For Cutting
Prepare for cutting acrylic with a Dremel by securing the acrylic sheet and marking the cutting line. Use a Dremel rotary tool with a cutting wheel attachment to slowly cut along the marked line, ensuring a smooth and precise cut.
Remember to wear safety goggles and work in a well-ventilated area for best results. Cutting acrylic with a Dremel requires preparation to ensure a successful outcome.
This process includes setting up your workspace and securing the acrylic sheet. Follow these steps to prepare for cutting acrylic with a Dremel.
Setting Up Your Workspace
Before you start cutting acrylic with a Dremel, you need to set up your workspace. Make sure you have a well-lit, clean, and flat surface to work on. Ensure there’s enough space around you to move the acrylic sheet while cutting. Also, make sure to have all the necessary tools and equipment within reach.
Securing The Acrylic Sheet
Securing the acrylic sheet is crucial to prevent it from moving around while cutting. Here are some ways to secure the acrylic sheet:
- Use clamps to hold the sheet in place.
- Use double-sided tape to attach the sheet to a stable surface.
- Use a vise to hold the sheet in place.
Choose the method that works best for you and ensure that the acrylic sheet is firmly held in place before you start cutting.
Following these steps will help you prepare for cutting acrylic with a Dremel. Setting up your workspace and securing the acrylic sheet are essential steps that will ensure a smooth and successful cutting process.
Selecting The Appropriate Dremel Bit
When cutting acrylic with a Dremel, selecting the appropriate Dremel bit is crucial to achieving precise and clean cuts. The type of bit you choose and the factors influencing the selection play a significant role in the quality of the cut and the overall outcome of your project.
Types Of Dremel Bits For Acrylic
There are several types of Dremel bits suitable for cutting acrylic, each designed for specific purposes.
Straight Router Bits are ideal for creating clean and precise edges, while Cutting Bits are specifically designed for making straight cuts through acrylic sheets.
Engraving Bits are perfect for intricate designs and detailed work, adding a personalized touch to your acrylic projects.
Factors Influencing Bit Selection
- Thickness of the Acrylic: Thicker acrylic sheets require more robust and durable bits to ensure smooth and accurate cuts.
- Desired Cut: The type of cut you want to achieve, whether it’s straight, curved, or detailed, will determine the most suitable Dremel bit for the job.
- Speed and Precision: Consider the speed and precision needed for your project to select a Dremel bit that can deliver the required level of control and accuracy.
- Material Compatibility: Ensure that the selected bit is compatible with acrylic to avoid any damage to the material during the cutting process.
Cutting Techniques
When it comes to cutting acrylic with a Dremel, mastering the right cutting techniques is essential for achieving precise and clean cuts.
Whether you need to make straight cuts or tackle curved designs, the proper approach can make a significant difference in the outcome of your project.
Below, we will explore the cutting techniques for both straight and curved cuts when using a Dremel tool to cut acrylic.
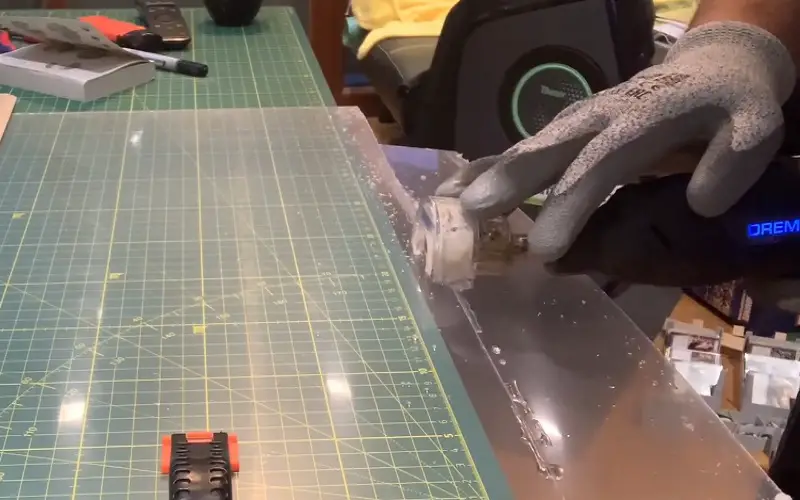
Straight Cuts
To make straight cuts in acrylic using a Dremel, start by outlining the cut line with a marker. Secure the acrylic sheet firmly in place using clamps or a worktable to prevent any movement during the cutting process.
Attach a cutting bit to the Dremel and set the speed to a medium setting. Begin cutting along the marked line, applying consistent and gentle pressure as you guide the tool through the acrylic. Ensure that the Dremel is held at a 90-degree angle to the surface of the acrylic to achieve a clean and precise cut.
Curved Cuts
Curved cuts in acrylic can be achieved by using a Dremel with a cutting wheel or a spiral cutting bit. Similar to straight cuts, mark the cutting line on the acrylic sheet and secure it in place before beginning the cutting process.
When cutting curves, it is crucial to move the Dremel slowly and steadily along the marked line, adjusting the speed and angle as needed to maintain control and accuracy. Take breaks as necessary to avoid overheating the acrylic, which can cause melting and imprecise cuts.
Speed And Pressure Considerations
Achieving the right speed and pressure is crucial when cutting acrylic with a Dremel. Adjusting these factors properly ensures clean and precise cuts, preventing melting or cracking of the acrylic material. Mastering the balance between speed and pressure is key to achieving professional results.
Cutting acrylic with a Dremel can be tricky, especially if you are not familiar with the tool. One of the most important things to keep in mind when cutting acrylic is the speed and pressure you apply. In this article, we will discuss how to adjust the Dremel speed and apply the right pressure for a clean and precise cut.
Adjusting Dremel Speed
The Dremel tool has a variable speed setting that allows you to adjust the speed according to the type of material you are cutting. When cutting acrylic, it is recommended to use a low to medium speed setting. This will prevent the acrylic from melting or cracking due to the heat generated by the high speed.
To adjust the speed on your Dremel, turn the speed control dial located on the tool’s body. Start at a low speed and gradually increase it until you find the speed that works best for the thickness and type of acrylic you are cutting.
Applying The Right Pressure
Another important consideration when cutting acrylic is the amount of pressure you apply. Too much pressure can cause the acrylic to crack or break, while too little pressure can result in a rough and uneven cut. To apply the right pressure, hold the Dremel tool with a firm grip and let the weight of the tool do the cutting.
Don’t push too hard or force the tool through the acrylic. Instead, let the speed and the cutting bit do the work. It is also important to use the right cutting bit for acrylic. A high-speed cutter or a straight router bit can be used for straight cuts, while a spiral cutting bit is best for curved cuts.
In conclusion, adjusting the Dremel speed and applying the right pressure are key factors in cutting acrylic with a Dremel. By following these tips, you can achieve a clean and precise cut every time.
Finishing touches are crucial when it comes to cutting acrylic with a Dremel. After the cutting and shaping are complete, the final steps involve sanding the edges and polishing for clarity. These finishing touches not only enhance the aesthetic appeal but also ensure a professional and polished end result.
Sanding The Edges
When sanding the edges of acrylic, it’s essential to use fine-grit sandpaper to achieve a smooth and even finish.
Start by sanding the edges in a circular motion, applying gentle and consistent pressure to avoid creating uneven surfaces. Continue the process until the edges are completely smooth to the touch, ensuring a professional and refined look.
Polishing For Clarity
Polishing acrylic is vital for achieving optical clarity and a high-gloss finish. Utilize a polishing compound specifically designed for acrylic materials, applying it with a soft cloth in a circular motion.
Continue polishing until the surface achieves the desired level of clarity, ensuring a flawless and professional appearance.

Maintenance And Safety Tips
When using a Dremel to cut acrylic, it is crucial to prioritize maintenance and safety to ensure successful and safe outcomes. Here are some essential guidelines to keep in mind:
Cleaning Your Dremel
- Regularly clean the Dremel after each use to prevent buildup and maintain performance.
- Use a soft, dry cloth to wipe away dust and debris from the tool’s body and accessories.
- Inspect the Dremel regularly for any signs of wear or damage that may affect its functionality.
Safety Practices To Follow
- Always wear protective gear, including safety glasses and a dust mask, to safeguard yourself from debris.
- Secure the acrylic piece properly before cutting to prevent slips or accidents during the process.
- Avoid applying excessive pressure on the Dremel to reduce the risk of breakage or kickback.
Advanced Projects And Creative Ideas
Engraving With A Dremel
One of the most fascinating ways to use a Dremel for advanced projects is by engraving. With the right attachments, you can achieve intricate designs and detailed patterns on acrylic surfaces.
This technique allows for personalization and customization, making it perfect for creating unique gifts or adding a personal touch to your projects.
Combining Materials
Another advanced application of a Dremel is combining materials. By using the appropriate cutting and shaping attachments, you can seamlessly integrate acrylic with other materials such as wood, metal, or glass.
This opens up a world of creative possibilities for crafting multimedia pieces and innovative designs that blend different textures and colors for a striking visual impact.
Frequently Asked Questions
Can I Use Dremel To Cut Acrylic?
Yes, you can use a Dremel to cut acrylic efficiently. It is a versatile tool for precise acrylic cuts.
What Is The Best Tool To Cut Acrylic With?
The best tool to cut acrylic is a fine-toothed saw or a laser cutter. These tools provide clean and precise cuts for acrylic material.
What Is The Easiest Way To Cut Acrylic?
The easiest way to cut acrylic is by using a fine-toothed saw or scoring tool. It’s important to go slow and steady for a clean cut.
Can A Rotary Cutter Cut Acrylic?
Yes, a rotary cutter can cut acrylic easily and precisely, making it a popular choice for craft and DIY projects. It provides clean, smooth cuts without the need for saws or other tools.
Conclusion
Cutting acrylic with a Dremel can be a rewarding and practical DIY skill. By following safety precautions and the right techniques, you can achieve precise cuts for various projects. Remember to practice, be patient, and enjoy the process of mastering this versatile tool.