For flattening slabs, the router bit to use is a flush trim bit with a top-mounted bearing. This type of bit is designed to remove excess material and create a flat, even surface on the slab.
When it comes to woodworking projects involving slabs, achieving a smooth and level surface is crucial. Flat slabs are not only visually appealing but also more functional. One essential tool for this task is a router, which can be a game-changer in achieving precise and uniform results.
However, not all router bits are suitable for flattening slabs. In order to achieve the desired outcome, it is crucial to choose the right router bit specifically designed for this purpose.
We will explore the ideal router bit to use for flattening slabs and why it is essential for achieving professional-grade results. So, let’s dive in and discover the best router bit for your slab flattening needs.
Contents
Understanding Slab Flattening
When it comes to working with large wooden slabs, achieving a flat and level surface is essential for creating beautiful and functional furniture pieces.
This process, known as slab flattening, involves removing the natural imperfections, such as unevenness and twists, from a slab of wood to create a smooth and uniform surface.
In this blog post, we will delve into the importance of slab flattening and guide you through the different router bits that can be used to achieve the best results.
What Is Slab Flattening?
Slab flattening refers to the process of making a rough slab of wood flat and level. When a fresh slab is cut, it often possesses natural defects, including unevenness, twists, and warps.
These imperfections not only hinder the stability of the slab but also make it difficult to work with when crafting furniture or other wooden pieces.
By flattening the slab, you are creating a solid and even surface that serves as a foundation for your woodworking project.
Why Is Slab Flattening Important?
Slab flattening is of utmost importance as it ensures stability and usability in woodworking projects. Here are a few reasons why this process is crucial:
- Stability: A flattened slab provides a stable base for your project, reducing the risk of wobbling or unevenness.
- Visual Appeal: Flattening a slab eliminates prominent imperfections, resulting in a visually pleasing piece of furniture with a smooth surface.
- Joinery: A flat slab allows for better joinery, ensuring strong and seamless connections between different wooden parts.
- Efficiency: By starting with a flattened slab, you minimize the amount of material you need to remove during the shaping and finishing stages, saving time and effort.
Now that you understand the importance of slab flattening, let’s explore the different router bits that can be used for this process.
Choosing The Right Router Bit
When it comes to flattening slabs, selecting the right router bit is crucial. Understanding different types of router bits and considering the specific slab characteristics are essential for successful flattening.
Understanding Different Types Of Router Bits
- Straight Router Bits: Ideal for initial slab leveling due to their versatility.
- Spiral Router Bits: Effective for clean and smooth cuts on slabs.
- Bottom Cleaning Router Bits: Great for removing material quickly in flat areas.
Considerations For Selecting The Right Router Bit
- Material Type: Choose a router bit that matches the slab material for best results.
- Cutting Depth: Adjust the cutting depth based on the slab’s thickness to avoid overcuts.
- Router Compatibility: Ensure the bit is compatible with your router for seamless operation.
Straight Bit
A straight bit is a versatile and commonly used router bit for flattening slabs. When it comes to working with large, rough surfaces, a straight bit can be a reliable tool for achieving flat and even results.
Let’s explore the benefits and limitations of using a straight bit, as well as the techniques for effectively utilizing it for slab flattening.
Benefits Of Using A Straight Bit
- Versatility: Straight bits are suitable for a wide range of materials, including wood, plastic, and non-ferrous metals.
- Smooth Cuts: They produce clean and smooth cuts, making them ideal for achieving a flat surface on slabs.
- Cost-Effective: Straight bits are generally more affordable compared to specialized router bits, offering a budget-friendly option for slab flattening.
- Minimal Tear-Out: With the right technique, straight bits can minimize tear-out and achieve a high-quality finish on wood slabs.
Limitations Of Using A Straight Bit
- Limited Depth: Straight bits may have limitations when it comes to cutting deeper sections of the slab, potentially requiring multiple passes.
- Edge Quality: Achieving precise edges and corners may require additional tools or techniques, as straight bits are not specifically designed for detailed work.
- Speed: Depending on the size of the slab and the power of the router, using a straight bit for flattening may require patience and multiple passes to ensure an even surface.
Techniques For Using A Straight Bit For Slab Flattening
When utilizing a straight bit for slab flattening, there are some key techniques to keep in mind:
- Multiple Passes: Gradually lowering the bit for each pass can help achieve a consistent and level surface.
- Support Structure: Using a sturdy support structure to hold the slab in place during routing can enhance stability and safety.
- Router Speed: Adjusting the speed of the router to match the specific requirements of the material can contribute to smoother cuts and reduced tear-out.
- Cleaning Debris: Regularly clearing away debris and sawdust during the routing process can help maintain the efficiency of the straight bit.

Spiral Upcut Bit
When it comes to flattening slabs, the spiral upcut bit is a popular choice among woodworkers. This type of router bit is designed to efficiently remove material and leave a smooth surface, making it ideal for flattening large and uneven surfaces such as live edge slabs.
Benefits Of Using A Spiral Upcut Bit
The spiral upcut bit is known for its efficient material removal capabilities, allowing woodworkers to flatten slabs quickly.
Its spiral design helps to pull the wood chips up and away from the cut, resulting in a cleaner cutting action and reduced chances of chip re-cutting.
Due to its upward spiral design, the bit also tends to produce less tear-out, resulting in a smoother surface finish compared to other types of router bits.
Furthermore, the spiral upcut bit is versatile and can be used on a variety of wood species, making it a popular choice for woodworking projects.
Limitations Of Using A Spiral Upcut Bit
While the spiral upcut bit is effective for slab flattening, it can be more aggressive than other bits, requiring careful handling to avoid splintering or tear-out, especially on delicate wood grain or highly figured slabs.
Additionally, the spiraling action of the bit can lead to more strain on the router motor and may produce more dust and debris, requiring proper dust collection systems and frequent bit cleaning during use.
Techniques For Using A Spiral Upcut Bit For Slab Flattening
- Secure the slab to a stable work surface using clamps or a sled to prevent movement during the routing process.
- Start with shallow passes and gradually increase the depth of cut to avoid putting excessive stress on the router and bit.
- Move the router in a slow and steady motion, ensuring even and consistent material removal across the entire surface of the slab.
- Regularly check the bit for any build-up of wood chips and clean it as needed to maintain optimal cutting performance.
- Consider using a dust collection system to minimize the accumulation of debris and maintain a cleaner working environment.
Straight Flute Bit
When flattening slabs, a straight flute bit is ideal for use with a router. This bit effectively removes material and produces a smooth finish, making it suitable for large, flat surfaces. It is a versatile choice for woodworking projects requiring slab leveling and flattening.
When flattening slabs, the straight flute bit is a versatile tool to consider.
Benefits Of Using A Straight Flute Bit
- Easily removes large amounts of material.
- Produces smoother cuts on hardwood slabs.
- Minimizes tear-out for a clean surface finish.
Limitations Of Using A Straight Flute Bit
- May require multiple passes for optimal results.
- Not suitable for intricate designs or detailed work.
- Can be challenging to control on uneven surfaces.
Techniques For Using A Straight Flute Bit For Slab Flattening
To achieve the best results with a straight flute bit:
- Secure the slab properly to prevent movement.
- Adjust the cutting depth gradually to avoid damage.
- Move the router steadily and evenly across the slab. By mastering these techniques, you can effectively flatten slabs using a straight flute bit.

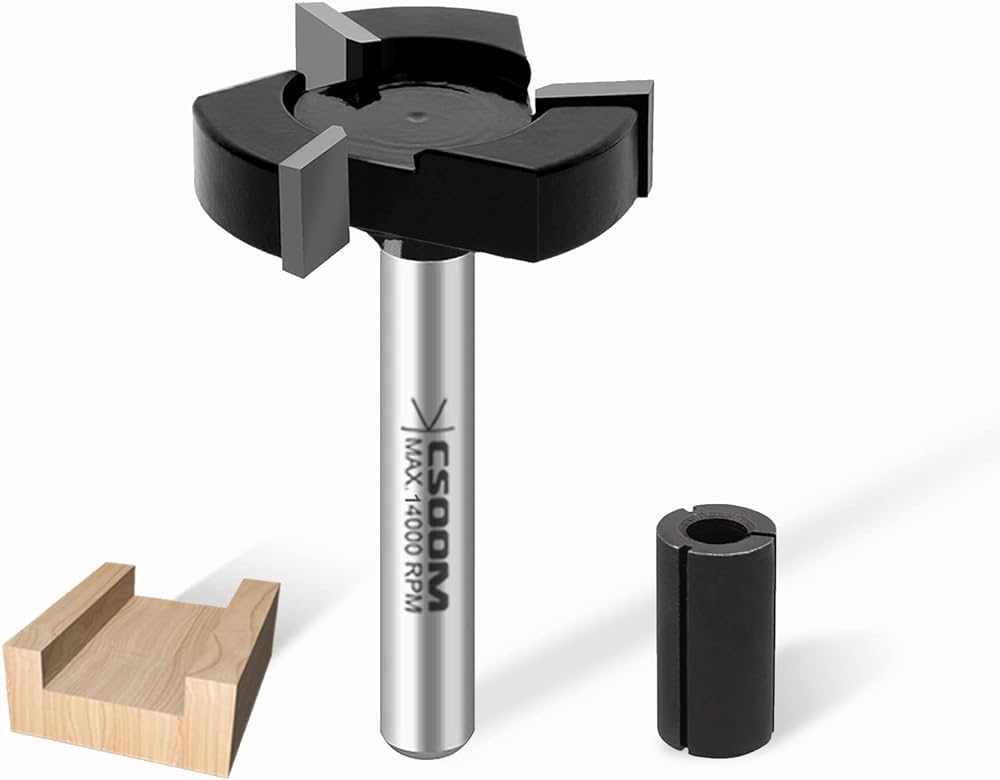
Spoilboard Bit
A crucial step in the woodworking process is ensuring that the slabs you work with are perfectly flat. This not only provides a solid foundation for your project, but it also enhances the overall aesthetic appeal.
One tool that is highly recommended for this purpose is the spoilboard bit. In this article, we’ll explore the benefits and limitations of using a spoilboard bit for slab flattening, as well as the techniques and best practices to ensure optimal results.
Benefits Of Using A Spoilboard Bit
The spoilboard bit is specifically designed for removing excess material and achieving a level surface on slabs. Here are some key advantages of using a spoilboard bit:
- Efficient Material Removal: The spoilboard bit features a large cutting diameter and a flat bottom, allowing it to remove material quickly and efficiently.
- Even Surface: This bit creates a smooth and level surface by cutting evenly across the entire length of the slab, minimizing the risk of unevenness or low spots.
- Versatility: Spoilboard bits are compatible with a wide range of wood types, including hardwoods and softwoods, making them suitable for various woodworking projects.
- Durability: With high-quality carbide cutting edges, spoilboard bits offer exceptional durability and long-lasting performance.
Limitations Of Using A Spoilboard Bit
While spoilboard bits are an excellent choice for slab flattening, they do have some limitations that should be considered:
- Depth Control: Spoilboard bits can remove material quickly, but their large cutting diameter makes it challenging to precisely control the depth of cut. Careful monitoring and multiple passes may be necessary to achieve the desired flatness.
- Material Wastage: Due to the aggressive nature of the spoilboard bit, it is important to plan your cuts strategically to minimize wastage. Proper layout and calculation of the required depth will help optimize material usage.
- Finishing Requirements: While spoilboard bits create a level surface, they may leave slight tool marks. Additional sanding or finishing may be required to achieve a perfectly smooth and polished appearance.
Techniques For Using A Spoilboard Bit For Slab Flattening
To ensure the best results when using a spoilboard bit for slab flattening, consider the following techniques:
- Secure the Slab: Properly secure the slab to prevent any movement during the cutting process. This will ensure consistent and accurate cuts.
- Multiple Passes: Due to the large cutting diameter, it is advisable to make multiple passes with gradually increasing depth to achieve the desired flatness. This allows for better control over the cutting depth.
- Clean the Bit: Regularly clean the spoilboard bit during the process to prevent buildup of debris and resin, which can affect its performance.
- Proper Feed Rate: Use a consistent and appropriate feed rate to ensure smooth and even cuts. Too slow or too fast of a feed rate can result in uneven surfaces or burning.
- Finishing Touches: After flattening the slab with the spoilboard bit, perform any necessary additional sanding or finishing to achieve the desired surface smoothness.
Expert Tips For Perfect Results
For perfect results when flattening slabs, it’s essential to use a router bit specifically designed for this task. Look for a large-diameter flat-bottom bit that can handle the width of your slab.
This type of bit will ensure a smooth and even surface, resulting in a professional finish for your woodworking projects. When it comes to flattening slabs, choosing the right router bit is crucial. By using the appropriate bit and following expert tips, you can achieve flawless results every time.
In this article, we will discuss the proper setup and adjustments, workpiece preparation, and the importance of using multiple passes for optimal results.
Proper Setup And Adjustments
Before flattening a slab, it is important to ensure that your router is properly set up and adjusted. Here are some expert tips to help you achieve perfect results:
- Choose the Right Router Bit: Selecting the correct router bit will depend on the type of wood and the desired thickness of the slab. For rough flattening, a straight bit with a large diameter is recommended. If you need to remove smaller amounts of material, a spiral upcut bit or a bowl and tray bit would be more suitable.
- Set the Router Speed: Adjusting the router speed is essential for achieving a smooth and efficient flattening process. Higher router speeds are typically used for roughing cuts, while lower speeds are better for finishing passes.
- Secure the Slab: Make sure the slab is securely clamped or fastened to the workbench. This will prevent any movement or shifting during the routing process, ensuring consistent cuts and a level surface.
- Use Guide Rails: Consider using guide rails or templates to help guide the router along the slab’s edges. This will ensure straight and accurate cuts.
Workpiece Preparation
Proper preparation of the workpiece is key to achieving the best results when flattening slabs. Follow these expert tips to prepare your workpiece:
- Inspect and Clean: Before starting the flattening process, carefully inspect the slab for any nails, screws, or other objects that could damage the router bit. Remove any debris or dirt from the surface to avoid chip clogging.
- Level the Surface: If the slab has any high spots or uneven areas, it is important to level them before starting the flattening process. Use a planer or hand plane to remove any excess material.
- Mark the High Points: Identify the high points or areas that need more material removal. Mark these areas on the slab’s surface to guide the routing process and ensure even flattening.
- Consider Moisture Content: Check the moisture content of the slab before flattening. Wood with a high moisture content may shrink or warp after the process, leading to uneven surfaces. It is best to let the slab dry adequately before flattening.
Using Multiple Passes For Optimal Results
When flattening slabs, using multiple passes is recommended for achieving optimal results. Here’s why:
By making multiple passes, you can gradually remove material and reduce the chances of tear-out and rough surfaces. Each pass should remove a small amount of material, ensuring precision and control.
This approach allows you to achieve a smoother and more consistent surface, especially when dealing with irregular or figured grain patterns.
Frequently Asked Questions For What Router Bit To Use For Flattening Slabs
What Router Bit To Use For Slab Flattening?
For slab flattening, use a router with a straight bit or a surfacing bit for efficient results.
Can I Flatten A Slab With A Straight Bit?
Yes, you can flatten a slab with a straight bit. It’s a common method for achieving a level surface.
What Router Bit Should I Use For Planing?
Use a flush trim router bit for planing. This bit has a cutting edge at the bottom that removes excess material. It’s great for leveling surfaces or creating smooth edges, ensuring a clean and professional look.
Can You Flatten A Slab On A Router Table?
Yes, you can flatten a slab on a router table by using a flattening jig.
Conclusion
In selecting router bits for flattening slabs, consider factors like bit diameter, cutting length, and shank size. Always ensure proper safety measures.
Experiment with different bits to find what works best for your specific project. Remember, the right router bit can make a significant difference in achieving a smooth and level slab surface.