To adjust the handle on a Ryobi leaf blower, loosen the knob that secures the handle and move it to the desired position. Tighten the knob to secure the handle in place.
Ryobi is a well-known brand that manufactures high-quality leaf blowers. These devices are incredibly useful for cleaning leaves and debris from your garden or driveway.
However, sometimes you may need to adjust the handle on your Ryobi leaf blower to make it more comfortable to use.
This can be done easily by following a few simple steps. We will discuss how to adjust the handle on a Ryobi leaf blower and provide some useful tips to make the process easier. So, let’s get started!
Contents
- Introduction To Ryobi Leaf Blowers
- The Importance Of Proper Handle Adjustment
- Identifying Your Ryobi Leaf Blower Model
- Tools Needed For Handle Adjustment
- Step-by-step Handle Adjustment
- Tips For A Comfortable Grip
- Troubleshooting Common Issues
- Maintaining Your Ryobi Leaf Blower
- Frequently Asked Questions
- Conclusion
Introduction To Ryobi Leaf Blowers
Ryobi leaf blowers are versatile and efficient tools for yard maintenance. These powerful machines are designed to make clearing leaves, debris, and grass clippings a breeze. With their ergonomic design and user-friendly features, Ryobi leaf blowers are popular among homeowners and professionals alike.
Popularity And Reliability
Ryobi leaf blowers are known for their popularity and reliability. They have built a strong reputation in the market for their performance and durability. Users trust Ryobi products for their consistent quality and dependability.
Variety In Models
Ryobi offers a wide variety of leaf blower models to suit different needs. Whether you need a cordless, gas-powered, or electric leaf blower, Ryobi has a model for you.
Each model is designed with specific features and capabilities to cater to various yard maintenance requirements.
The Importance Of Proper Handle Adjustment
Adjusting the handle on your Ryobi leaf blower is crucial for ensuring a comfortable and safe user experience. The proper handle adjustment can significantly enhance control, reduce fatigue, and improve overall safety.
Enhanced Control
Proper handle adjustment allows for a secure grip, enabling enhanced control of the leaf blower during operation. This ensures precise maneuverability and targeted airflow, optimizing the efficiency of your yard work.
Reduced Fatigue
By positioning the handle to suit your grip, reduced fatigue is achieved as it minimizes the strain on your hands, wrists, and arms. This allows for prolonged use without discomfort, promoting a more enjoyable and productive outdoor maintenance experience.
Safety Considerations
Safety considerations are paramount when adjusting the handle of your Ryobi leaf blower. Proper positioning can prevent accidents, such as loss of control or strain-related injuries, ensuring a secure and stable grip during operation.
Identifying Your Ryobi Leaf Blower Model
Checking The User Manual
If you have the original user manual that came with your Ryobi leaf blower, this can be the easiest and most accurate way to identify the model. Look for the model number on the cover or the first few pages of the manual. It is usually printed in a prominent location for easy reference.
Online Resources
If you don’t have the user manual, don’t worry. Ryobi provides online resources where you can identify your leaf blower model. Visit the official Ryobi website and navigate to the leaf blower section.
Look for a model number or product identification tool that can help you determine the specific model of your leaf blower. Additionally, you can use online forums and communities where fellow Ryobi users may be able to assist you in identifying your leaf blower model.

Tools Needed For Handle Adjustment
When adjusting the handle on your Ryobi leaf blower, having the right tools at your disposal is crucial for a seamless process. By utilizing the appropriate equipment, you can ensure that the adjustment is made accurately and efficiently. Here’s a breakdown of the tools you’ll need for the handle adjustment:
Standard Toolkit Items
The following are the standard toolkit items you’ll need for adjusting the handle on your Ryobi leaf blower:
- Screwdriver set: To remove and reattach screws holding the handle in place.
- Adjustable wrench: For tightening and loosening nuts and bolts on the handle.
- Utility knife: Useful for cutting and removing any excess material that may hinder the adjustment process.
Specialized Equipment
Additionally, you may require specialized equipment to ensure precise adjustments:
- Torque wrench: Essential for achieving the correct level of torque when reassembling the handle for optimal stability.
- Wire cutters: In case any wiring needs to be adjusted along with the handle.
- Handle grip adhesive: If the handle grip needs to be replaced or readjusted, this adhesive will be necessary for securing the new grip in place.
Step-by-step Handle Adjustment
Adjusting the handle of your Ryobi leaf blower is a simple process that can greatly improve your comfort and control while using the tool. In this step-by-step guide, we will walk you through the process of adjusting the handle to ensure that it is positioned to suit your grip and working style.
Powering Off The Blower
To begin the handle adjustment process, ensure that the leaf blower is powered off and the motor is completely stopped. This is essential for safety and prevents any accidental activation of the blower during the adjustment.
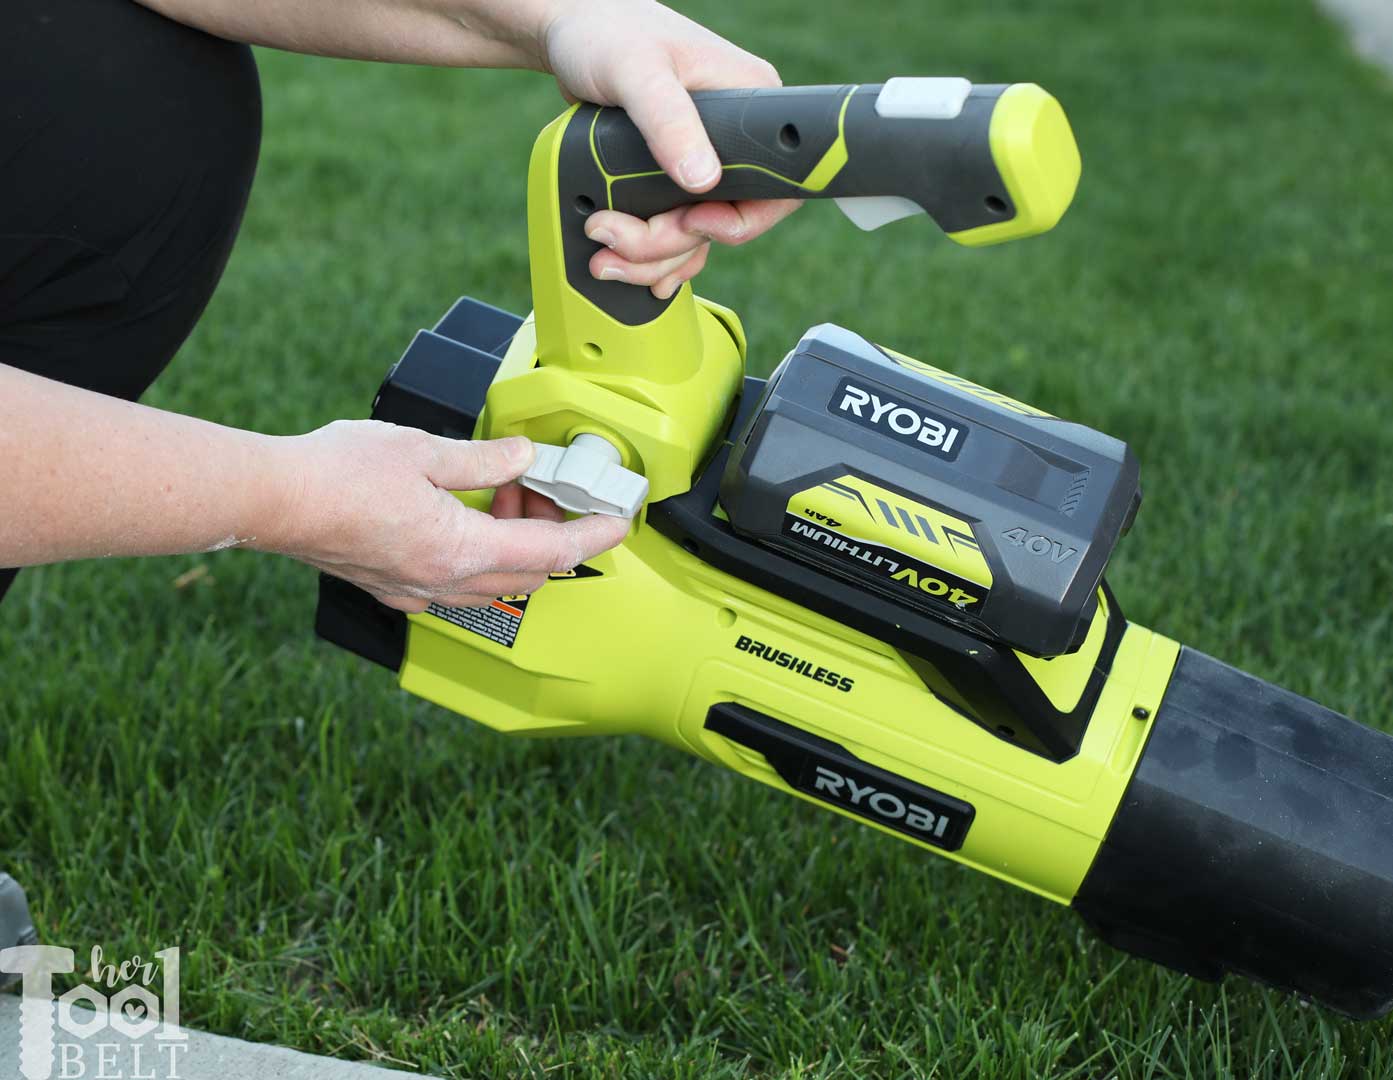
Loosening The Grip
Start by loosening the grip on the handle to allow for movement. Depending on the model of your Ryobi leaf blower, there may be a specific mechanism for releasing the handle grip. Refer to the user manual for instructions on how to do this for your particular blower.
Positioning The Handle
- Once the grip is loosened, carefully position the handle to a comfortable and ergonomic position that suits your hand and arm.
- Consider the angle and orientation of the handle to ensure that it provides the best balance and control while operating the leaf blower.
Securing The Handle
After adjusting the handle to your desired position, secure it in place by tightening the grip mechanism. Ensure that the handle is firmly locked into position to prevent any movement during operation.
Tips For A Comfortable Grip
When using a Ryobi leaf blower, ensuring a comfortable grip can make a significant difference in user experience. Here are some tips for achieving a comfortable grip when adjusting the handle on your Ryobi leaf blower.
Ergonomic Considerations
Ergonomic design plays a crucial role in ensuring a comfortable grip when operating a leaf blower.
Testing Different Positions
Experiment with different handle positions to find the most comfortable and efficient grip for your Ryobi leaf blower.
Troubleshooting Common Issues
When using a Ryobi leaf blower, you may encounter some common issues with the handle, causing inconvenience and hindering the operation of the device.
Understanding these issues and how to troubleshoot them can help ensure a smooth and efficient leaf-blowing experience.
Handle Won’t Stay In Place
If you find that the handle of your Ryobi leaf blower won’t stay in place, it may be due to loose or damaged components. To troubleshoot this issue:
- Tighten the handle screws using a screwdriver to secure it in place.
- Inspect the handle for any signs of wear or damage, and consider replacing it if necessary.
Difficulty In Adjusting
Encountering difficulty when trying to adjust the handle of your Ryobi leaf blower can be frustrating. Here are some troubleshooting steps to address this issue:
- Check for any obstructions or debris that may be hindering the adjustment mechanism, and clear them if found.
- Apply lubricant to the adjustment mechanism to ensure smooth operation.
Replacement Parts
When troubleshooting the handle of your Ryobi leaf blower, it’s essential to consider the availability of replacement parts. In case you need to replace any components:
- Refer to the user manual or manufacturer’s website to identify the correct replacement parts for your specific model.
- Ensure that you use genuine Ryobi replacement parts to maintain the quality and performance of your leaf blower.
Maintaining Your Ryobi Leaf Blower
Proper maintenance of your Ryobi leaf blower is crucial to ensure its longevity and optimal performance. By following these simple steps, you can keep your leaf blower in top condition for years to come.
Regular Cleaning
- Clean the exterior of the leaf blower regularly with a damp cloth.
- Remove any debris or dirt that may have accumulated on the blower.
- Check the air vents and cooling fins for any blockages.
Checking For Wear And Tear
- Inspect the handle for any cracks or signs of damage.
- Tighten any loose screws or bolts on the handle.
- Check the trigger and throttle for smooth operation.
Adjusting the handle on your Ryobi leaf blower is a simple yet essential task that can greatly enhance your user experience.
By customizing the handle to your comfort level, you can work more efficiently and reduce fatigue. Remember to follow the manufacturer’s guidelines to ensure proper adjustment and safe usage.
Recap Of Benefits
- Personalized comfort
- Enhanced user experience
- Improved efficiency
- Reduced fatigue
Encouragement To Maintain
- Regularly check handle alignment
- Keep handle clean and free of debris
- Inspect for any signs of wear or damage
- Follow manufacturer’s maintenance recommendations
Frequently Asked Questions
Why Is My Ryobi Blower So Hard To Start?
A Ryobi blower may be hard to start due to issues with the spark plug, fuel system, or air filter. Regular maintenance and cleaning can help improve starting performance.
How To Set Up Ryobi Leaf Blower?
To set up your Ryobi leaf blower, first read the manual thoroughly. Attach the nozzle and battery, and ensure the blower tube is properly connected.
Adjust the speed settings and start the blower. Always wear protective gear and follow safety guidelines.
Why Is My Ryobi Cordless Blower Not Working?
If your Ryobi cordless blower is not working, check the battery to ensure it’s charged and inserted correctly.
Also, check the air filter, spark plug, and fuel system for any issues. If these don’t solve the problem, contact Ryobi customer service for further assistance.
Where Is The Air Filter On A Ryobi Leaf Blower?
The air filter on a Ryobi leaf blower is typically located near the engine. Check the user manual for specific instructions.
Conclusion
In a few simple steps, you can adjust the handle on your Ryobi Leaf Blower easily. By following our guide, you can ensure optimal comfort and efficiency while using your leaf blower. Stay tuned for more tips on maintaining and enhancing your gardening tools!