
Ever found yourself struggling to hang a picture or install a new shelf, only to worry about missing the wall studs? You’re not alone.
The Ryobi Stud Finder is a tool designed to eliminate that guesswork, making your DIY projects smoother and more efficient. Imagine the confidence you’ll feel knowing exactly where to drill, without the risk of hitting pipes or wires. This guide will walk you through the simple steps to master this handy gadget, ensuring your home projects are both safe and successful.
Are you ready to transform your DIY experience and take the stress out of finding studs? Let’s dive in and uncover the secrets to using your Ryobi Stud Finder like a pro.
Contents
Getting Started With Ryobi Stud Finder
Begin by turning on the Ryobi stud finder. Slide it across the wall to detect studs. The device will beep or light up when a stud is found.
Getting started with the Ryobi Stud Finder is an exciting journey into the world of DIY home improvement. Whether you’re hanging a picture or installing shelves, finding the right spot is crucial. The Ryobi Stud Finder simplifies this process, ensuring you don’t drill into drywall aimlessly. This handy tool is user-friendly, making it ideal for both beginners and seasoned DIY enthusiasts. Let’s dive into the unboxing and setup, and explore the key features that make the Ryobi Stud Finder a must-have in your toolkit.Unboxing And Setup
When you open the box of your Ryobi Stud Finder, you’ll find the device, a user manual, and sometimes, a battery included. The compact design makes it easy to hold and maneuver. First, check if the battery is included and install it if necessary. If not, you’ll need a standard AAA battery. Once powered, familiarize yourself with the buttons and display. It’s straightforward—no complicated settings to tweak. Just turn it on, and you’re ready to start finding studs.Key Features Overview
The Ryobi Stud Finder is equipped with features designed to simplify the search for studs. Its LED indicators are a standout—clearly showing when you’ve located a stud. The ergonomic grip ensures comfort during use, allowing you to scan large areas without hand fatigue. Advanced technology minimizes false positives, saving you time and frustration. Imagine confidently marking the wall, knowing you’re accurately locating the stud behind it. As you use the Ryobi Stud Finder, consider what projects you can confidently tackle with this tool. How much time will you save compared to manual methods? With its intuitive interface, even first-time users can become pros in no time. The Ryobi Stud Finder is more than just a tool; it’s a partner in your DIY adventures.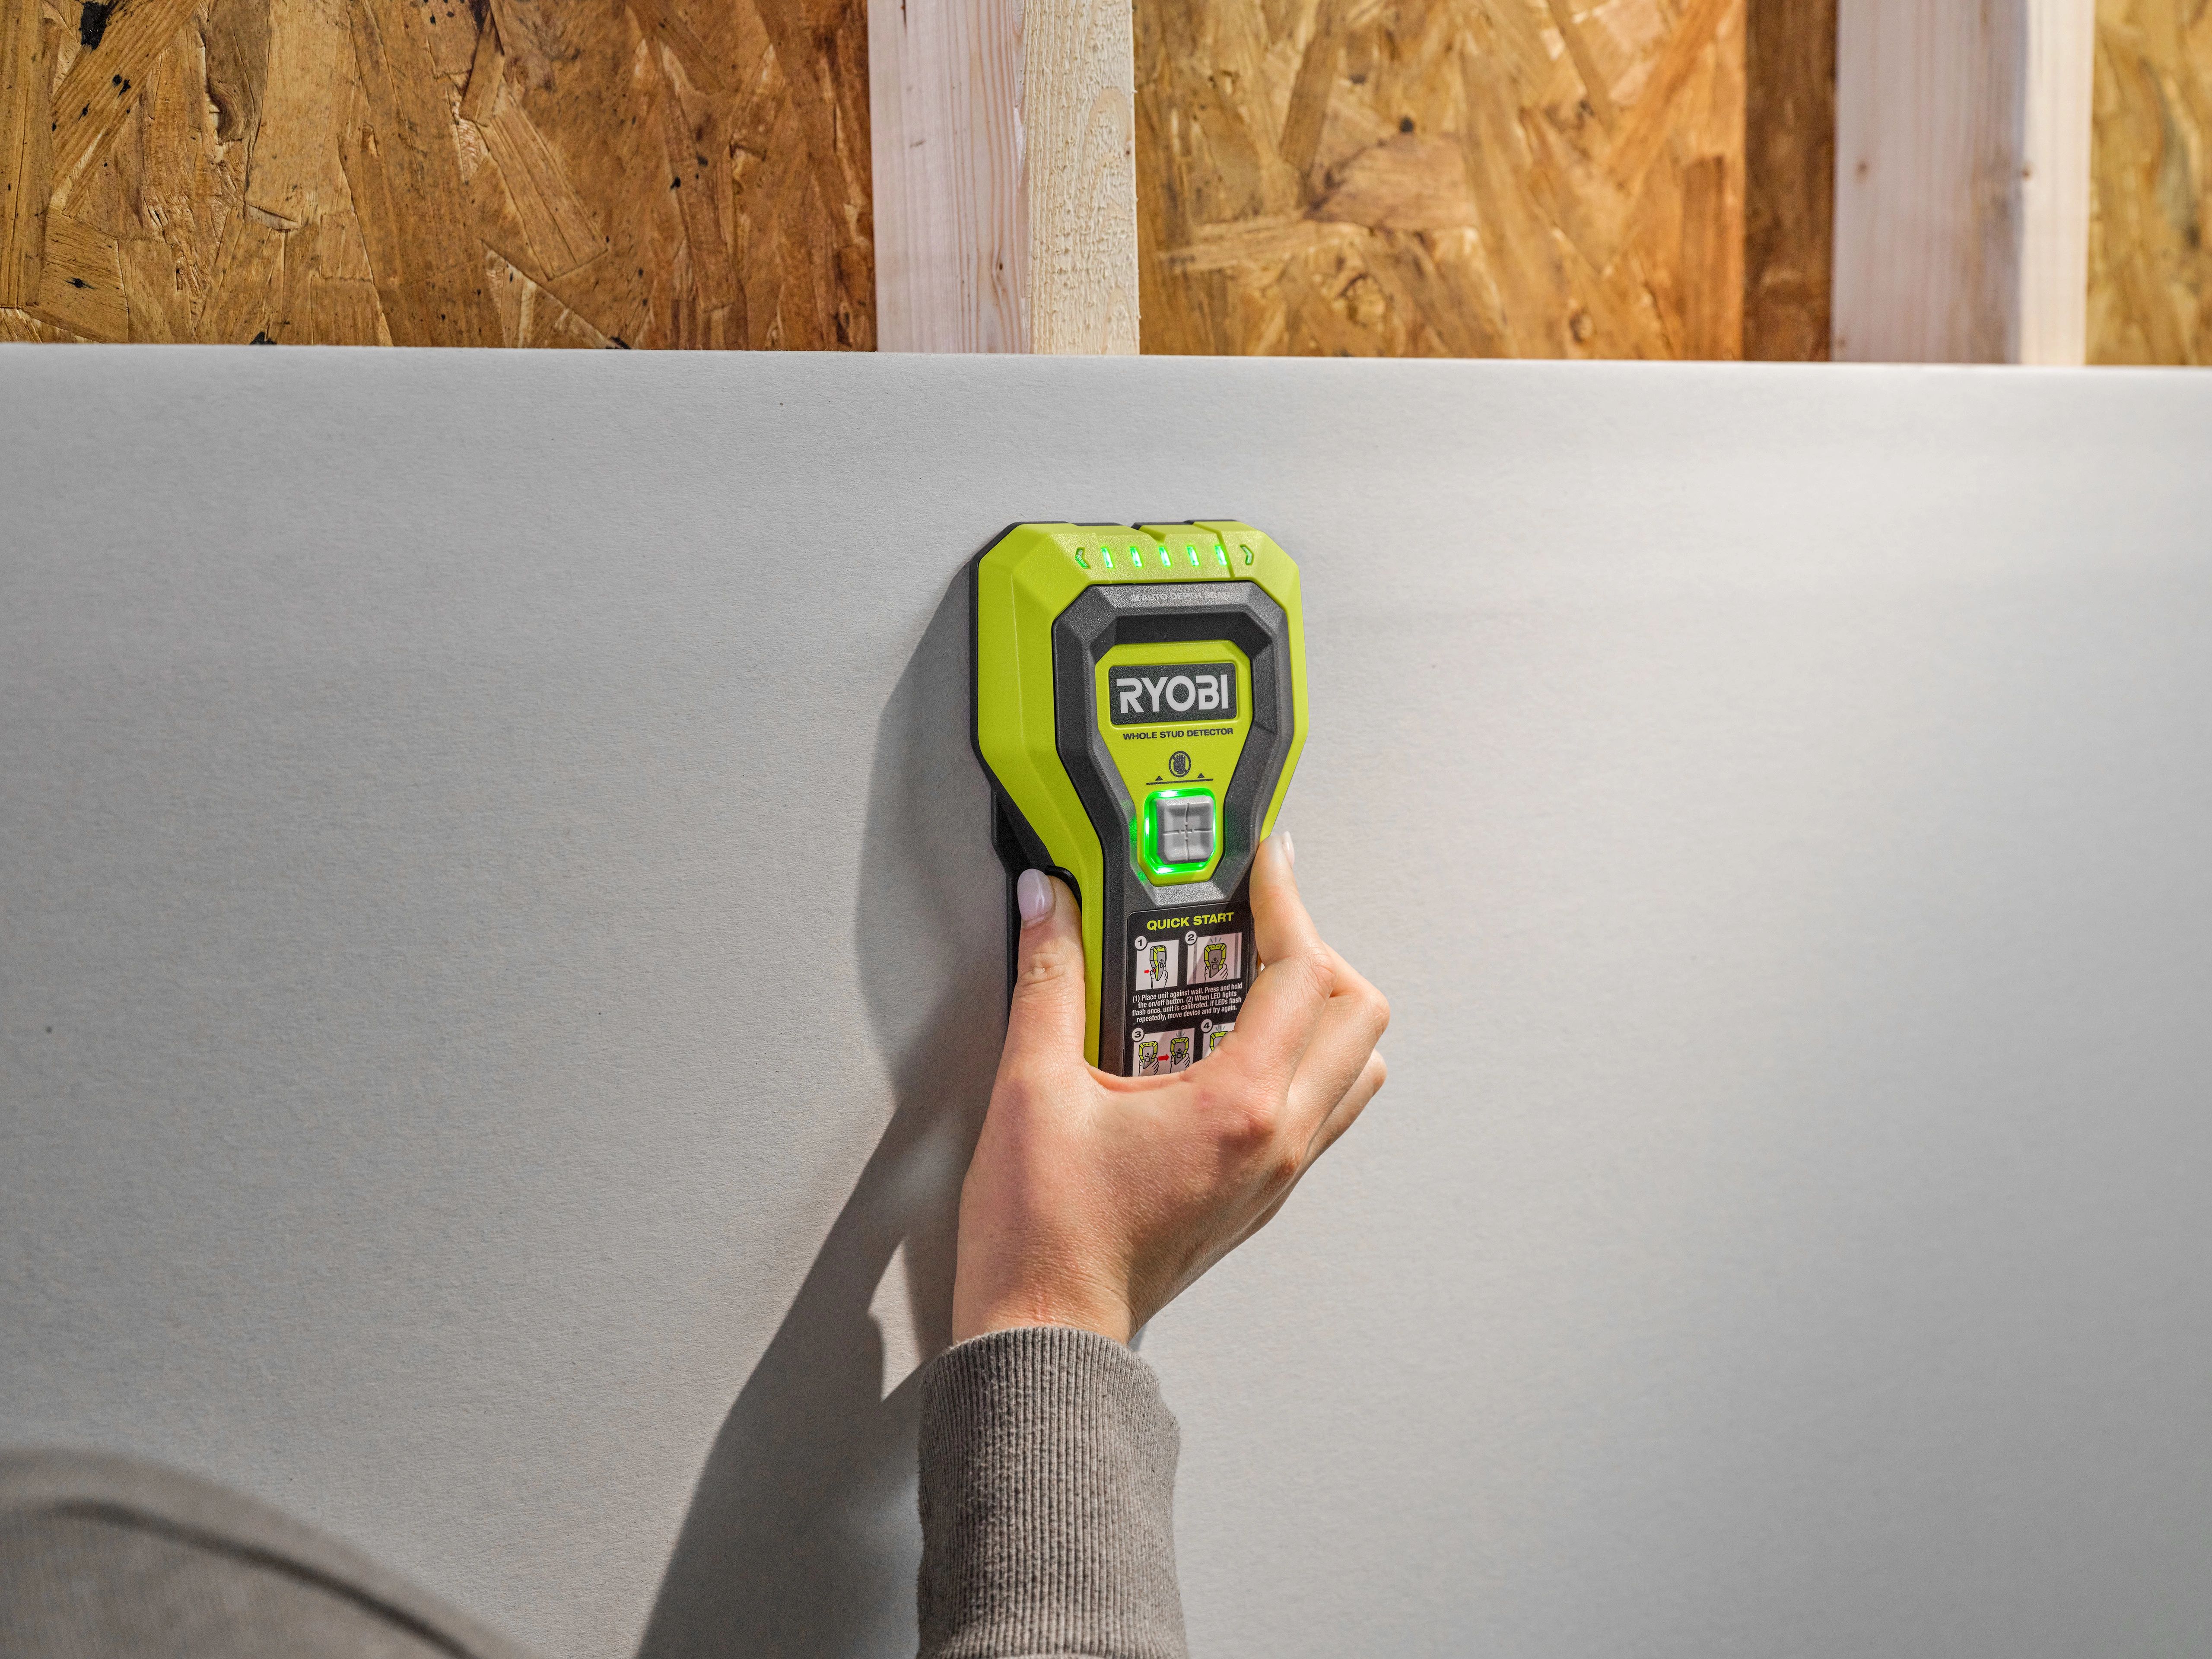
Credit: espanol.ryobitools.com
Proper Handling Techniques
Learn to use the Ryobi Stud Finder effectively by holding it flat against the wall. Slide it slowly until it detects a stud. Follow on-screen instructions for precise results, ensuring safe and accurate home improvement projects.
Using a Ryobi Stud Finder effectively requires understanding proper handling techniques. This ensures accurate results and a smooth process. Let’s dive into the essentials of handling your tool with confidence.Grip And Positioning
Maintaining the right grip on your Ryobi Stud Finder is crucial. Hold it firmly but not too tight, ensuring your hand remains steady. A relaxed grip helps avoid unnecessary movements that can lead to inaccurate readings. Positioning is just as important. Keep the tool flat against the wall, allowing the sensors to work optimally. Imagine trying to find a stud while holding the finder at an angle; it could lead to unreliable results. Always ensure the device is aligned straight and parallel to the floor for the best performance.Understanding Sensor Technology
The Ryobi Stud Finder is equipped with advanced sensor technology. This technology is designed to detect changes in density behind the wall. Understanding how it works can significantly improve your usage experience. As you slide the finder across the wall, pay attention to its signals. The device might beep or light up when it detects a stud. This is your cue to slow down and pinpoint the exact location. Have you ever rushed through a task only to miss crucial details? Taking your time here ensures you don’t miss the stud’s precise location. When you understand what your tool is telling you, you avoid unnecessary guesswork. This not only saves time but also minimizes mistakes. Are you ready to put these handling techniques into practice and experience the difference?Effective Usage Strategies
Effective usage of the Ryobi Stud Finder involves placing it flat against the wall. Move it slowly to detect studs. The indicator light will show when a stud is found, ensuring precise drilling or hanging tasks.
Finding the perfect way to use your Ryobi Stud Finder can save you time and ensure your projects are securely anchored. Whether you’re mounting a TV or hanging a shelf, understanding effective usage strategies can make all the difference. Let’s delve into some practical tips that will help you use your Ryobi Stud Finder like a pro.Finding Wall Studs
Begin by holding the Ryobi Stud Finder flat against the wall. Press the power button to calibrate it. Once you hear a beep, the device is ready to guide you to the studs. Move the stud finder slowly across the wall. Watch for the indicator light and listen for a beep, signaling you’ve found the edge of a stud. Mark this spot lightly with a pencil. Repeat this process to locate the other edge and find the center of the stud. Use this method to identify all necessary studs for your project. It’s crucial to ensure stability when hanging heavy items. Have you ever missed a stud and ended up with a crooked picture frame? This simple tool can help you avoid such mishaps.Avoiding Common Mistakes
One frequent mistake is moving the stud finder too quickly. If you rush, you might miss a stud or get a false reading. Slow and steady wins the race in this case. Another common issue is forgetting to calibrate. Each time you use the stud finder on a new section, recalibrate it to ensure accuracy. It might seem like a small step, but it prevents many potential errors. Avoid scanning near electrical outlets or switches. These areas might give false positives due to wiring. Always double-check these spots with another method, like tapping the wall to listen for a hollow sound. By paying attention to these details, you can use the Ryobi Stud Finder more effectively. Have you ever overlooked a simple step and faced unexpected challenges? These strategies can help you avoid such frustrations.
Credit: espanol.ryobitools.com
Advanced Tips And Tricks
Using a Ryobi Stud Finder can seem simple. But mastering advanced tips and tricks can enhance your experience. These techniques can uncover hidden objects and improve accuracy. This section will guide you through essential strategies. Perfect for both beginners and seasoned users. Let’s delve into these advanced tips.
Detecting Other Objects
Stud finders can detect more than just studs. They can also find pipes and wires. Switch to metal scanning mode to find metallic objects. This is useful in older homes. It helps avoid hitting pipes during installations. Always scan slowly to ensure accuracy. Listen for different signals indicating various materials. Practice helps distinguish between them. Use this feature to prevent unwanted surprises.
Improving Accuracy
Accuracy matters when using a stud finder. Start by calibrating the device on a flat surface. This ensures it functions correctly. Move the device slowly along the wall. A steady hand results in better readings. Avoid areas with heavy textures. They can affect the device’s performance. Always repeat scans to confirm findings. Multiple passes help verify the location of studs. Regular practice sharpens your skills and boosts confidence.
Maintenance And Care
Proper maintenance and care extend your Ryobi Stud Finder’s life. Regular checks ensure accurate readings and reliable performance. Focusing on cleaning and battery management keeps your device in top shape.
Cleaning The Device
Dust and debris can affect your stud finder’s performance. Wipe the device with a soft, dry cloth regularly. Avoid using water or cleaning solutions. Moisture can damage sensitive electronic parts. Check the sensor area often. Ensure it stays free of dirt or obstruction.
Battery Management
Battery life is crucial for consistent performance. Replace the battery when the device shows low power. Always use the recommended battery type for optimal function. Remove the battery if storing the device for long periods. This prevents battery leakage and device damage.

Credit: www.youtube.com
Troubleshooting Common Issues
Using a Ryobi Stud Finder can be straightforward, but sometimes, you might run into common issues that can disrupt your home improvement projects. Don’t let these hiccups slow you down. Whether you’re hanging a picture or installing a new shelf, understanding how to troubleshoot these problems will keep your project on track.
Resolving Calibration Errors
Calibration errors can be frustrating. You might be wondering why your stud finder isn’t detecting anything. Ensure that your device is properly calibrated before use. Hold the stud finder against the wall and press the button until it beeps. This reset allows it to adjust to the wall’s density.
If the calibration fails, check if the batteries are fresh. Low battery power can cause inaccuracies. Replace old batteries to restore the stud finder’s functionality. Have you ever thought a device was broken only to realize it needed a simple battery change? It happens more often than you think!
Handling Signal Interference
Signal interference can cause false readings. It’s like trying to hear someone in a crowded room—frustrating, right? Check for metallic objects or wiring inside the wall. These can confuse the sensor.
Move the stud finder slowly to minimize interference. Quick movements can disrupt the signal. Are you moving too fast because you’re impatient? Slow down, and you might find that elusive stud.
Sometimes, interference comes from nearby electronic devices. Turn off any devices that might be causing disruption. Imagine trying to listen to a podcast with background noise—clearing the air can make all the difference.
Remember, tools can sometimes be temperamental, but with these tips, you can tackle common issues with ease. What’s your go-to method for solving tech problems?
Frequently Asked Questions
How Do I Calibrate A Ryobi Stud Finder?
To calibrate a Ryobi stud finder, place it against the wall and press the power button. Wait for the calibration light to stay solid. This indicates the stud finder is ready to use. Ensure there are no obstructions for accurate calibration.
Why Is My Ryobi Stud Finder Beeping?
Your Ryobi stud finder beeps to indicate it has detected a stud or metal object. Ensure the surface is clear of any obstructions. If it continues beeping, recalibrate it and check for any interference from nearby objects or electrical wires.
Can Ryobi Stud Finder Detect Metal Pipes?
Yes, Ryobi stud finders can detect metal pipes within walls. They utilize advanced sensors to locate metal objects. When scanning, the stud finder will alert you to the presence of metal with a beep or light indicator. Always follow the manual for specific detection capabilities.
How Do I Change Battery In Ryobi Stud Finder?
To change the battery, locate the battery compartment on the back of the stud finder. Open it using a screwdriver if necessary. Remove the old battery and insert a new one, ensuring correct polarity. Close the compartment securely before using the stud finder again.
Conclusion
Mastering the Ryobi Stud Finder is quite simple with practice. Start by reading the manual thoroughly. Follow the steps to ensure correct usage. Always calibrate before scanning walls. This ensures accurate detection of studs. Keep the stud finder steady while scanning.
Move slowly to avoid errors. The lights and beeps guide your actions. They help find the stud locations. A helpful tool for home improvement projects. Make your tasks easier and safer. Improve your DIY skills with this handy device. With patience, you’ll achieve better results every time.