To tie an elastic bracelet without glue, use a simple overhand knot to secure the ends together. You can also use a surgeon’s knot for added security and durability.
Tying elastic bracelets without glue is a quick and easy process that ensures your bracelet stays intact without the mess of adhesive. Whether you’re making bracelets for yourself or as gifts for others, this method provides a reliable and hassle-free way to secure the elastic without using glue.
In the following sections, we’ll outline the step-by-step process for tying an elastic bracelet without glue, providing clear instructions for achieving a secure and professional-looking result.
Contents
- Introduction To Elastic Bracelets
- Essential Materials For Elastic Bracelet Making
- Measuring And Cutting The Elastic Cord
- Threading Beads Onto The Elastic Cord
- Knotting Techniques For Elastic Bracelets
- Finishing Touches Without Glue
- Testing The Durability Of The Knot
- Care And Maintenance Of Elastic Bracelets
- Troubleshooting Common Issues
- Creative Ideas And Variations
- Frequently Asked Questions
- Conclusion
Introduction To Elastic Bracelets
Crafting elastic bracelets without glue is easy. Start by tying a secure knot to hold the beads together tightly. Then, create a stylish accessory that fits comfortably on your wrist. Enjoy making these versatile bracelets hassle-free.
Elastic bracelets are trendy accessories that are easy to make and comfortable to wear. They are popular among all age groups due to their flexibility and versatility.
Benefits Of Elastic Bracelets
- Easy to put on and take off
- Fit various wrist sizes
- Comfortable for everyday wear
Common Challenges In Tying Elastic Bracelets
- Difficulty in securing knots
- Ensuring proper tension for durability
- Avoiding overstretching the elastic

Essential Materials For Elastic Bracelet Making
Creating elastic bracelets is a fun and rewarding craft that allows you to express your creativity. Before you get started, it’s important to gather the essential materials to ensure a smooth and enjoyable bracelet-making process.
From selecting the right elastic cord to gathering beads and tools, each component plays a crucial role in crafting beautiful and durable elastic bracelets.
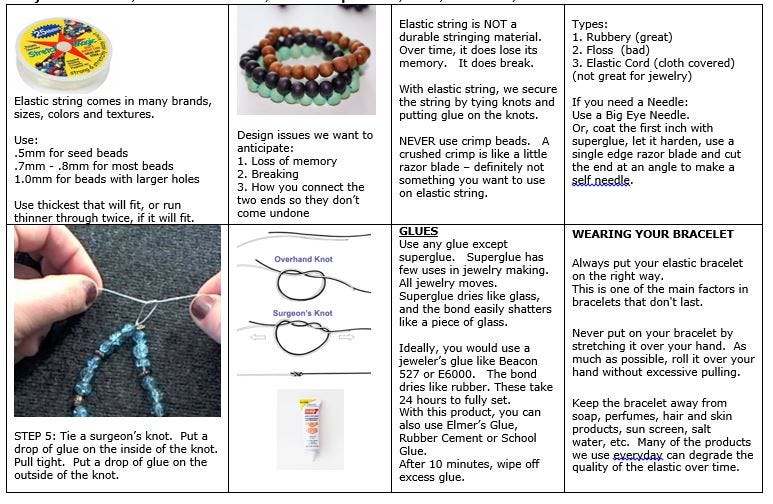
Selecting The Right Elastic Cord
When selecting the elastic cord for your bracelet, it’s important to choose a high-quality option that offers both flexibility and strength.
Look for elastic cord specifically designed for jewelry making, such as durable stretch cord or elastic beading cord that can withstand frequent wear and stretching without losing its elasticity.
Consider the thickness of the cord to ensure it can accommodate the size of your beads while maintaining its durability.
Gathering Beads And Tools
Before starting your bracelet-making project, gather an assortment of beads in various colors, shapes, and sizes to add visual interest to your designs.
Additionally, ensure you have the necessary tools on hand, such as scissors for cutting the elastic cord, and beading needles to assist with threading smaller beads onto the cord.
Organize your beads and tools in a well-lit and comfortable workspace to facilitate a smooth and enjoyable crafting experience.
Measuring And Cutting The Elastic Cord
To tie an elastic bracelet without using glue, start by measuring and cutting the elastic cord to the desired length. This ensures a snug fit on your wrist and allows for easy tying of the bracelet. Follow these steps for a secure and glue-free bracelet.
Determining Bracelet Size
Before you start cutting the elastic cord for your bracelet, it’s important to determine the appropriate bracelet size. This step ensures that your bracelet will fit comfortably on your wrist without being too loose or too tight.
Here’s a simple method to measure your wrist and determine the ideal bracelet size:
- Wrap a measuring tape or a piece of string around your wrist, just below the wrist bone.
- Note the measurement in inches or centimeters.
- Add an additional 0.5 to 1 inch (1.27 to 2.54 centimeters) to the measurement to allow for a comfortable fit.
- This final measurement will be the length of the elastic cord you’ll need for your bracelet.
Techniques For Cutting Elastic
Once you have determined the bracelet size, it’s time to cut the elastic cord. There are a few techniques you can use to ensure a clean and precise cut:
- Scissors: Using a sharp pair of scissors, cut the elastic cord straight across. Be sure to hold the cord firmly to prevent it from slipping or stretching while cutting.
- Hot Knife: If you have access to a hot knife, it can be a great tool for cutting elastic cord. The hot knife melts the cord as it cuts, sealing the ends to prevent fraying.
- Wire Cutters: For thicker or tougher elastic cord, wire cutters can provide a clean and precise cut. Place the cord between the blades of the wire cutters and squeeze firmly to cut through the cord.
Remember to measure twice and cut once to ensure you have the correct length of elastic cord for your bracelet. It’s always better to have a slightly longer cord than a shorter one, as you can easily trim off any excess later.
Threading Beads Onto The Elastic Cord
Pattern Design
Decide on your desired pattern before threading beads onto the elastic cord.
Securing The End While Beading
Use a piece of tape to secure the end of the elastic cord while adding beads.
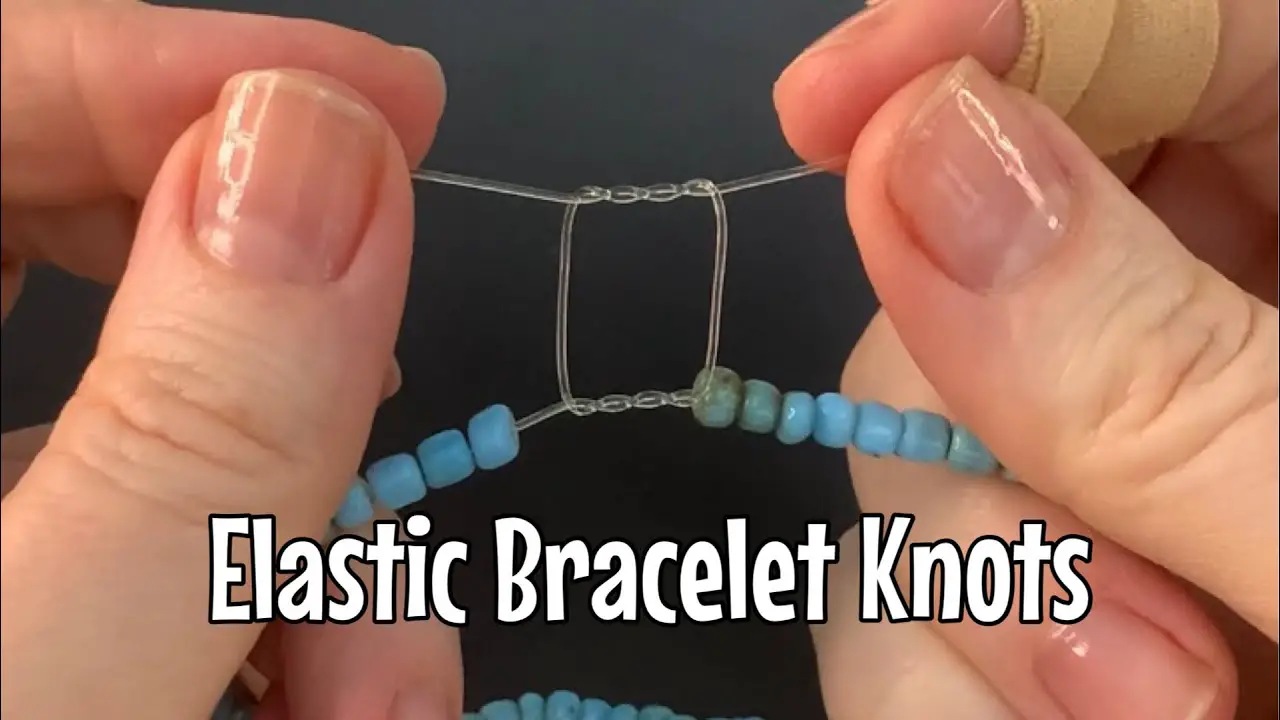
Knotting Techniques For Elastic Bracelets
Learn how to tie elastic bracelets without using glue by mastering essential knotting techniques. With simple steps and clear instructions, you can create secure and durable elastic bracelets that will withstand everyday wear.
Whether you’re a beginner or an experienced crafter, these knotting techniques will help you achieve professional-looking results for your elastic bracelets.
The Surgeon’s Knot
The Surgeon’s Knot is a popular knotting technique for tying elastic bracelets without glue. It is known for its strength and reliability, making it perfect for securing your bracelet and preventing it from coming undone.
To tie the Surgeon’s Knot, follow these simple steps:
- Start by overlapping the ends of the elastic cord, leaving a small loop at the end.
- Take one end of the cord and wrap it around the other end two times, creating a double loop.
- Pass the end of the cord through the loop you created in step 2.
- Hold onto both ends of the cord and pull them in opposite directions to tighten the knot.
- Repeat the process once more to ensure a secure knot.
The Surgeon’s Knot is a reliable choice when it comes to tying elastic bracelets without using glue. It creates a strong bond that will keep your bracelet securely in place.
The Weaver’s Knot
The Weaver’s Knot is another knotting technique that is commonly used for elastic bracelets. It is a simple yet effective way to secure your bracelet without the need for glue.
To tie the Weaver’s Knot, follow these steps:
- Overlap the ends of the elastic cord, leaving a small loop at the end.
- Take one end of the cord and wrap it around the other end, creating a single loop.
- Pass the end of the cord through the loop you created in step 2.
- Hold onto both ends of the cord and pull them in opposite directions to tighten the knot.
- Repeat the process once more to ensure a tight and secure knot.
The Weaver’s Knot is a simple yet effective way to tie elastic bracelets without glue. It provides a secure hold, ensuring that your bracelet stays in place.
Tips For Tight And Secure Knots
To ensure that your knots are tight and secure, follow these tips:
- Make sure to pull the ends of the cord firmly when tightening the knot.
- Double or triple knot your elastic cord for added security.
- Trim any excess cord after tying the knot to give your bracelet a clean finish.
- Test the strength of your knots by gently pulling on the bracelet to ensure it doesn’t come undone.
- Consider using a knot sealer or clear nail polish to secure the knots further.
By following these tips, you can ensure that your elastic bracelets are securely tied without the need for glue. Knotting techniques like the Surgeon’s Knot and the Weaver’s Knot, along with these tips, will help you create beautiful and durable bracelets that will withstand everyday wear.
Finishing Touches Without Glue
Achieve the perfect finishing touches for your elastic bracelet without the need for glue. Master the art of tying your bracelet securely and stylishly in place without any messy adhesive. Embrace a glue-free method that ensures both durability and easy customization.
When it comes to making elastic bracelets, it’s common to use glue to secure the knot and prevent it from coming undone. However, not everyone likes the idea of using glue on their jewelry.
Fortunately, there are ways to finish your elastic bracelet without glue. In this post, we’ll discuss two techniques that will help you achieve a secure and comfortable fit for your bracelet.
Hiding The Knot Within Beads
One way to finish your elastic bracelet without glue is to hide the knot within the beads. Here’s how you can do it:
- Thread your elastic through the beads as you normally would.
- Once you’ve reached the desired length, tie a double knot with the two ends of the elastic.
- Using a beading needle, thread one end of the elastic back through a few beads, making sure the knot is hidden inside.
- Repeat the same step with the other end of the elastic, making sure both ends are woven through the same beads.
- Trim any excess elastic and your bracelet is ready to wear!
This technique not only secures the knot but also creates a neat and professional finish to your bracelet.
Adjusting Bead Position For Comfort
Another way to finish your elastic bracelet without glue is to adjust the bead position for comfort. Sometimes, the knot can feel uncomfortable against your skin, especially if it’s located at the back of your wrist.
Here’s how you can avoid that:
- Thread your elastic through the beads as you normally would.
- Once you’ve reached the desired length, tie a double knot with the two ends of the elastic.
- Slide the knot to the side of the bracelet, away from your wrist.
- Using a beading needle, thread one end of the elastic back through a few beads, making sure the knot is still on the side of the bracelet.
- Repeat the same step with the other end of the elastic, making sure both ends are woven through the same beads.
- Trim any excess elastic and your bracelet is ready to wear!
This technique not only secures the knot but also ensures that your bracelet is comfortable to wear for long periods. In conclusion, finishing your elastic bracelet without glue is possible and easy to achieve.
By hiding the knot within the beads or adjusting the bead position for comfort, you can create a beautiful and secure bracelet that you’ll love to wear.
Testing The Durability Of The Knot
Test the durability of your knot when tying an elastic bracelet without glue. Ensure a secure fastening for long-lasting wear.
Stretch Test
When testing the durability of the knot on an elastic bracelet, it’s essential to perform a stretch test. Gently pull the bracelet from both ends to assess the strength of the knot. If the knot holds firmly without slipping or loosening, it indicates good durability.
Wear Test
Another crucial step in testing the durability of the knot is the wear test. Wear the bracelet throughout the day, engaging in various activities to simulate real-life conditions.
This will help determine if the knot remains secure and withstands everyday wear and tear. By conducting these tests, you can ensure that the elastic bracelet is securely tied without the need for glue, providing both durability and longevity.
Care And Maintenance Of Elastic Bracelets
Elastic bracelets are a stylish and versatile accessory, but they require proper care and maintenance to ensure longevity. By following simple guidelines for cleaning and storage, you can keep your elastic bracelets looking great for years to come.
Cleaning Guidelines
- Use a soft, damp cloth to gently wipe the surface of the elastic bracelet.
- Avoid using harsh chemicals or abrasive cleaners, as they can damage the elastic material.
- For stubborn stains, mix mild soap with water and dab the affected area with a soft cloth.
- After cleaning, air dry the bracelet completely before wearing it again.
Storage Tips
Proper storage is essential for preserving the elasticity and overall condition of your bracelets.
| Storage Tip | Description |
|---|---|
| Keep in a Jewelry Box | Store your elastic bracelets in a jewelry box to protect them from dust and moisture. |
| Avoid Overstretching | When not in use, avoid overstretching the bracelets to maintain their original shape. |
| Separate from Other Jewelry | Store each bracelet separately to prevent tangling and potential damage from other jewelry pieces. |
Troubleshooting Common Issues
Learn how to tie an elastic bracelet without using glue by following these simple steps. First, make sure you have enough elastic cord and tie a knot at one end.
Then, string the beads and tie another knot at the other end, making sure it’s tight. Finally, tie both ends together and trim the excess cord.
Loosening Knots
If you find that your elastic bracelet has loosened over time, you may need to re-tie the knot. To do this, follow these steps:
- Remove the old knot by gently pulling the elastic apart at the knot until it comes undone.
- Cut off the frayed ends of the elastic to ensure a clean tie.
- Re-string your beads onto the elastic, making sure to leave enough slack to tie the knot.
- Tie a tight double knot by pulling the elastic tightly and looping it over itself twice.
- Pull the knot tight and trim the excess elastic.
Frayed Elastic Fixes
If your elastic bracelet has become frayed, you can fix it without using glue. Follow these steps:
- Cut off the frayed end of the elastic.
- Thread a new piece of elastic through the beads, making sure it is long enough to tie into a knot.
- Tie a tight double knot by pulling the elastic tightly and looping it over itself twice.
- Pull the knot tight and trim the excess elastic.
By following these simple steps, you can fix common issues that may arise when tying elastic bracelets without glue. Whether your knot has come loose or your elastic has become frayed, you can easily re-tie your bracelet and continue to enjoy wearing it.
Creative Ideas And Variations
When it comes to making elastic bracelets without glue, there are plenty of creative ideas and variations you can explore. These techniques not only give you the flexibility to customize your bracelets but also allow you to experiment with different beads, colors, and styles.
In this section, we’ll explore two exciting ways to take your elastic bracelet game to the next level: mixing different beads and colors, and layering multiple bracelets.
Mixing Different Beads And Colors
One way to make your elastic bracelets stand out is by mixing different beads and colors. This technique allows you to create unique and eye-catching designs that reflect your personal style.
Here are some ideas to get you started:
- Combine beads of different sizes to add visual interest and texture to your bracelet.
- Experiment with a variety of bead shapes, such as round, faceted, or even geometric, to create a dynamic look.
- Play with contrasting colors to make your bracelet pop. For example, pair vibrant and bold beads with neutral tones for a striking contrast.
- Create a gradient effect by using beads in different shades of the same color.
Remember, the key is to let your creativity shine and have fun mixing and matching beads and colors to create a bracelet that truly reflects your unique style.
Layering Multiple Bracelets
If you’re looking to make a bold statement, consider layering multiple elastic bracelets. This technique allows you to create a stacked look that adds depth and dimension to your wrist.
Here are some tips to achieve a stylish layered effect:
- Start by selecting bracelets with different bead sizes and styles. This will create a visually appealing contrast.
- Mix and match bracelets in complementary colors to create a cohesive and harmonious look.
- Experiment with varying bracelet lengths to achieve a cascading effect.
- Consider adding a charm or a focal bead to one of the bracelets to create a focal point.
Layering multiple bracelets not only allows you to showcase your creativity but also gives you the opportunity to wear your favorite bracelets together, creating a unique and personalized statement piece.
Frequently Asked Questions
How To Tie The End Of A Bracelet Elastic?
To tie the end of a bracelet elastic, create a knot and secure it tightly. Trim any excess elastic for a neat finish.
How To Tie A Bracelet Knot That Won’t Come Undone?
To tie a bracelet knot that won’t come undone, use a square knot for security. Cross the left cord over the right, then tuck it under. Next, cross the right cord over the left, tuck it under, and pull tight.
What Is A Good Knot For Elastic Bracelet Cord?
A good knot for elastic bracelet cord is the surgeon’s knot. It is strong, secure, and easy to tie. Make a loop, then pass the end of the cord through twice before pulling tight. This knot will keep your bracelet from coming undone.
How To Tie A String For A Bracelet?
To tie a string for a bracelet, create a loop, thread ends through, and pull tight. Repeat for a secure knot.
Conclusion
Tying an elastic bracelet without glue is a simple yet creative way to make your own accessories. With just a few tools and techniques, you can create beautiful and unique bracelets that are perfect for any occasion.
Remember to choose the right type of elastic cord and to use the correct knot to ensure that your bracelet stays secure. With a little bit of practice, you’ll be able to make bracelets that are both fashionable and functional. So, go ahead and try it out for yourself!