To start a Dewalt generator, ensure it’s on a flat surface. Check fuel and oil levels to prevent damage before starting the generator.
Are you ready to power up your Dewalt generator? A key step is ensuring it’s on a level surface to prevent any potential mishaps. It’s crucial to also verify that the fuel and oil levels are adequate, as improper levels can lead to damaging the generator.
By following these simple steps, you can effectively kickstart your Dewalt generator and have it ready to provide you with reliable power whenever you need it.
Let’s delve deeper into the process of starting your Dewalt generator and explore some essential tips to keep it running smoothly.
Contents
Choosing The Right Location
When it comes to starting a Dewalt generator, choosing the right location is crucial to ensure safety and efficient operation. Before you start the generator, it’s important to consider environmental factors and ensure proper ventilation.
Consider Environmental Factors
Before starting your Dewalt generator, take into account the environmental factors that may affect its operation. Check the weather conditions to ensure that the generator will not be exposed to extreme temperatures or moisture.
Avoid placing it in direct sunlight or near water sources, as this can lead to malfunctions and potential hazards. Consider the noise level of the generator and make sure it will not cause disturbance to yourself or your neighbors.
Ensure Proper Ventilation
Proper ventilation is essential when starting a Dewalt generator. Choose a location with adequate airflow to prevent the buildup of exhaust gases. Avoid enclosed spaces or areas with limited ventilation as this can lead to carbon monoxide poisoning.
Position the generator at least 20 feet away from windows, doors, and vents to ensure that exhaust fumes do not enter your living or working space.

Checking The Fuel And Oil Levels
Before starting your Dewalt Generator, it’s crucial to check the fuel and oil levels to ensure proper operation.
Inspect Fuel Level
- Ensure there is adequate fuel in the tank to power the generator.
- Check visually the fuel gauge or use a dipstick to measure the fuel level accurately.
Check Oil Level
- Verify the oil level is sufficient for smooth generator function.
- Use the dipstick provided to check the oil level in the engine.
Preparing The Generator For Operation
Before you can power up your Dewalt Generator, it is crucial to properly prepare it for operation. This involves connecting necessary cords and grounding the generator to ensure safety and optimum performance.
In this guide, we will walk you through each step to help you get your generator up and running smoothly. Let’s dive in!
Connecting Necessary Cords
To begin, you need to gather the necessary cords and cables required for the generator’s operation. The most important cord you will need is a heavy-duty extension cord, specifically designed for generators.
This cord should have a rating matching the wattage of your Dewalt Generator, ensuring that it can handle the power output without any issues.
When connecting the extension cord, always make sure that both the generator and the device you are powering are turned off. Start by plugging one end of the cord into the generator’s output receptacle, ensuring it fits securely.
Then, connect the other end of the cord to the device you wish to power. Again, ensure a snug fit to prevent any loose connections that could lead to power interruptions.
Grounding The Generator
Grounding your generator is an essential safety step that should never be overlooked. Grounding helps prevent electrical shocks and reduces the risk of potential fire hazards.
To ground your Dewalt Generator, you will need a grounding rod, copper wire, and a grounding clamp specifically designed for generators.
Start by gently pushing the grounding rod into the ground, ensuring that it is firmly planted. Next, attach one end of the copper wire to the grounding clamp and the other end to the grounding point on the generator. Make sure the connections are secure; a loose connection can compromise the effectiveness of grounding.
Once you have connected the generator to the grounding rod, it’s crucial to test the grounding to ensure its effectiveness. You can use a multimeter or a grounding tester to check if there is a proper ground connection. This step is important for your safety and the longevity of your generator.
Congratulations! You have now successfully prepared your Dewalt Generator for operation. In the next section, we will guide you through the process of starting the generator and troubleshooting common issues that may arise. Stay tuned for more helpful tips and tricks!
Starting The Generator
To start a Dewalt Generator, begin by turning the fuel valve to the open position. Next, pull the recoil starter cord firmly to ignite the engine. Once the engine starts, adjust the choke lever accordingly to ensure smooth operation.
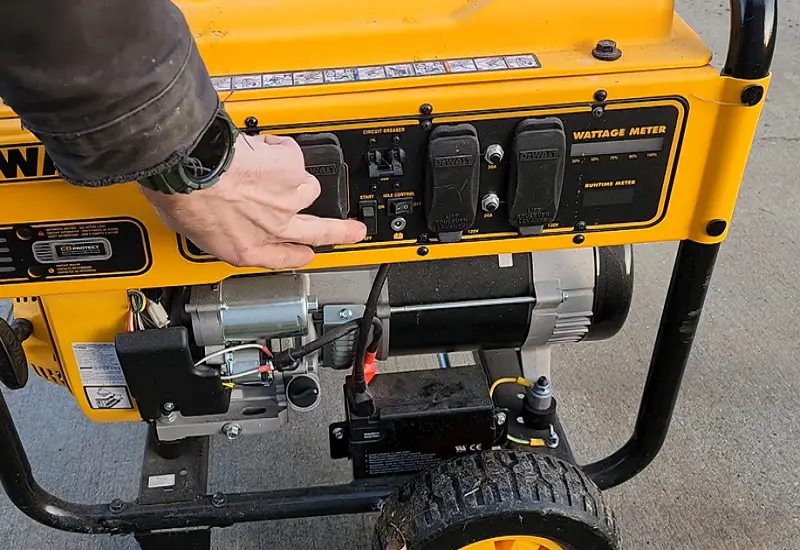
Activating The Ignition Switch
Starting your Dewalt generator is a simple process that requires a few easy steps. The first step is to activate the ignition switch. Locate the ignition switch on the control panel of your generator. It is usually marked with an “On/Off” label or a symbol resembling a key.
Once you have located the ignition switch, insert the key and turn it clockwise to the “On” position. This will provide power to the generator’s electrical system and prepare it for starting. It is important to ensure that the switch is securely in the “On” position before proceeding to the next step.
Pulling The Recoil Starter
With the ignition switch activated, it’s time to start the generator by pulling the recoil starter. Locate the recoil starter, which is usually located on the side of the generator’s engine. It is a rope or handle attached to a pulley system.
Before pulling the recoil starter, make sure you have a firm grip on the handle. Stand with your feet shoulder-width apart for stability. Pull the starter rope with a quick, smooth motion. You may need to give it a few more pulls if the generator doesn’t start on the first try.
Remember to release the recoil starter slowly to avoid any injury. Once the generator has started running, you can let go of the recoil starter and focus on the next steps, such as connecting any necessary appliances or equipment.
Summary:
- Locate the ignition switch on the control panel and turn it clockwise to the “On” position.
- Find the recoil starter on the side of the generator’s engine and grab the handle with a firm grip.
- Stand with your feet shoulder-width apart and pull the recoil starter with a quick, smooth motion.
- If the generator doesn’t start, give the starter rope a few more pulls.
- Once the generator starts, release the recoil starter slowly and let it run.
Monitoring And Troubleshooting
Dewalt generators are designed to provide reliable power for various applications. However, it’s important to properly monitor and troubleshoot the generator to ensure it functions effectively.
By observing for proper functioning and addressing common issues, you can ensure your Dewalt generator starts smoothly when you need it.
Observing For Proper Functioning
When starting a Dewalt generator, it’s essential to observe its functioning to ensure everything is in order. Here are a few key areas to monitor:
- Check the fuel level to ensure there is sufficient fuel for operation.
- Inspect the oil level and quality to ensure proper lubrication of the engine.
- Listen for any unusual noises or vibrations that may indicate a problem.
- Observe the exhaust for any smoke or unusual emissions.
Addressing Common Issues
Despite their reliability, Dewalt generators may encounter common issues that can be easily addressed. Here are some troubleshooting tips:
- Low Oil Shutdown: If the generator has a low oil shutdown feature and it fails to start, check the oil level and top it up if necessary.
- Dirty Air Filter: A clogged air filter can impede starting. Clean or replace the air filter as needed.
- Fuel System Issues: Check the fuel system for any clogs or contaminants that may be preventing proper fuel flow.
- Spark Plug Malfunction: Inspect and clean the spark plug, or replace it if necessary, to ensure proper ignition.
Shutting Down The Generator
When it comes to shutting down a Dewalt generator, it’s important to follow the proper steps to ensure safety and longevity of the equipment. Here’s how to gracefully power down your generator after use:
Turning Off Electrical Loads
Before shutting down the generator, make sure to turn off all electrical loads connected to it. This includes appliances, tools, and any other devices that are drawing power from the generator. Unplugging these devices helps prevent any potential damage or electrical hazards.
Letting The Generator Cool Down
Once all electrical loads are turned off, allow the generator to cool down for a few minutes before shutting it down completely. This step is crucial for the safety of the operator and also helps the generator to appropriately dissipate any heat built up during operation.
Maintenance Tips For Longevity
To start your Dewalt generator, follow these maintenance tips for longevity. First, ensure the fuel valve is open, choke is engaged, and the engine switch is set to the “On” position. Then, pull the recoil starter cord firmly until the engine starts.
Regular maintenance will help prolong the life of your generator. Maintenance Tips for Longevity To keep your Dewalt Generator running smoothly for a long time, regular maintenance is key. Proper care not only ensures optimal performance but also extends the lifespan of your generator.
Let’s delve into some essential maintenance tips for longevity.
Regular Oil and Filter Changes
- Change oil every 50 hours of use or as recommended by the manufacturer.
- Check oil levels before starting the generator each time.
- Replace the oil filter when changing the oil to prevent debris buildup.
- Use the recommended oil type for your specific Dewalt Generator model.
Cleaning and Storage
- Regularly clean the exterior of the generator to prevent dust accumulation.
- Ensure the exhaust vent is clear of obstructions to prevent overheating.
- Prior to storage, clean the generator and remove any dirt or debris.
- Store the generator in a dry, cool place away from moisture or extreme temperatures.
By following these maintenance tips, you can ensure your Dewalt Generator operates efficiently and lasts for years to come. Remember, proper care and regular upkeep are essential for longevity.
Frequently Asked Questions
How Do You Start A Generator Step By Step?
To start a generator:
1. Place it on a flat surface.
2. Turn the fuel valve on.
3. Pull the choke lever out.
4. Pull the starter cord.
5. Push the choke in once it starts.
How To Start A Generator That Has Been Sitting?
To start a generator that has been sitting, first, check fuel level and oil. Next, turn on fuel valve and choke.
Pull starter cord until engine starts. Let engine warm up before connecting appliances.
Do You Leave The Choke On The Generator?
No, you should turn off the choke once the generator is running smoothly. Leaving the choke on can cause engine damage.
Why Won’t My Generator Start?
Ensure the generator has fuel, check the spark plug, battery, and oil level. Clean any clogged fuel filters.
Conclusion
Starting a Dewalt generator is easy when following these simple steps. By understanding the process outlined in this guide, you can confidently power up your generator whenever needed.
Remember to prioritize safety and maintenance to ensure the longevity of your Dewalt generator.