Views: 0
Open the chuck fully, remove the left-hand screw, then spin the chuck off counterclockwise.
If you want a clear, no-stress guide on how to remove Makita drill chuck, you’re in the right place. I’ve swapped more chucks than I can count in shops, garages, and on job sites. In this guide, I’ll show you simple steps, real fixes, and pro tips so you can do it fast, safe, and without breaking parts.
Contents
- Safety and setup
- Tools you’ll need
- Identify your Makita chuck type
- Step-by-step: Remove a keyless Makita chuck
- Step-by-step: Remove a keyed Makita chuck
- Special cases: Hammer driver-drills, SDS adapters, and stubborn setups
- Troubleshooting a stuck chuck
- Reinstalling or upgrading your chuck
- Care tips to extend chuck life
- Real-world notes from the bench
- Frequently Asked Questions of how to remove makita drill chuck
- How do I know if my Makita chuck has a retaining screw?
- Which way do I turn the chuck to remove it?
- Can I use an impact driver to help with removal?
- What if I stripped the internal screw?
- Does this process work on all Makita drills?
- How often should I service or replace my chuck?
- Can I upgrade to a better keyless chuck?
- Why does my chuck keep loosening in hammer mode?
- Is thread locker needed on the retaining screw?
- Will this void my warranty?
- Conclusion
Safety and setup
Before you start, pull the battery or unplug the drill. This prevents surprise spins and saves fingers. Work on a clean bench with good light and a small tray for screws.
Keep the manual nearby if you have it. Makita has many models, and details can vary a bit. We’ll note those spots as we go so you can follow how to remove Makita drill chuck with confidence.

Tools you’ll need
You can do this with basic tools. A few extras help when things are stubborn.
- Hex key: A large hex key (6 mm or 8 mm, or 5/16 inch or 3/8 inch) to use as a lever inside the chuck.
- Screwdriver bits: Phillips, Torx, or flat, depending on the retaining screw inside the chuck.
- Rubber mallet: To give a quick tap to break the chuck loose.
- Penetrating oil: A drop or two helps on stuck threads.
- Vise or pipe wrench: For chucks that refuse to move.
- Safety gear: Glasses and gloves to protect your hands and eyes.
When folks ask how to remove Makita drill chuck, I always say start simple with this kit. Most jobs finish in minutes with these basics.
Identify your Makita chuck type
Makita uses a few chuck styles. Knowing yours saves time and guesswork.
- Keyless chuck: Most cordless Makita driver-drills use a keyless chuck. You twist by hand to open and close the jaws.
- Keyed chuck: Some corded models and older drills use a keyed chuck with a gear and a T-handle key.
- SDS or quick-change systems: Rotary hammers and some adapters use sleeves and clips, not threads.
The core steps for how to remove Makita drill chuck depend on whether there is an internal retaining screw and how the chuck mounts to the spindle. We’ll cover both common cases.

Step-by-step: Remove a keyless Makita chuck
This is the most common task I see. It’s fast if you follow a clear sequence. The key point in how to remove Makita drill chuck on keyless models is the left-hand screw inside and a firm spin to break the chuck free.
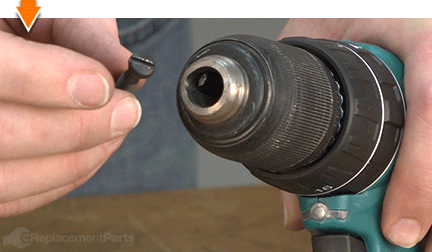
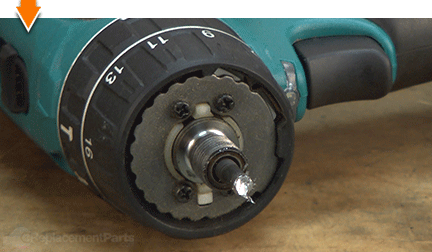
- Open the jaws all the way: Twist the chuck counterclockwise until you see the screw head inside.
- Remove the retaining screw: It’s almost always left-hand thread. Turn clockwise to loosen. Use the right bit (usually Phillips or Torx). If it slips, press hard and keep the bit square.
- Seat a hex key in the chuck: Close the jaws onto the short end of the hex key and tighten by hand. You want the long arm sticking out like a lever.
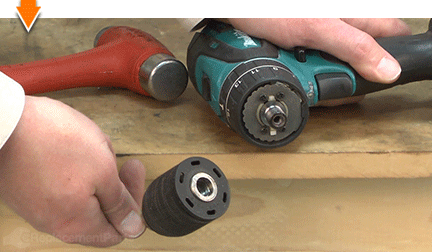
- Break the chuck free: Hold the drill on a bench. Give the hex key a sharp tap counterclockwise with a mallet. This shock breaks static friction.
- Spin the chuck off: Once loose, unscrew the chuck by hand counterclockwise until it’s off the spindle.
Pro tip from the field: If tapping does not work, set the drill to lowest speed and tighten the clutch. A quick blip of the motor with a firm grip on the hex key can help. Do this only if your hands are clear and the battery is low on speed. Safety first.
In many shops, this is the go-to way for how to remove Makita drill chuck on driver-drills, including popular XFD and XPH series.
Step-by-step: Remove a keyed Makita chuck
Keyed chucks use a similar mount but open and close with a key. The process is nearly the same.
- Open the jaws fully: Expose the screw deep inside the chuck.
- Remove the retaining screw: Again, most are left-hand thread. Turn clockwise to loosen. Add a drop of penetrating oil if needed.
- Lock the spindle if possible: Some Makita drills have a spindle lock or you can set the drill in low gear with high clutch to resist spin.
- Use a hex key or the chuck key body: Clamp a large hex key in the jaws or use the body of the chuck key as a lever.
- Strike counterclockwise: Tap with a mallet to break the thread loose, then unscrew the chuck by hand.
If you’re teaching someone else how to remove Makita drill chuck on a keyed model, stress the left-hand screw. Many folks try to turn it the wrong way the first time.

Special cases: Hammer driver-drills, SDS adapters, and stubborn setups
Hammer driver-drills can jam the chuck tighter due to impact mode. Turn hammer off before removal. If the chuck is extra tight, a vise saves your wrist.
- Use a vise: Wrap the chuck with a cloth. Clamp the chuck gently. Turn the drill body counterclockwise to break it loose.
- SDS or quick-change: If you have an SDS-plus adapter chuck, there may be a locking collar or snap ring. Pull back the sleeve, then slide the chuck off. Many are not threaded to the motor spindle.
In every odd case of how to remove Makita drill chuck, the idea stays the same: secure, release the lock or screw, and apply steady counterclockwise torque.

Troubleshooting a stuck chuck
Some chucks fight back. Here’s how I unstick the worst of them without damage.
- Screw will not budge: Remember it’s left-hand. Turn clockwise to loosen. Use fresh bits and press hard. Heat the screw head with a soldering iron for 20–30 seconds to soften thread locker.
- Chuck won’t break free: A longer hex key gives more leverage. A sharper mallet strike works better than brute force.
- Threads feel gritty: Clean the spindle with a nylon brush. Wipe and add a touch of oil before reinstall.
- Jaws won’t open: Turn the outer sleeve both ways while tapping the front with a plastic hammer. Add a tiny drop of oil to the jaws.
These are the common pain points people hit when learning how to remove Makita drill chuck on older or job-worn tools.
Reinstalling or upgrading your chuck
Putting the chuck back is simple, but alignment and thread care matter. A clean start prevents wobble.
- Clean and inspect: Wipe the spindle and check for nicks. Lightly oil the threads.
- Thread by hand first: Spin the chuck on counterclockwise to start, then tighten clockwise by hand. If you feel cross-threading, stop and restart.
- Secure it: Insert the retaining screw with a drop of medium thread locker. Tighten counterclockwise (left-hand thread) until snug.
- Check runout: Chuck a straight hex key or drill bit and spin by hand to check wobble. Reseat if needed.
Most 13 mm (1/2 inch) Makita driver-drill chucks use fine threads on the spindle. Models vary, so check your manual for the exact spec and torque. If you’re upgrading, choose a quality keyless chuck rated for your drill’s speed and torque. This closes the loop on how to remove Makita drill chuck and install a better one that holds bits true.

Care tips to extend chuck life
A little love keeps your chuck smooth and strong for years.
- Keep it clean: Blow out dust from the jaws and sleeve.
- Seat bits fully: Bottom the bit in the jaws and tighten evenly.
- Don’t overtighten: Let the clutch protect the chuck in tough jobs.
- Avoid grit: If you drop the drill, clean the chuck before the next use.
These habits reduce slip, wear, and the need to repeat how to remove Makita drill chuck sooner than you’d like.

Real-world notes from the bench
I’ve removed chucks on everything from a Makita XFD10 to an older corded 6408. The quickest wins come from using the right bit for that tiny retaining screw and a solid, confident strike on the hex key. The worst delays come from baby taps and the wrong direction on the left-hand screw.
One time on a tile job, an XPH model had a chuck that refused to move. A single wrap with a cloth in a vise, a drop of oil, and a clean counterclockwise twist on the body saved the day in seconds. When friends ask how to remove Makita drill chuck without stress, I always share that story: secure the work, commit to the move, and don’t overthink it.
Frequently Asked Questions of how to remove makita drill chuck
How do I know if my Makita chuck has a retaining screw?
Open the jaws all the way and look inside. If you see a screw head, remove it first, turning clockwise because it’s a left-hand thread.
Which way do I turn the chuck to remove it?
Almost always counterclockwise to remove the chuck from the spindle. The small retaining screw inside loosens clockwise.
Can I use an impact driver to help with removal?
You can use a short, controlled burst with the drill set to low speed while holding a hex key. Keep hands clear and avoid high impact; controlled taps are safer.
What if I stripped the internal screw?
Try a fresh, tight-fitting bit and press hard. If needed, use a screw extractor sized for small machine screws and apply gentle heat to soften thread locker.
Does this process work on all Makita drills?
It works on most driver-drills with threaded chucks. SDS and some quick-change systems are different, but the idea of unlocking and sliding off still applies.
How often should I service or replace my chuck?
Service when you feel slip, roughness, or wobble. Replace if jaws won’t hold bits tight or if you see obvious damage.
Can I upgrade to a better keyless chuck?
Yes, choose a high-quality keyless chuck sized for your spindle and rated for your drill’s torque and RPM. Check your manual for thread specs.
Why does my chuck keep loosening in hammer mode?
Hammering can shock the jaws loose if bits are not seated well. Turn off hammer when tightening and use good SDS tools for heavy masonry.
Is thread locker needed on the retaining screw?
A drop of medium thread locker helps hold the screw without making removal impossible. Avoid high-strength products.
Will this void my warranty?
Swapping a chuck usually does not, but damage from misuse might. Check your warranty terms and follow model-specific instructions.
Conclusion
You now know the simple, reliable method to remove and refit a Makita chuck: open the jaws, loosen the left-hand screw, and break the threads free with a firm, controlled move. With a few basic tools and the tips above, you can handle stuck parts, upgrade your chuck, and keep your drill running true.
Put these steps to work on your next project and save time at the bench. Want more tool care guides and fix-it tips? Subscribe for updates or drop a comment with your model number and we’ll help you troubleshoot.