To load nails in Ryobi Airstrike 18 Gauge, pull down the magazine release lever and slide the magazine out. Load the nails into the magazine and slide it back into place until it clicks.
If you’re working on a project that requires a lot of nailing, Ryobi Airstrike 18 Gauge is an excellent tool to have. It’s a cordless nailer that is easy to use and doesn’t require any gas or air to operate.
However, if you’re not familiar with how to load nails in Ryobi Airstrike 18 Gauge, it can be a bit confusing. We’ll explain how to load nails in Ryobi Airstrike 18 Gauge step by step, so you can get back to your project in no time.
Contents
Introduction To The Ryobi Airstrike 18 Gauge
To load nails in the Ryobi Airstrike 18 Gauge, first, ensure the tool is disconnected from the power source. Then, slide the magazine cover open, insert the nails, and close the cover securely. Reconnect the power and you’re ready to use the nailer.
The Convenience Of Cordless Nailing
Ryobi Airstrike 18 Gauge offers hassle-free nailing without cords, giving flexibility.
Key Features Of The Ryobi Airstrike
With a brushless motor, the Ryobi Airstrike provides efficient power for various nailing tasks.
Safety First: Preparing To Load Nails
To load nails in the Ryobi Airstrike 18 Gauge, prioritize safety first. Begin by disconnecting the tool from its power source and ensuring it’s not loaded. Then, load the nails carefully, following the manufacturer’s instructions to avoid accidents and ensure smooth operation.
Personal Protective Equipment
Ensuring The Tool Is Off
Safety First: Preparing to Load Nails Before loading nails into your Ryobi Airstrike 18 Gauge, wear proper personal protective equipment.
Personal Protective Equipment
Always wear safety goggles and work gloves to protect your eyes and hands.
Ensuring The Tool Is Off
Make sure the Ryobi Airstrike 18 Gauge is turned off before loading nails. When loading nails, avoid touching the trigger to prevent accidental firing.
Ensure the nail magazine is empty before loading a new strip of nails. Follow these steps to safely load nails into your Ryobi Airstrike 18 Gauge.
Identifying The Correct Nails
When it comes to loading nails into your Ryobi Airstrike 18 Gauge, it’s important to know which types and sizes of nails are compatible.
Using the wrong nails can cause damage to the tool and potentially harm the user. In this guide, we’ll discuss how to identify the correct nails for your Ryobi Airstrike.
Nail Types And Sizes
The Ryobi Airstrike 18 Gauge is designed to use 18 gauge brad nails. These nails are typically used for finish work such as trim, baseboards, and crown molding. They come in a variety of lengths ranging from 5/8 inch to 2 inches.
It’s important to note that the Ryobi Airstrike is not compatible with staples or pins. Using these types of fasteners can cause damage to the tool and potentially harm the user.
Compatibility With Ryobi Airstrike
When choosing nails for your Ryobi Airstrike, it’s important to ensure that they are compatible with the tool. The Airstrike is designed to work with 18 gauge brad nails from various manufacturers such as Bostitch, DeWalt, and Hitachi.
It’s important to check the packaging of the nails to ensure that they are compatible with the Ryobi Airstrike. Some brands may have nails that are slightly too large or too small for the tool.
How To Load Nails Into Your Ryobi Airstrike?
Once you have identified the correct nails for your Ryobi Airstrike, it’s time to load them into the tool. Here’s how:
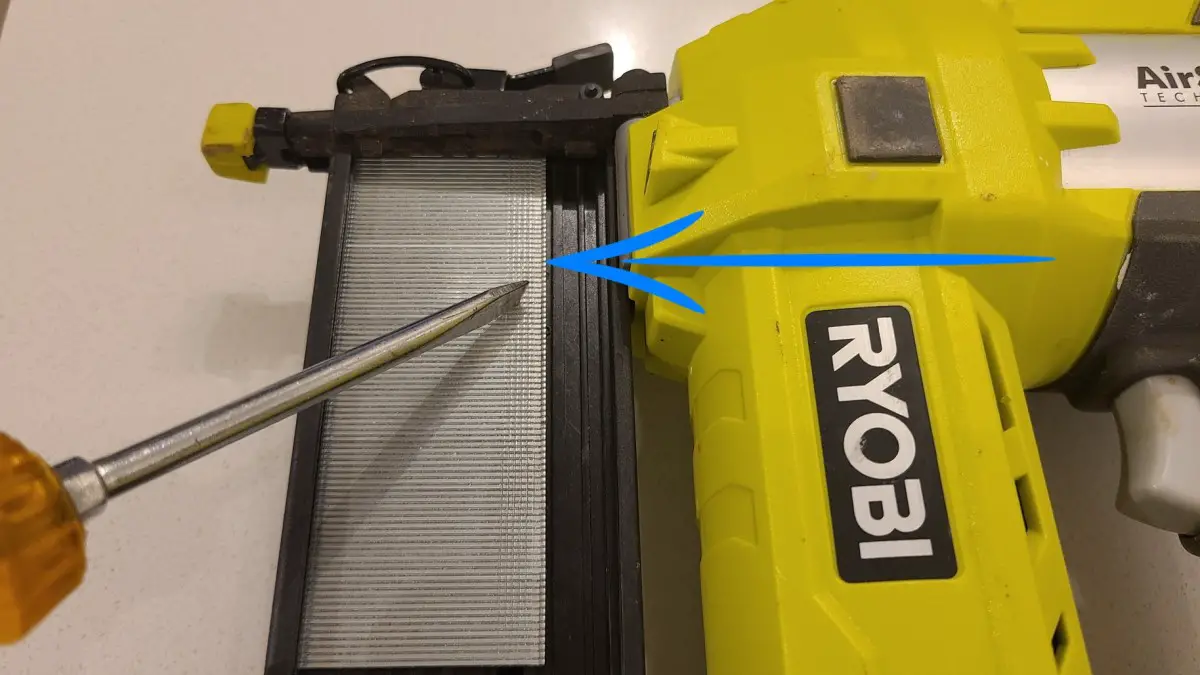
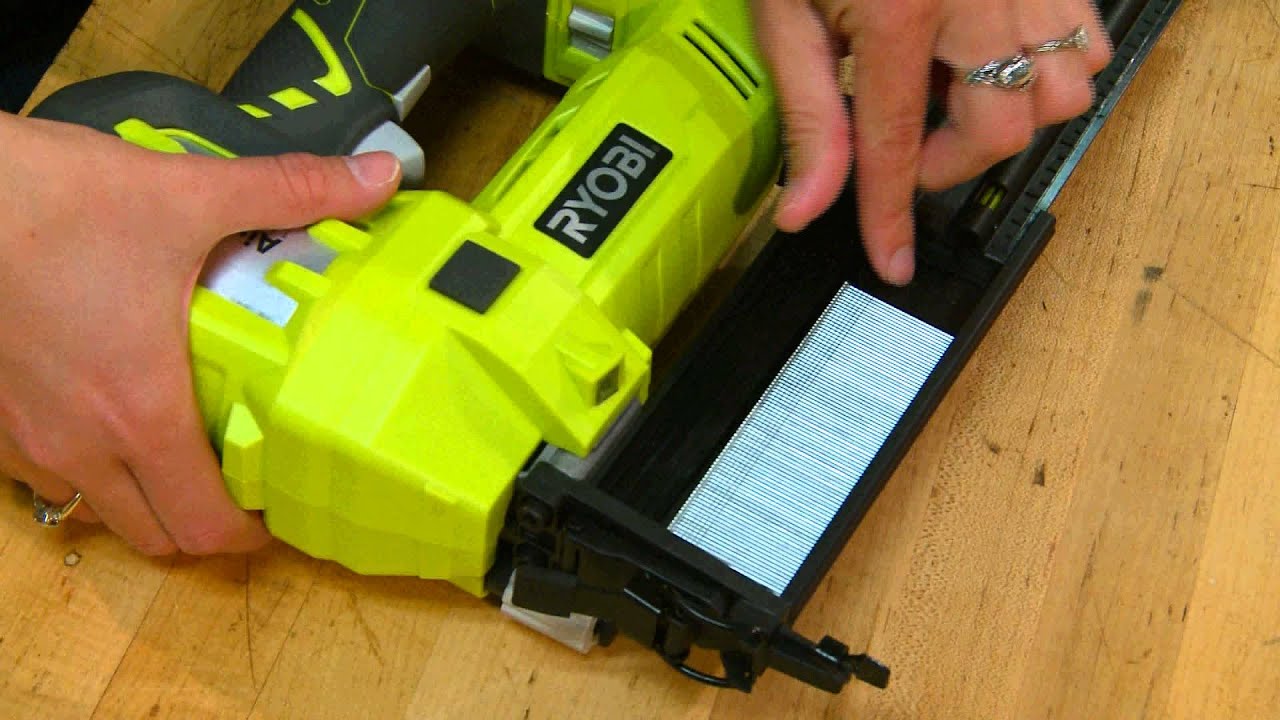
- Press the latch on the magazine to release it from the tool.
- Slide the magazine open and insert the nails into the channel. Be sure to load the nails with the pointed end facing down.
- Close the magazine and slide it back into the tool until it clicks into place.
- You’re now ready to use your Ryobi Airstrike with the correct nails!
It’s important to follow these steps carefully to ensure that the nails are loaded correctly and the tool operates safely.
By identifying the correct nails for your Ryobi Airstrike 18 Gauge and following the proper loading procedure, you can ensure that your tool operates safely and effectively.
Always check the packaging of the nails to ensure compatibility with the tool, and load them carefully to avoid any damage or injury.
Accessing The Magazine
Opening The Nailer
1. Ensure the nailer is turned off and disconnected from the power source.
2. Locate the magazine release lever usually located near the nose of the nailer.
3. Push the release lever to open the magazine for nail loading.
Understanding The Magazine Mechanism
1. The magazine is where the nails are loaded for the nailer to function.
2. Check for any existing nails or debris that may hinder the loading process.
3. Ensure the nails are aligned properly in the magazine for smooth operation.
Loading The Nails Properly
When it comes to using the Ryobi Airstrike 18 Gauge nailer, it’s essential to know how to load the nails properly. This ensures smooth operation and helps you get the job done efficiently. In this guide, we will walk you through the steps of inserting and securing the nails in place.
Inserting The Nails
Inserting the nails into the Ryobi Airstrike 18 Gauge nailer is a simple process. First, make sure the nailer is turned off and disconnected from the power source.
Then, pull back the magazine latch to open the nail magazine. Insert a strip of nails, ensuring they are aligned properly and facing the correct direction. Once the nails are loaded, close the magazine latch securely.
Securing The Nails In Place
Securing the nails in place is crucial for the nailer to function effectively. Once the nails are loaded, double-check to ensure they are held securely in the magazine.
Make sure to avoid overloading the magazine, as this can cause jams and affect the nailer’s performance. Always follow the manufacturer’s guidelines for the maximum nail capacity.

Closing The Magazine
Ensuring that the magazine of your Ryobi Airstrike 18 Gauge nailer is properly closed is crucial for efficient and safe operation. When closing the magazine, it’s important to ensure a snug fit and check for proper nail movement.
Ensuring A Snug Fit
When closing the magazine, make sure it snaps securely into place. An improperly closed magazine can result in nail jams and misfires, affecting the performance of the nailer. To guarantee a snug fit, apply firm but gentle pressure while closing the magazine.
Checking For Proper Nail Movement
After closing the magazine, visually inspect the nail track to ensure that the nails are properly aligned and free from obstructions.
This step is essential to prevent nail misfeeds and blockages during operation. Confirm that the nails move smoothly within the track by gently pushing them back and forth with your finger.
Ready To Fire: Testing The Nailer
Performing A Test Fire
Before putting the Ryobi Airstrike 18 Gauge Nailer to work, it’s crucial to ensure it’s operating smoothly. To perform a test fire, follow these simple steps:
- Insert the battery into the nailer, ensuring it’s fully charged.
- Load the nails into the magazine, making sure they are positioned correctly.
- Press the nose of the nailer firmly against the material to be nailed.
- Ensure the safety contact and trigger are engaged, then press the trigger to fire the nailer.
- Observe the nailer’s performance, ensuring the nails are driven in cleanly and effectively.
Troubleshooting Common Issues
If the test fire reveals any issues, here are some common troubleshooting steps to consider:
- Check the nailer for any jammed nails or debris, and clear them if found.
- Inspect the nail magazine for any misaligned or damaged nails, and adjust or replace them as needed.
- Verify that the battery is fully charged and properly inserted, as low power can affect the nailer’s performance.
- Ensure the air pressure is adequate if using the pneumatic version of the nailer, as insufficient pressure can lead to inconsistent firing.
- Check the depth adjustment dial to ensure the nails are being driven to the appropriate depth.
Maintenance And Care
Proper maintenance and care of your Ryobi Airstrike 18 Gauge nailer are essential to ensure its longevity and optimal performance. By following a few simple maintenance practices, you can keep your tool in top condition for years to come.
In this section, we’ll cover cleaning after use and regular maintenance tips to help you care for your Ryobi Airstrike nailer effectively.
Cleaning After Use
After each use, it’s important to clean the Ryobi Airstrike 18 Gauge nailer to prevent debris and dust from affecting its performance. Use a soft, dry cloth to wipe down the exterior of the nailer, removing any accumulated dirt or residue.
For stubborn debris, a mild detergent solution can be used to gently clean the tool, followed by thorough drying to prevent rust or corrosion.
Regular Maintenance Tips
- Inspecting for Wear: Regularly inspect the nailer for signs of wear and tear, paying close attention to the trigger, magazine, and safety mechanisms. Replace any worn or damaged components to maintain the tool’s reliability.
- Lubrication: Apply a few drops of lubricating oil to the moving parts of the nailer according to the manufacturer’s recommendations. This helps to ensure smooth operation and prevents premature wear.
- Air Filter Maintenance: Keep the nailer’s air filter clean and free from debris to maintain consistent airflow and prevent damage to internal components.
- Battery Care: If your Ryobi Airstrike nailer is battery-powered, ensure the battery is charged and stored properly to maximize its lifespan and maintain consistent power output.
Frequently Asked Questions
How To Load Nails Into Ryobi Airstrike?
To load nails into Ryobi Airstrike, slide the magazine cover back, insert nails, then release the cover.
How Do You Load An 18 Gauge Nail Gun?
To load an 18 gauge nail gun, follow these steps:
1. Disconnect the air supply and ensure the gun is not loaded.
2. Slide the magazine follower back and insert the nails.
3. Release the follower and ensure the nails are locked in place.
4. Reconnect the air supply and test fire the gun.
5. If the gun fails to fire, unload and repeat the process.
How Do You Put Nails In An Air Gun?
To load nails in an air gun, open the magazine, insert nails, and close the magazine securely.
How To Load A Ryobi Framing Nail Gun?
To load a Ryobi framing nail gun, first open the magazine door. Insert nails strip, close the door, and lock it. Release the pusher latch, slide it back, and load the nails.
Push the pusher latch forward until it locks. Your nail gun is now loaded and ready to use.
Conclusion
Mastering how to load nails in the Ryobi Airstrike 18 Gauge is key for efficient use. By following the simple steps outlined in this guide, you can ensure smooth operation of your nail gun. Proper loading technique will enhance your woodworking projects and make your DIY tasks a breeze.