Ever felt the frustration of trying to load nails into your Ryobi Airstrike 18 Gauge and just not getting it right? You’re not alone.
Whether you’re a seasoned DIY enthusiast or a beginner tackling your first project, knowing how to properly load your tool can make all the difference. Imagine the satisfaction of smoothly driving in nails without any hiccups or jams. It’s a simple skill that can save you time, effort, and a lot of headaches.
In this guide, you’ll discover the step-by-step process to master the art of loading nails in your Ryobi Airstrike. Get ready to enhance your project efficiency and enjoy a seamless nailing experience. Your next perfect finish awaits!
Credit: www.youtube.com
Contents
Understanding Ryobi Airstrike 18 Gauge
The Ryobi Airstrike 18 Gauge is a game-changer for DIY enthusiasts and professionals alike. With its cordless convenience and ease of use, it simplifies the task of nailing projects, making it a go-to tool for many. Whether you’re working on home improvement projects or crafting, understanding its features and benefits can elevate your work quality and efficiency.
Features Of The Airstrike
The Ryobi Airstrike boasts a plethora of features designed to make your nailing tasks hassle-free. It operates without the need for compressors or hoses, granting you more freedom to move around your workspace. The tool is powered by a lithium-ion battery, ensuring consistent performance without the worry of running out of air.
Another highlight is its adjustable depth control, which allows you to tailor the depth of your nails for different materials. This feature is essential for achieving a professional finish, whether you’re working on delicate trim or sturdy woodwork. The Airstrike also features a convenient LED light, illuminating your work area so you can see clearly, even in dim conditions.
Benefits Of Using Airstrike
Using the Ryobi Airstrike offers numerous advantages, especially if you’re aiming for efficiency and precision. The cordless design eliminates the need for bulky setups, allowing you to focus entirely on your project. You can easily switch from one task to another without the hassle of untangling cords or setting up equipment.
Additionally, the tool’s user-friendly design means even beginners can master it quickly. Imagine the satisfaction of completing your projects faster and with less effort—this tool makes it possible. Plus, the adjustable settings ensure that each nail goes in perfectly, giving you the confidence to tackle more complex projects.
Have you ever struggled with inconsistent nail depths or cumbersome equipment? The Ryobi Airstrike addresses these common frustrations with its innovative design. Consider how much smoother your DIY projects could be with this reliable tool. What projects could you finally complete with ease?
Safety Precautions
Ensuring safety involves wearing eye protection while loading nails into the Ryobi Airstrike 18 Gauge nailer. Keep fingers away from the firing area to prevent injury. Always disconnect the nailer from power before loading to avoid accidental discharge.
When using a powerful tool like the Ryobi Airstrike 18 Gauge, safety must be your top priority. Even if you’re experienced, it’s easy to overlook crucial safety steps in the excitement of starting a new project. Prioritizing safety precautions not only protects you but also ensures your tool functions optimally. Let’s dive into the essential measures to keep you safe and sound while loading nails into your Ryobi Airstrike.Essential Safety Gear
Before you even pick up your Ryobi Airstrike, ensure you’re wearing the right gear. Safety glasses are a must to protect your eyes from any flying debris or accidental nail discharges. Ear protection is equally important, especially if you’re working in a confined space where noise can be amplified. Consider wearing work gloves to get a better grip and protect your hands from any unintended slips. A sturdy pair of gloves can make a big difference if you accidentally brush against a sharp edge or misfire a nail. Have you ever overlooked wearing gloves, only to regret it later?Handling The Tool Safely
Always treat your Ryobi Airstrike as if it’s loaded and ready to fire. Keep your fingers away from the trigger until you’re absolutely ready to use it. This simple habit can prevent accidental firing and potential injuries. Before loading nails, ensure the tool is unplugged or the battery is removed. This step cannot be stressed enough; it’s a small action that can prevent major accidents. Are you someone who frequently skips this step due to impatience or distraction? Additionally, maintain a clean workspace free of clutter. A tidy area minimizes the chance of tripping over tools or materials, allowing you to focus solely on the task at hand. Do you often find yourself working in a chaotic environment, struggling to locate tools? By paying attention to these safety precautions, you’re not just protecting yourself but also ensuring that your Ryobi Airstrike operates smoothly and efficiently. Consider these steps a small investment in your well-being and project success. What are some other safety tips that you’ve found invaluable in your DIY projects?Gathering Necessary Supplies
Gathering the necessary supplies is crucial for loading nails in the Ryobi Airstrike 18 Gauge. Ensure you have the right nails and safety gear. Proper preparation ensures a smooth and efficient nailing process.
Gathering the right supplies is a crucial step in loading nails into your Ryobi Airstrike 18 Gauge. A well-prepared workspace ensures a smoother, more efficient process and reduces the chance of mid-task interruptions. Before you start, take a moment to check that you have everything you need at hand. This simple step can save you both time and frustration. ###Types Of Nails Required
Selecting the correct type of nails is vital for your project’s success. The Ryobi Airstrike 18 Gauge requires 18-gauge brad nails, which are perfect for delicate trim work, molding, and other finish carpentry. Ensure the length of the nails matches your project needs, typically ranging from 5/8-inch to 2-inch. Check the packaging to confirm compatibility with your tool. Misjudging nail size can lead to jams or damage. Avoid the hassle by double-checking before making a purchase. ###Additional Tools And Materials
You might think your Ryobi Airstrike and nails are all you need, but don’t overlook other essential tools. Having a pair of safety glasses is crucial to protect your eyes from debris. A small brush can be handy for cleaning the nail channel of dust or old nails. Consider using a small piece of wood for practice shots. This can help you adjust the depth settings without damaging your project material. Keep a set of pliers nearby in case you need to remove any misplaced nails. Have you ever started a project only to realize you’re missing a tool? Double-check your supplies to avoid this common pitfall. It’s amazing how a little preparation can keep your workflow smooth and stress-free.Preparing The Nail Gun
Loading nails into a Ryobi Airstrike 18 Gauge nail gun is straightforward. First, slide the magazine open and insert nails carefully. Ensure they’re aligned, then close the magazine securely for optimal performance.
Preparing your Ryobi Airstrike 18 Gauge nail gun for use is essential. Proper preparation ensures smooth operation and extends the tool’s life. Follow these simple steps to get your nail gun ready.Checking The Battery
Start by checking the battery. Ensure it is fully charged. A charged battery powers the nail gun effectively. Remove the battery from the charger. Insert it securely into the nail gun. Listen for a click. This confirms proper placement. A secure battery connection is vital. It prevents interruptions during use. A quick battery inspection saves time and frustration.Inspecting The Magazine
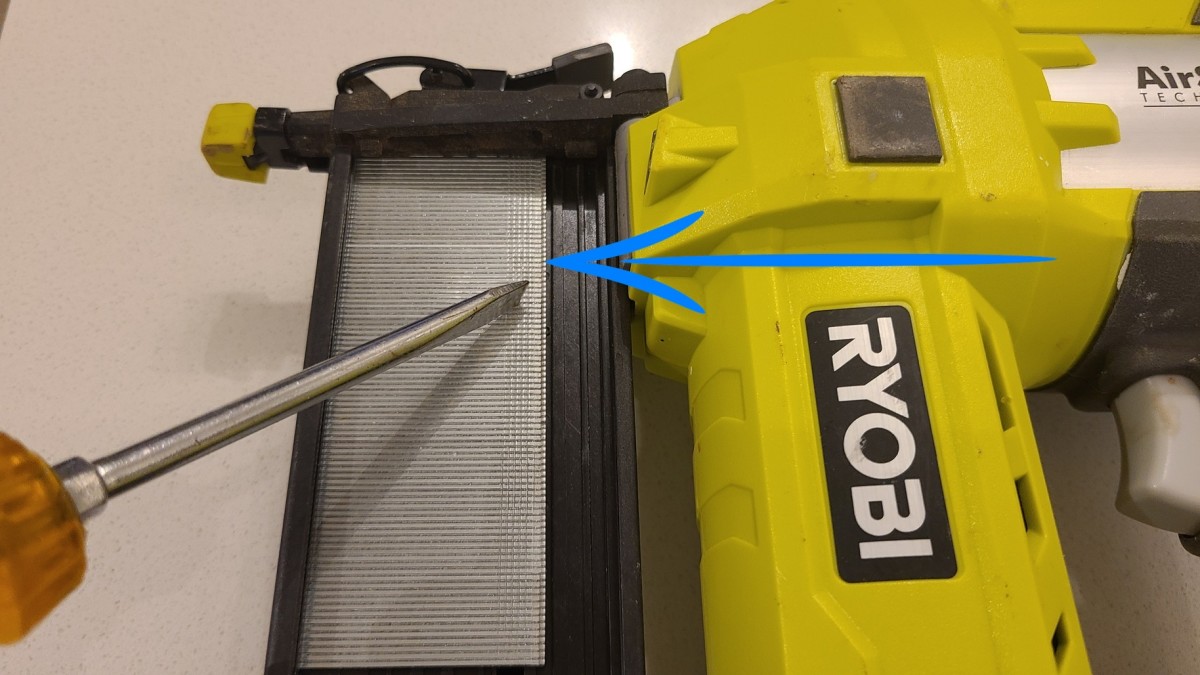
Next, inspect the magazine. Open it to check for obstructions. Remove any debris or old nails. Clear the magazine completely. Load new nails carefully. Ensure nails are aligned correctly. Proper alignment prevents jamming. The magazine should close smoothly. Double-check the closure. A secure magazine ensures efficient operation. Inspecting the magazine prevents issues during tasks.Loading Nails Into The Magazine
Loading nails into the Ryobi Airstrike 18 Gauge is simple. First, slide open the magazine. Insert nails with the points facing down. Close the magazine securely. Ensure everything is locked in place before using.
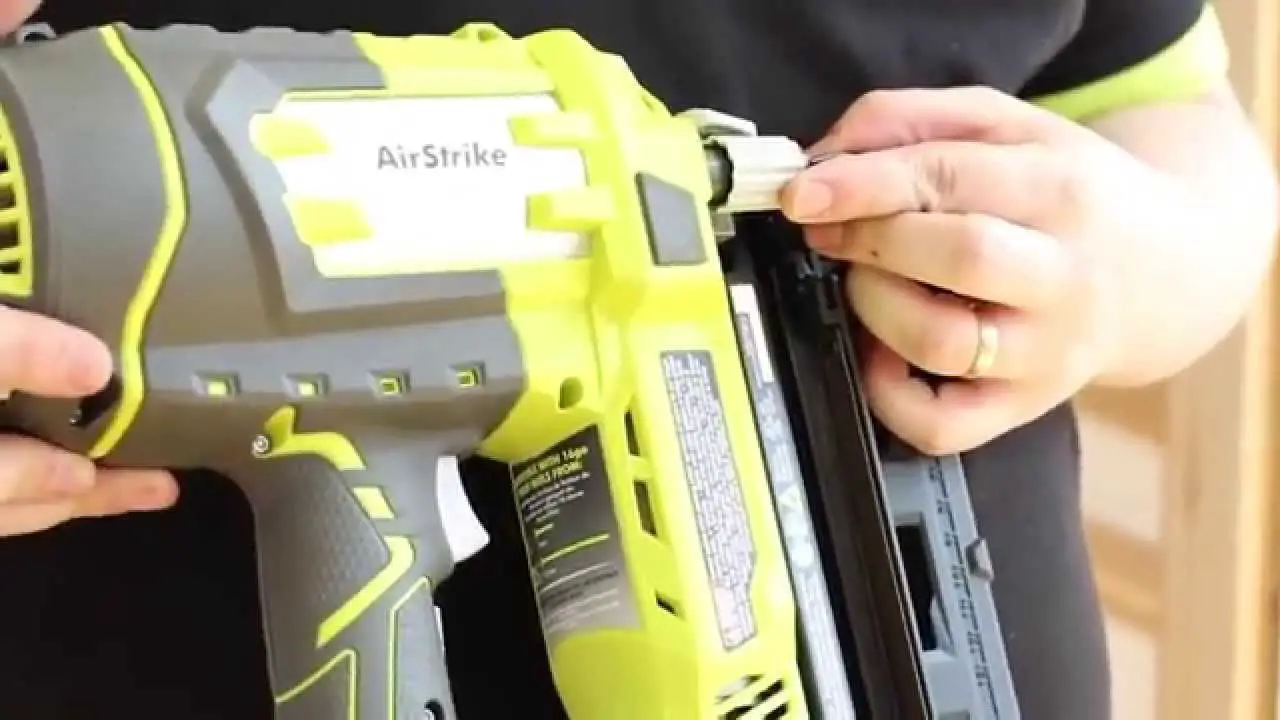
Loading nails into the magazine of your Ryobi Airstrike 18 Gauge is a crucial step to ensure seamless operation and precision in your projects. Whether you’re a seasoned DIY enthusiast or a curious beginner, mastering this step can save you time and frustration. Imagine the satisfaction of effortlessly firing nail after nail without a single jam. Ready to load those nails like a pro? Let’s dive in. ###Opening The Magazine
First, ensure your Ryobi Airstrike is turned off and disconnected from any power source. Safety first! Locate the magazine release latch on the side of the tool. Press the latch to open the magazine, revealing the track where nails are loaded. It’s a simple yet critical step—remember, your goal is precision and efficiency. ###Inserting The Nails Correctly
Now, let’s get those nails in. Align the strip of 18-gauge nails with the track inside the magazine. Ensure the pointed ends face outward. This is crucial to avoid any misfires. Slide the nails gently into the track. You should feel a slight resistance as they settle into place. Have you ever had a nail jam in the middle of a project? It’s frustrating and interrupts your workflow. By ensuring the nails are properly aligned, you minimize the risk of jams and keep your work on track. Once the nails are in place, close the magazine securely. A firm click should confirm it’s locked and ready for action. Take a moment to double-check everything is aligned perfectly. Doesn’t it feel empowering to know your tool is perfectly prepped? With these steps, you’re not just loading nails; you’re gearing up for success. Now, what project will you tackle next with your newfound skill?Securing The Magazine
Learn to load nails in the Ryobi Airstrike 18 Gauge with ease. Open the magazine, insert the nail strip, and slide it into place. Secure the magazine by closing it, ensuring proper alignment for smooth operation.
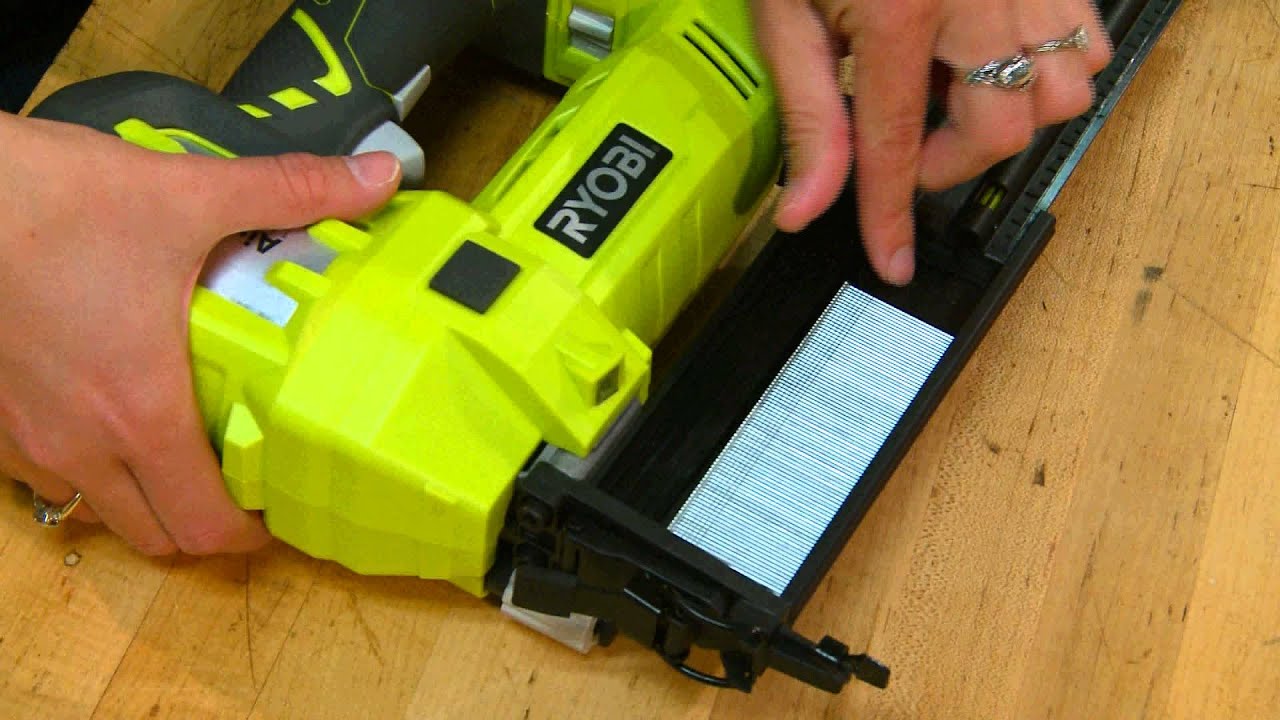
Securing the magazine in your Ryobi Airstrike 18 Gauge is a crucial step to ensure smooth and efficient operation. Imagine the frustration of a jammed nailer right in the middle of your project. To avoid such mishaps, mastering the art of properly securing the magazine is key. It’s not just about loading nails; it’s about ensuring every nail is ready to fire seamlessly. Let’s dive into how you can achieve this with confidence.Closing The Magazine Properly
Closing the magazine properly is essential to prevent nail jams and ensure consistent firing. Begin by sliding the magazine back into the nailer with a firm hand. Make sure it aligns perfectly without forcing it. A gentle click should confirm it’s in place. You might wonder, “What if it doesn’t click?” Don’t panic. Gently check the alignment and try again. A securely closed magazine is the foundation for hassle-free nailing.Ensuring The Nails Are Locked
Once the magazine is closed, your next step is ensuring the nails are locked. This is where attention to detail pays off. Look for any visible gaps between the nails and the magazine edges. If there’s a gap, they aren’t locked in. Adjust the nails slightly until they fit snugly. Think of it as a puzzle piece sliding into place—when it fits, you know it’s right. Have you ever experienced nails dropping out unexpectedly? That’s often because they weren’t locked properly. This simple check can save you time and frustration. In your experience, how often do you rush through loading nails? Taking a moment to secure them can make all the difference. A few extra seconds of care can ensure your Ryobi Airstrike performs like a charm every time you use it.Testing The Nail Gun
Loading nails in the Ryobi Airstrike 18 Gauge is simple. Open the magazine, insert nails, and close securely. Ensure nails align properly to prevent jams and ensure smooth operation.
Once you’ve successfully loaded nails into your Ryobi Airstrike 18 Gauge, it’s crucial to ensure everything is working correctly. Testing the nail gun is an essential step to make sure your projects turn out just right. Imagine the frustration of starting a project only to find out your nail gun isn’t firing properly. Let’s dive into the steps to verify and optimize the performance of your Ryobi Airstrike. ###Checking For Proper Functionality
First, confirm that your nail gun is functioning as expected. Plug in the battery and switch the power on. Press the safety tip against a scrap piece of wood, then pull the trigger. Did the nail fire smoothly? If not, check if the nails are loaded correctly and the magazine is securely closed. Sometimes, a simple adjustment can resolve minor hiccups. Inspect the nails that were fired. Are they straight, and did they penetrate the wood correctly? This quick check can save you a lot of headaches down the road. ###Adjusting Settings If Needed
Your Ryobi Airstrike might need a tweak here and there. Adjust the depth of the nail by using the depth adjustment wheel. This ensures nails are neither too shallow nor too deep. Test again to see if the adjustment improved the performance. A slight change can make a big difference in how cleanly the nails enter the material. Are you using the right pressure setting for your project? If the nails are not firing consistently, try adjusting the air pressure to get a smoother operation. Remember, every project is unique. What worked for one might not work for another. Always be open to making adjustments as needed. Does your nail gun still not work properly after adjustments? It might be time to consult the manual or reach out for professional assistance. By spending a few moments on these tests and adjustments, you ensure your projects run smoothly. You’re setting yourself up for success with a tool that’s ready to perform at its best.
Credit: ryobidealfinders.com
Troubleshooting Common Issues
Loading nails into a Ryobi Airstrike 18 Gauge can be simple. Open the magazine and insert nails until secure. Ensure they are aligned properly to prevent jamming.
Troubleshooting common issues with your Ryobi Airstrike 18 Gauge can save you time and frustration. Imagine this: you’re halfway through a project, and suddenly, your nailer stops working correctly. Knowing how to troubleshoot these problems can keep your workflow smooth and efficient. Understanding common issues and their solutions ensures that your projects don’t hit a snag.Dealing With Jams
Jamming is a frequent issue with nailers. To resolve this, first, disconnect your tool from the power source. Safety is key here, so make sure it’s not connected to the battery. Open the jam release on the tool. Check for any nails stuck inside. Clear them out with a pair of needle-nose pliers. Reinsert the nails correctly. Ensure they are aligned as per the guide. Misalignment often causes jams. After clearing, test the tool. Attach the battery and fire a few nails into a scrap piece of wood. Does it work smoothly now?Addressing Misfires
Misfires can be frustrating. They often happen when the nails aren’t loaded properly. Check the magazine to ensure nails are in the correct position. Inspect the air pressure. If the pressure is too low, it might not drive nails properly. Adjust the pressure to the recommended level indicated in the manual. Look at the nail size. If you’re using the wrong size, it can cause misfires. Stick to the 18-gauge nails for best results. If the problem persists, consider the condition of your tool. Is it clean and well-maintained? Regular maintenance can prevent many issues. Have you ever faced these issues with your nailer? What solutions worked for you? Engage in the comments below and share your experiences. Your insights might just help someone else in their DIY journey.Maintaining Your Nail Gun
Proper maintenance of your Ryobi Airstrike 18 Gauge nail gun is essential. This ensures it works efficiently and lasts longer. Regular upkeep prevents malfunctions and enhances performance. Let’s explore how you can maintain your tool.
Regular Cleaning Tips
Keep your nail gun clean to ensure smooth operation. Use a soft cloth to wipe dust and debris. Focus on the air vents and trigger area. Compressed air can help remove particles from tight spots. Avoid using water or harsh chemicals. They might damage the gun’s components. Regularly check for nail jams. Clear any obstructions you find.
Storage Recommendations
Store your nail gun in a dry, cool place. Humidity can cause rust on metal parts. Use a protective case to prevent dust accumulation. Keep the tool away from children. Ensure it’s stored with the safety lock engaged. This prevents accidental firing. Check the condition of the power source regularly. Replace batteries if necessary. Proper storage extends the life of your nail gun.
Credit: discover.hubpages.com
Frequently Asked Questions
How Do I Insert Nails In Ryobi Airstrike?
To insert nails in the Ryobi Airstrike, open the magazine by sliding the latch. Place the 18-gauge nails into the magazine with points facing downwards. Close the magazine securely and ensure it’s locked. Always check the nail size compatibility to avoid jamming or malfunction.
What Nail Size Is Compatible With Ryobi Airstrike?
The Ryobi Airstrike is compatible with 18-gauge nails ranging from 5/8 inch to 2 inches. Using the correct nail size ensures efficient operation. Check the nail packaging for compatibility. Always ensure that the nails are loaded properly to prevent any jams or tool damage.
Can I Use Brad Nails With Ryobi Airstrike?
Yes, the Ryobi Airstrike is specifically designed for 18-gauge brad nails. It accommodates a range from 5/8 inch to 2 inches. Ensure your brad nails are within this range for optimal performance. Always verify the brad nails’ compatibility to prevent any operational issues or jams.
Why Won’t My Ryobi Airstrike Load Nails?
If your Ryobi Airstrike won’t load nails, check for obstructions in the magazine. Ensure nails are the correct size and loaded correctly. Verify that the magazine latch is properly secured. Regularly clean the magazine to prevent build-up that could impede nail loading.
Conclusion
Loading nails into your Ryobi Airstrike 18 Gauge is simple. Follow the steps for safe and effective use. This tool enhances your projects with precision. Proper loading ensures smooth operation every time. Check your nails’ size for compatibility. Always handle the tool with care.
Keep your workspace organized and clutter-free. Regular maintenance prolongs its lifespan. Practice makes the process easier and faster. Embrace the convenience of cordless nailing. Enjoy efficient, hassle-free results with your Ryobi Airstrike. Happy building, and stay safe!