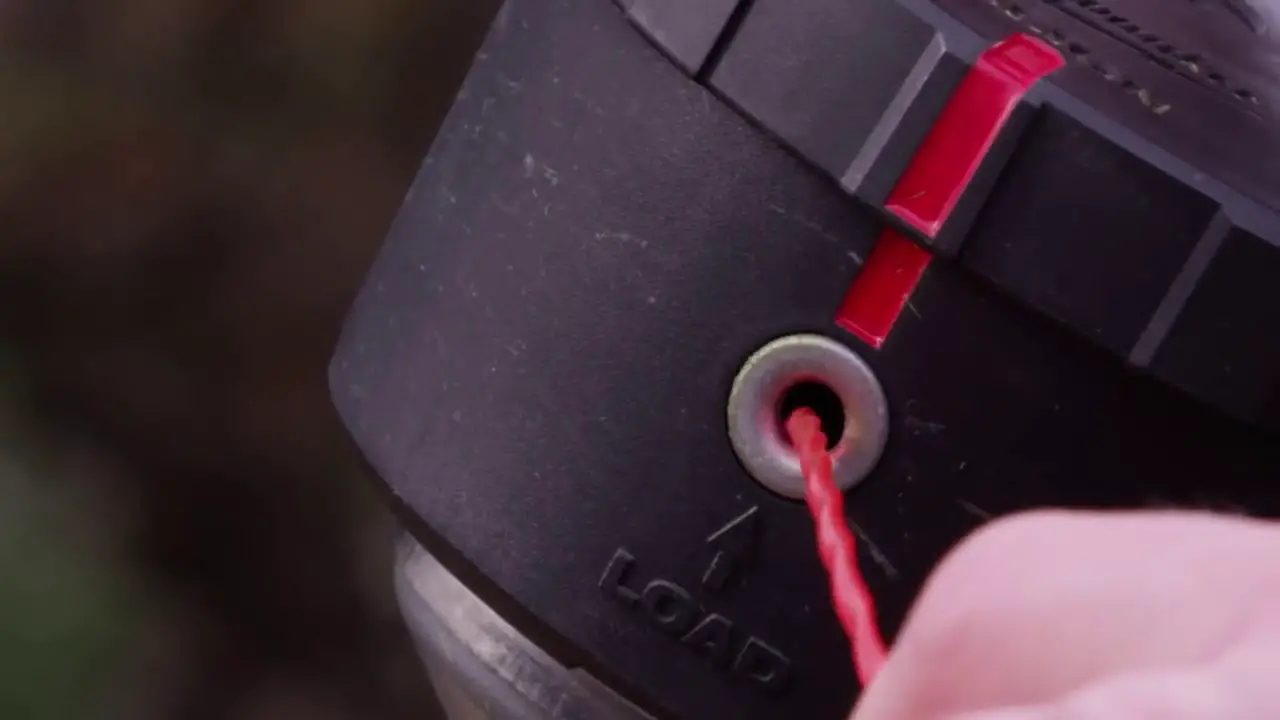
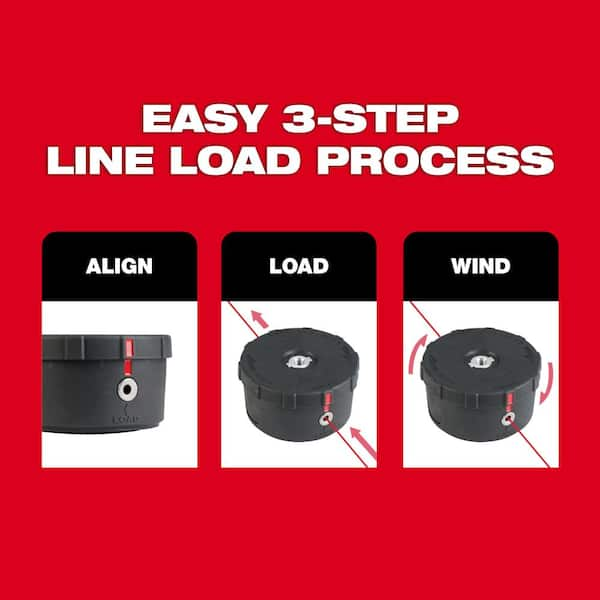
To load a Milwaukee string trimmer, insert the line through the trimmer head eyelets and wind it in the direction indicated on the spool. Push the line into the notches on the trimmer head until secure.
Maintaining your yard’s edges and trimming grass is essential for a well-kept lawn. With a Milwaukee string trimmer, you can easily tackle these tasks with efficiency and precision. Learning how to properly load the trimmer with new line is a crucial step in ensuring optimal performance.
In this guide, we will walk you through the simple process of loading a Milwaukee string trimmer, so you can get back to enjoying your beautifully manicured lawn in no time.
Contents
Understanding Milwaukee String Trimmer
To load a Milwaukee string trimmer, simply follow these steps: First, ensure the trimmer is off. Next, remove the spool cover and insert the line. Wind the line following the arrow direction, then replace the spool cover. Finally, trim any excess line for optimal performance.
Understanding Milwaukee String Trimmer The Milwaukee string trimmer is a versatile and powerful tool designed to keep your lawn and garden looking neat and well-maintained.
Whether you’re a seasoned professional or a DIY enthusiast, knowing how to properly load and use your Milwaukee string trimmer is essential for achieving the best results.
In this guide, we’ll walk you through the key components of a Milwaukee string trimmer and the different types available, so you can feel confident in using this essential gardening tool.
Parts Of Milwaukee String Trimmer
The Milwaukee string trimmer consists of several essential parts that work together to deliver efficient cutting and trimming performance. Here are the main components you should familiarize yourself with:
- Trimmer Head
- Guard
- Handle
- Trigger
- Battery
- Shaft
Types Of Milwaukee String Trimmer
Milwaukee offers a range of string trimmers to cater to different needs and preferences. Understanding the types available will help you choose the right trimmer for your specific requirements.
The main types of Milwaukee string trimmers include:
- Gas-powered string trimmers
- Battery-powered string trimmers
- Corded electric string trimmers
By familiarizing yourself with these different types, you can make an informed decision when selecting a Milwaukee string trimmer that suits your lawn care needs.
Preparing For Loading
Safety Precautions
Before loading the Milwaukee string trimmer, it’s crucial to prioritize safety to prevent any accidents or injuries.
Here are some essential safety precautions to consider:
- Wear protective gear such as gloves, goggles, and closed-toe shoes to shield yourself from debris and potential flying objects.
- Ensure the trimmer is turned off and the power source is disconnected before attempting to load the trimmer line.
- Inspect the trimmer for any damaged or worn-out parts, and make sure it’s in good working condition before proceeding.
- Work in a well-lit and ventilated area to enhance visibility and minimize exposure to fumes.
Checking The Line
Before loading the trimmer line, it’s essential to inspect and prepare the line for optimal performance.
Follow these steps to ensure the line is ready for loading:
- Examine the trimmer line for any signs of wear, fraying, or damage. Replace the line if it shows any of these issues to maintain efficient cutting performance.
- Ensure the trimmer line is compatible with the Milwaukee string trimmer model to guarantee a proper fit and operation.
- Clean the trimmer head and remove any debris or grass clippings to prevent clogging and ensure smooth line feeding during operation.
Loading The String
Loading the string on your Milwaukee string trimmer is a simple process that can help you maintain your yard with ease.
Properly loading the string will ensure that your trimmer operates efficiently and effectively.
Here’s a step-by-step guide on how to load the Milwaukee string trimmer, focusing on the subheading: Loading the String.
Removing The Spool
To begin loading the string on your Milwaukee string trimmer, you need to first remove the spool.
Follow these steps to remove the spool:
- Turn off the trimmer and disconnect it from the power source.
- Flip the trimmer upside down to access the spool.
- Press the tabs on the sides of the spool to release it from the trimmer.
- Gently pull the spool out of the trimmer.
Winding The Line
Once the spool is removed, you can begin winding the line.
Here’s how to wind the line onto the spool:
- Cut a length of string that is recommended for your trimmer.
- Insert the end of the string into the small hole in the spool.
- Wind the string evenly and tightly around the spool in the direction indicated by the arrow on the spool.
- Leave a few inches of string unwound to ensure it doesn’t come loose.
Replacing The Spool
Once the line is wound onto the spool, it’s time to replace the spool back into the trimmer.
Follow these steps to replace the spool:
- Insert the ends of the string into the notches on the trimmer.
- Place the spool back into the trimmer, ensuring it snaps securely into place.
- Feed the ends of the string through the trimmer head and pull them tight.
- Trim any excess string that extends beyond the trimmer head.
Adjusting The String Trimmer
Adjusting the string trimmer is an essential step to ensure efficient and effective trimming. Proper adjustment of the line length and angle can significantly impact the performance of your Milwaukee string trimmer.
In this section, we will discuss how to adjust the line length and angle for optimal results.
Adjusting The Line Length
To adjust the line length on your Milwaukee string trimmer, follow these simple steps:
- Turn off the trimmer and disconnect it from the power source for safety.
- Inspect the trimmer head to locate the line length adjustment mechanism.
- Using the provided tool or your hands, adjust the line length to the desired level. Ensure that both lines are of equal length for balanced trimming.
- Once the adjustment is complete, securely fasten the trimmer head back in place.
Adjusting The Line Angle
Properly adjusting the line angle can help you achieve precise and clean cuts. Here’s how to adjust the line angle on your Milwaukee string trimmer:
- Identify the line angle adjustment mechanism on the trimmer head.
- Loosen the adjustment knob or screw to allow for repositioning of the cutting line.
- Adjust the line angle according to your trimming needs, ensuring it is aligned for efficient cutting.
- Tighten the adjustment knob or screw to secure the line in the new position.
Tips And Tricks For Efficient Use
Discover expert tips and tricks for efficiently loading your Milwaukee string trimmer. Learn step-by-step techniques to streamline the process for maximum effectiveness and performance.
Master the art of loading your trimmer effortlessly for a seamless gardening experience. Milwaukee string trimmers are a great tool for keeping your lawn looking neat and tidy.
However, loading the trimmer line can be a bit tricky. In this blog post, we will cover some tips and tricks to help you efficiently load your Milwaukee string trimmer and avoid common mistakes.
Choosing The Right Line
Choosing the right line for your Milwaukee string trimmer is important for efficient use. The line you choose should match the diameter specified in your trimmer’s user manual. Using the wrong line can cause your trimmer to malfunction and may even damage your tool.
Avoiding Common Mistakes
When it comes to loading your Milwaukee string trimmer, there are a few common mistakes to avoid.
Here are some tips to help you avoid these mistakes:
- Always wear protective gloves when handling the trimmer line.
- Make sure to wind the line in the correct direction, as indicated by the arrows on the spool.
- Don’t overfill the spool with line, as this can cause it to tangle or jam.
- Keep the line taut as you wind it onto the spool to prevent overlapping and tangling.
- Make sure the line is loaded tightly onto the spool to prevent it from coming loose during use.
By following these tips and tricks, you can efficiently load your Milwaukee string trimmer and avoid common mistakes. Remember to always refer to your user manual for specific instructions on loading your trimmer’s line.

Maintenance And Care
Maintenance and care are essential for keeping your Milwaukee string trimmer in top working condition. By following a few simple steps, you can ensure that your trimmer stays in great shape for years to come.
In this section, we’ll cover the important aspects of maintenance and care, including cleaning the string trimmer and storing it properly.
Cleaning The String Trimmer
Proper cleaning of your Milwaukee string trimmer is crucial for its longevity and performance.
Follow these steps to keep your trimmer in top condition:
- After each use, remove any debris or grass clippings from the cutting head and guard.
- Use a soft brush to gently clean the exterior of the trimmer, removing any dirt or grass residue.
- Inspect the air filter and clean or replace it as needed to maintain proper airflow.
- Check for any loose or damaged parts, and tighten or replace them as necessary to prevent further damage.
Storing The String Trimmer
Proper storage is essential for protecting your Milwaukee string trimmer when it’s not in use.
Follow these tips to ensure your trimmer stays in great shape:
- Clean the trimmer thoroughly before storing it to prevent dirt and debris buildup.
- Store the trimmer in a dry, cool place away from direct sunlight and moisture to prevent rust and corrosion.
- Use a protective cover to shield the trimmer from dust and debris during storage.
- Keep the trimmer in a secure location to prevent accidental damage or theft.

Frequently Asked Questions
How Do You Reload A String Trimmer?
To reload a string trimmer, follow these steps:
1. Turn off the trimmer.
2. Remove the spool cover.
3. Take out the empty spool.
4. Wind the new trimmer line onto the spool.
5. Place the spool back in the trimmer.
6. Replace the spool cover.
Is Milwaukee String Trimmer Bump Feed?
Yes, Milwaukee string trimmer models feature a bump feed mechanism for easy line advancement during use.
How Do You Put String In A String Trimmer?
To put string in a string trimmer, follow these steps:
1. Turn off the trimmer and disconnect the power source.
2. Remove the trimmer head cover.
3. Insert and secure the new string following the trimmer’s specific instructions.
4. Reassemble the trimmer head cover.
5. Test the trimmer to ensure the string is properly installed.
Can I Use Any Line In Milwaukee String Trimmer?
Yes, you can use any line in a Milwaukee string trimmer as long as it fits the trimmer’s specifications.
Conclusion
To sum up, properly loading your Milwaukee string trimmer is essential for optimal performance.
By following the steps outlined in this guide, you can ensure that your trimmer operates efficiently and effectively.
Remember to refer back to this post whenever you need a refresher on loading your trimmer correctly.