
I’ve installed more Bosch dishwashers than I’ve had coffee-fueled Mondays, and that’s saying something. If you want a clean, quiet machine that hums like a library, you picked well. In this guide, I’ll show you how to install dishwasher Bosch models the right way, with pro tips, quick fixes, and a few laughs to keep your spirits up. By the end, you’ll know exactly how to install dishwasher Bosch the safe, correct, and stress-free way.
Source: www.youtube.com
Contents
- Tools And Parts You’ll Need
- Prep Your Kitchen And Space
- Electrical, Water, And Drain Basics For Bosch
- Step-By-Step Installation
- Level, Test, And Troubleshoot
- Safety, Codes, And Warranty Notes
- Maintenance Tips After Installation
- Frequently Asked Questions Of How To Install Dishwasher Bosch
- Wrap-Up And Next Steps
- Watch This Video on how to install dishwasher bosch
Tools And Parts You’ll Need
Before you start, do a quick inventory. Missing one small fitting can turn a 90-minute job into a four-hour saga.
- Adjustable wrench snugging nuts and fittings
- Phillips and flat screwdrivers driving screws and removing brackets
- Drill with bits for pilot holes and brackets
- Level making the machine sit flat so doors don’t drift
- Bucket and towels for the one time the hose misbehaves
- Teflon tape sealing threaded connections
- Pliers or channel locks gripping stubborn parts
- Appliance dolly optional, saves your back
- Voltage tester confirming power is off
- Hole saw only if you need a new cabinet pass-through
Common parts for Bosch installs:
- 3/8-inch dishwasher installation kit water supply line and fittings
- 3/4-inch garden hose adapter if your Bosch inlet needs it
- 90-degree elbow 3/4-inch to 3/8-inch, brass or stainless
- Air gap where required by local code
- Drain hose extension only if your run is long, check manual
- Mounting brackets top or side-mount, often included with Bosch
Pro tip: Lay everything out on a towel like a surgeon. It keeps small parts from rolling off, and you’ll feel fancy.
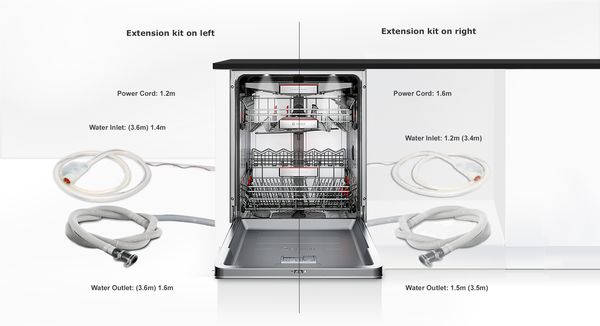
Source: www.bosch-home.com.sg
Prep Your Kitchen And Space
Measure twice, shove once. Bosch dishwashers typically fit a 24-inch wide opening with a 34 to 35-inch height under the counter.
- Check opening width, height, and depth account for door thickness and handle
- Ensure a nearby hot water shutoff valve under sink is accessible
- Confirm a grounded 120V, 60Hz outlet or hardwire option per your model
- Clear the path from the door to the cabinet bay
- Remove the old dishwasher if replacing it, cap water line, and plug drain temporarily
If you have a flooring lip in front of the cavity, measure toe-kick depth and clearance. You may need to raise the rear feet so you can slide it in without scraping. Ask me how I learned that. Yes, it involved a new toe kick.
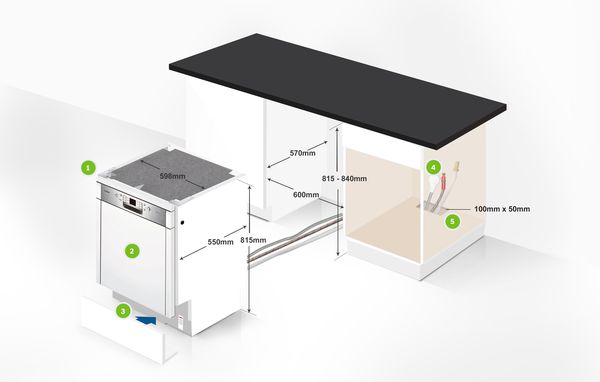
Source: www.bosch-home.com.sg
Electrical, Water, And Drain Basics For Bosch
Bosch designs are efficient and quiet, but they like neat hookups.
- Electrical: Most Bosch models use a 15-amp dedicated circuit. If your model has a cord, use a grounded outlet within the adjacent cabinet. If hardwiring, follow the junction box instructions. Always cut power at the breaker and confirm with a voltage tester.
- Water: Use hot water, ideally 120 to 140°F. Connect a 3/8-inch supply line to a 90-degree elbow at the dishwasher inlet. Wrap threads with Teflon tape. Open the valve slowly when testing.
- Drain: Your drain hose should run up high and connect to a disposal or sink tailpiece. Use a high loop at the underside of the countertop or an air gap if required by your local code. Many regions require an air gap. Check the rules before you start.
From experience, 80% of leaks come from over-tightening or cross-threading. Hand-tight plus a small snug with a wrench is often enough.
Source: www.youtube.com
Step-By-Step Installation
Follow these steps and you’ll be loading plates by dinner.
- Kill the power and water. Turn off the breaker. Close the hot water shutoff valve under the sink. Test both.
- Attach the elbow. Lay the dishwasher on its back with a blanket under it. Install the 90-degree elbow at the inlet valve. Wrap threads with Teflon tape. Tighten snug.
- Connect the water line. Thread the 3/8-inch supply line onto the elbow. Hand-tight, then a gentle wrench snug.
- Prep the drain hose. Attach the factory drain hose to your disposal or sink tailpiece. If using a disposal, knock out the plug first. Secure with a clamp. Add the high loop or air gap now.
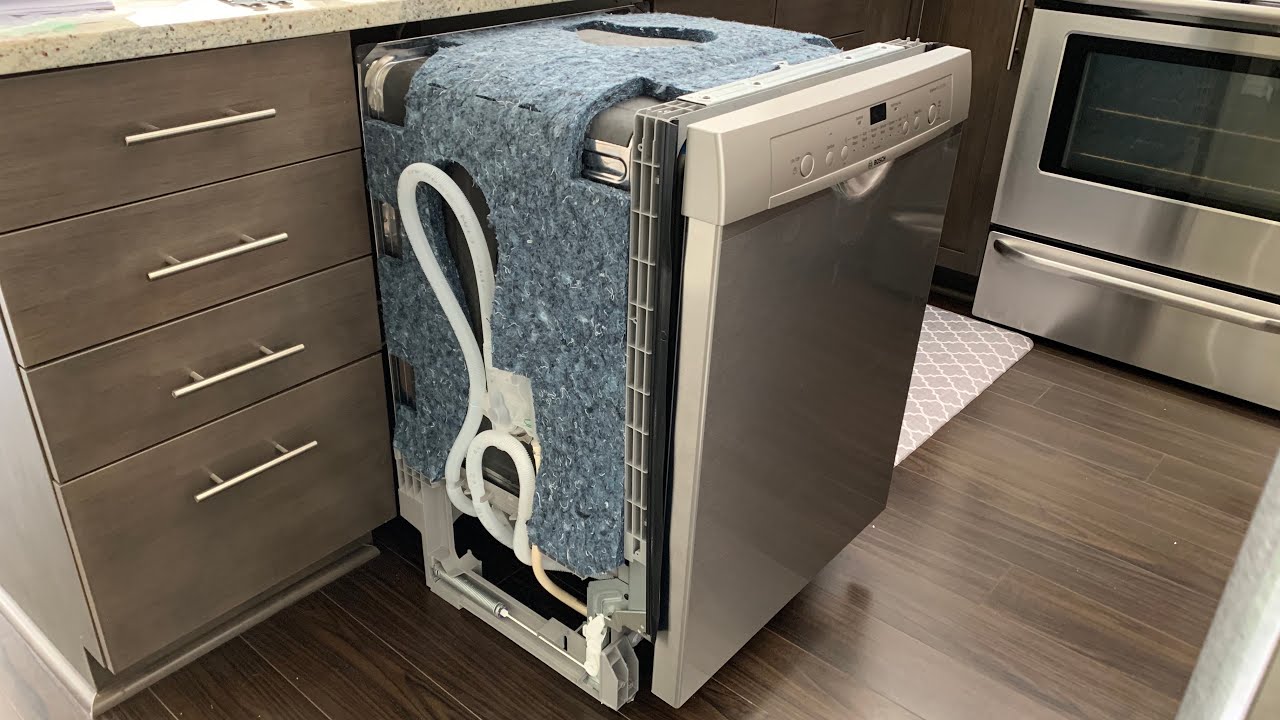
- Run lines through. Feed the water line, drain hose, and cord or wires through the side cabinet holes. Smooth edges help. Add grommets if needed.
- Slide the dishwasher in. Gently ease it into the opening. Guide the lines so they don’t kink or crush. Keep the unit a few inches out for adjustments.
- Level it. Adjust the front feet and rear mechanism until the door sits square and swings without drifting. Check side-to-side and front-to-back with a level.
- Secure mounting brackets. Bosch models often include top-mount brackets for stone counters use side-mount if needed. Pre-drill pilot holes. Drive screws until snug.
- Make electrical connection. If corded, plug into the dedicated outlet. If hardwired, connect per the junction box diagram hot to hot, neutral to neutral, ground to ground. Close the cover.
- Open the water. Crack the valve and check for leaks at the shutoff, line, and elbow. Wipe with a dry paper towel and look for moisture rings.
- Final slide and toe kick. Push the unit fully flush. Re-check level. Install the toe-kick panel without blocking airflow or the leak tray, if present.
- Test run. Restore power at the breaker. Run a quick cycle. Watch the first 10 minutes. Check underneath for drips and listen for strange noises.
If you hear gurgling that sounds like a bathtub monster, your drain hose might be too low or kinked. Raise the loop and straighten the run.
Source: www.bosch-home.com
Level, Test, And Troubleshoot
A level Bosch is a quiet Bosch. And a quiet Bosch is a happy home.
- Door drift fix adjust front feet until the door stays put at 45 degrees
- Water hammer add a water hammer arrestor near the shutoff if pipes bang
- Slow fill check water valve is open, screen isn’t clogged, and supply is hot
- Cloudy dishes run hot water at the sink before starting, and use rinse aid
- Random beeps confirm the door latch alignment and that the unit is level
Quick leak check method: Place a dry paper towel under each connection. If it spots, you’ve found the culprit fast.

Source: www.youtube.com
Safety, Codes, And Warranty Notes
You can be handy and cautious at the same time. Your future self will thank you.
- Follow local codes for electrical, GFCI, and drain requirements
- Many areas require an air gap rather than only a high loop
- Use a dedicated 15-amp circuit as recommended by the manufacturer
- If the install is hardwired, a licensed electrician may be required by code
- Keep your proof of purchase, serial number, and install photos for warranty
I’ve seen warranties delayed because someone skipped an air gap where it was required. A five-dollar part saved a five-day headache.
Maintenance Tips After Installation
Good installs stay good with small habits.
- Clean the filter monthly twist, rinse, replace
- Wipe the door gasket and the bottom edge to stop smells
- Use dishwasher salt only if your Bosch model requires it and you have hard water
- Run a hot cycle with a cleaner every 2 to 3 months
- Check the drain loop stays high and the hose clamp stays tight
If you host a big dinner, run a hot rinse right after loading. It helps the next cycle clean better.
Frequently Asked Questions Of How To Install Dishwasher Bosch
Do I Need An Air Gap Or Is A High Loop Enough?
It depends on your local plumbing code. Many places require an air gap by law. A high loop is still good practice, but it may not meet code. Check before you drill.
Can I Use A Flexible Hose For The Water Supply?
Yes, a braided stainless 3/8-inch line is standard. Use a 90-degree elbow at the inlet and Teflon tape on threads. Do not over-tighten.
What If My Opening Is Too Short Because Of New Flooring?
Raise the rear and front feet to gain height. If you still need more, remove the feet, slide in, then reattach if your model allows. Avoid cutting the countertop.
Should I Hardwire Or Use A Power Cord?
Follow your model’s instructions and local code. Many Bosch models support a power cord for a dedicated outlet. Hardwiring should be done in the junction box and may require an electrician.
Why Is My Dishwasher Not Draining On The First Run?
Check that the disposal knockout plug was removed. Confirm the drain hose has a high loop or air gap. Make sure the clamp is tight and the hose isn’t kinked.
Wrap-Up And Next Steps
You now know how to install dishwasher Bosch models like a pro. You planned the space, made clean connections, leveled the unit, and ran a smart test. The big lessons are simple: measure twice, loop that drain high, don’t over-tighten, and keep things level.
If you’re ready, go make that first sparkle cycle happen. If you want more, bookmark this guide, share it with a DIY friend, or drop a question in the comments. Curious to see the process live? Watch this helpful walkthrough.
Watch This Video on how to install dishwasher bosch