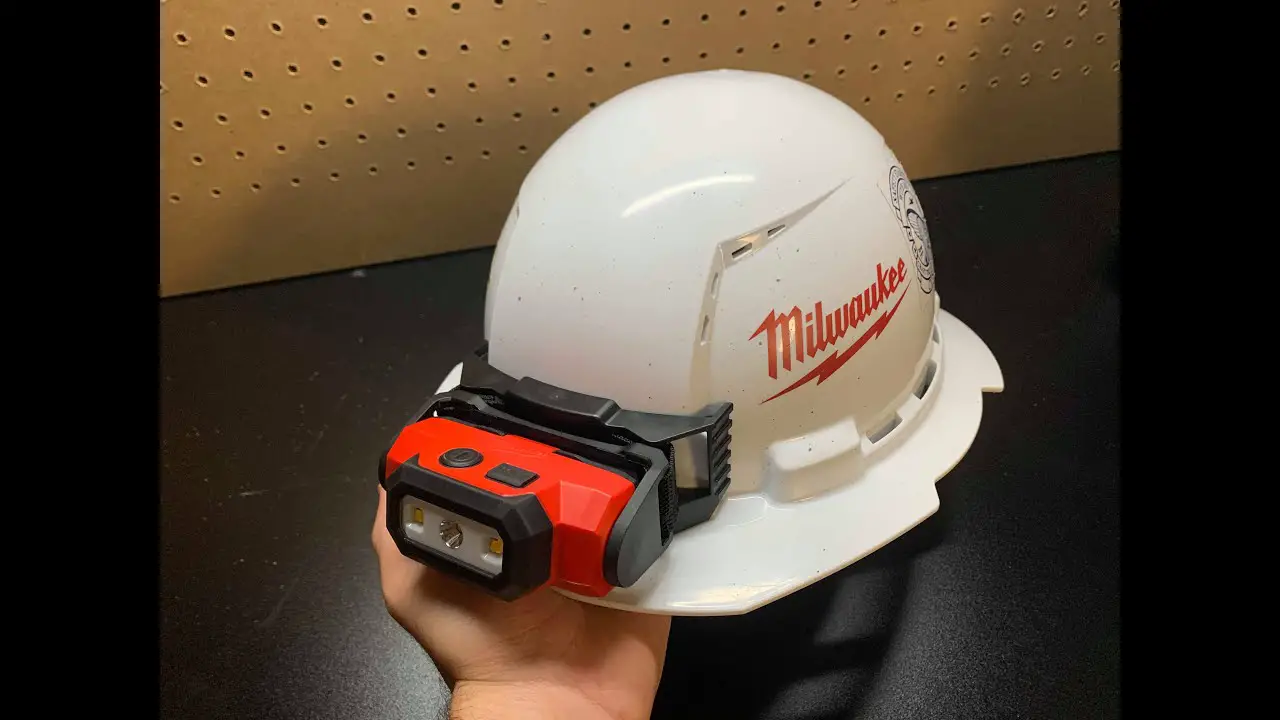
To attach a Milwaukee headlamp to a hard hat, use the built-in clips for a secure fit. Place the headlamp onto the front of the hard hat and adjust the clips for a snug attachment.
Milwaukee headlamps are designed for versatility and hands-free illumination. Whether you’re working in low-light conditions or need focused light on a specific task, having a headlamp attached to your hard hat can greatly improve visibility and safety.
By following a few simple steps, you can easily attach your Milwaukee headlamp to your hard hat, ensuring a secure and reliable source of light while you work.
We’ll guide you through the process of attaching your headlamp to your hard hat, allowing you to work with confidence in any lighting situation.
Contents
Gathering The Required Materials
Gathering the Required Materials is the first step to attaching a Milwaukee headlamp to a hard hat. To ensure a successful attachment, it is important to have the necessary items ready before beginning the process.
Milwaukee Headlamp
The Milwaukee headlamp is a crucial component for this project. It is a powerful, hands-free lighting solution designed for various applications, including industrial and construction settings.
Hard Hat
The hard hat serves as the foundation for attaching the headlamp. It provides the necessary structure and stability to support the headlamp during use. Ensure the hard hat is in good condition and properly fitted before proceeding.
Mounting Clips
The mounting clips are the connecting elements that secure the headlamp to the hard hat. These clips are specifically designed to fit the Milwaukee headlamp and the hard hat, ensuring a secure and reliable attachment.
Identifying The Mounting Area
When attaching the Milwaukee headlamp to a hard hat, the first step is to identify the mounting area on the hard hat. This crucial step ensures that the headlamp is securely attached and positioned for optimal functionality.
Front Of The Hard Hat
To attach the headlamp to the front of the hard hat, locate the designated mounting area at the front of the hard hat.
This area is typically indicated by a raised or flat section specifically designed for attaching accessories such as headlamps. Ensure that this area is clean and free from any obstructions before proceeding with the attachment.
Side Of The Hard Hat
If you prefer to attach the headlamp to the side of the hard hat, locate the appropriate mounting area on the sides of the hard hat.
This area is often found near the brim or along the sides of the hard hat. It is essential to identify the specific mounting point to ensure a secure and stable attachment of the headlamp.
Attaching The Mounting Clips
Attaching the mounting clips to your hard hat is an essential step in securing your Milwaukee headlamp. The mounting clips provide a sturdy and reliable attachment, ensuring that your headlamp stays in place, no matter the task at hand.
In this guide, we’ll walk you through the process of inserting and securing the mounting clips, so you can confidently use your headlamp in any work environment.
Inserting The Mounting Clips
Before you can secure the mounting clips, you’ll need to properly insert them into the slots on your hard hat. Begin by aligning the mounting clips with the designated slots, ensuring that they are positioned securely and evenly on both sides of the hard hat.
Use gentle pressure to push the clips into place, making sure they are fully seated and flush with the hard hat’s surface.
Securing The Mounting Clips
Once the mounting clips are properly inserted, it’s time to secure them in place. Check that the clips are aligned with the headlamp housing and use the provided screws to fasten them securely.
Tighten the screws until the mounting clips are firmly attached to the hard hat, ensuring that they provide a stable base for your Milwaukee headlamp.
Attaching The Headlamp To The Hard Hat
Attaching the headlamp to the hard hat is a crucial step to ensure safety and visibility in various work environments. Properly securing the headlamp to the hard hat allows for hands-free lighting, making it easier to focus on tasks at hand while working in dark or low-light conditions.
Aligning The Headlamp With The Mounting Clips
To begin, align the headlamp with the mounting clips on the front of the hard hat. Ensure that the headlamp is positioned evenly and securely between the clips to prevent any movement or slippage during use. Proper alignment is key to maintaining stability and functionality while wearing the headlamp on the hard hat.
Pushing The Headlamp Into Place
Once aligned, gently push the headlamp into place, making sure that each clip securely holds the headlamp in position. Apply even pressure to ensure a snug fit without causing damage to the headlamp or the hard hat. Double-check that the headlamp is firmly attached before using it in any work setting.
Adjusting The Headlamp
Attaching a Milwaukee headlamp to a hard hat can be a lifesaver in many situations, especially in low-light or dark environments.
But once you have attached your headlamp, it is essential to adjust it properly to ensure optimal visibility and comfort. In this section, we will discuss two ways to adjust your headlamp: tilting it up or down and rotating it.
Tilting The Headlamp Up Or Down
Adjusting the angle of your headlamp is crucial to ensure you can see what you need to see without straining your neck or eyes. Tilting the headlamp up or down is a simple process, but it can make all the difference in your comfort and visibility.
Here are the steps to follow:
- Locate the tilting mechanism on your headlamp. This is usually a small button or lever on the side or bottom of the lamp.
- Press or slide the mechanism in the direction you want to tilt the headlamp. If you want to tilt it up, push the button up, and if you want to tilt it down, push the button down.
- Adjust the angle until you have the desired level of visibility. Remember to avoid aiming the headlamp too high, as this can blind others and cause discomfort.
Rotating The Headlamp
Rotating the headlamp is another essential adjustment to make once you have attached it to your hard hat. This allows you to aim the light in different directions and adjust it to your specific needs.
Here are the steps to follow:
- Locate the rotating mechanism on your headlamp. This is usually a small knob or lever on the top or side of the lamp.
- Turn the mechanism in the direction you want to rotate the headlamp. If you want to rotate it to the left, turn the knob or lever to the left, and if you want to rotate it to the right, turn it to the right.
- Rotate the headlamp until you have the desired level of visibility. Remember to avoid aiming the headlamp at others, as this can cause discomfort or distraction.
Adjusting your Milwaukee headlamp is crucial to ensure optimal visibility and comfort. By following these simple steps, you can tilt and rotate your headlamp to meet your specific needs and make the most out of your hard hat headlamp.

Testing The Headlamp
To attach the Milwaukee Headlamp to a hard hat, first, secure the bracket onto the front of the hard hat. Then, slide the headlamp onto the bracket until it clicks into place. Adjust the angle of the light as needed for optimal visibility during testing.
Turning The Headlamp On
Before testing the headlamp, ensure it is securely attached to the hard hat. To turn the headlamp on, locate the power button and press it firmly.
Adjusting The Headlamp Settings
To adjust the headlamp settings for optimal visibility, use the buttons or knobs provided. Ensure the light angle and brightness are suitable for your working conditions.
Now that you have attached and turned on the headlamp, it’s time to test its functionality. Follow these steps to ensure it works correctly:
- Check the beam angle by pointing the headlamp in different directions.
- Test the different lighting modes, such as high, low, and strobe.
- Verify the battery level to ensure it is sufficiently charged for your tasks.
- Walk around in a dark or dimly lit area to assess the headlamp’s performance in real conditions.
Tips And Precautions
When attaching the Milwaukee Headlamp to your hard hat, it’s crucial to follow some tips and precautions to ensure safety and optimal performance.
Using The Headlamp In Hazardous Environments
Before using the headlamp in hazardous environments, make sure to check for any damage or defects that could compromise its functionality.
- Avoid exposing the headlamp to extreme temperatures or humidity to prevent malfunction.
- Always secure the headlamp firmly to the hard hat to prevent it from falling off during work.
- Regularly inspect the headlamp and its components for any signs of wear and tear.
Cleaning And Maintaining The Headlamp
Proper cleaning and maintenance of the headlamp are essential to ensure longevity and efficiency while using it on the job.
- Use a soft, damp cloth to wipe the headlamp and remove any dirt or debris accumulated on the surface.
- Avoid using harsh chemicals or solvents that could damage the headlamp’s materials.
- Store the headlamp in a cool, dry place away from direct sunlight when not in use to prevent deterioration.

Frequently Asked Questions
How Do You Put A Headlight On A Hard Hat?
To attach a headlight to a hard hat, use a headlamp bracket or adhesive strips. Place the headlight on the front of the hard hat and secure it according to the manufacturer’s instructions. Ensure the headlight is positioned securely for optimal visibility and safety.
Why Is The Light Flashing Red And Green On My Milwaukee Hard Hat?
The flashing red and green light on your Milwaukee hard hat indicates a low battery. Charge the battery to resolve the issue.
How Do You Change The Battery In A Milwaukee Headlamp?
To change the battery in a Milwaukee headlamp, locate the battery compartment, remove the old battery, insert a new one, and close the compartment securely.
How To Charge A Milwaukee Headlamp?
To charge a Milwaukee headlamp, plug the charging cable into the headlamp and a power source. The LED indicator will show when the headlamp is fully charged.
Conclusion
Incorporating a Milwaukee headlamp with your hard hat is a simple yet essential safety measure.
By following the easy steps outlined in this guide, you can ensure proper attachment and maximize visibility in low-light conditions. Stay safe and efficient with this convenient headlamp setup.