Views: 59
Are you struggling to remove a drill bit from your Ryobi drill? You’re not alone.
Many DIY enthusiasts and professionals face this common challenge. It can be frustrating when a simple task becomes a tricky puzzle. But don’t worry, you’re in the right place. In this guide, we’ll walk you through the process step-by-step, so you can quickly get back to your project without any hassle.
Imagine the satisfaction of smoothly swapping out drill bits, enhancing your efficiency and confidence in your tool-handling skills. Let’s dive in and solve this problem together, making your next project smoother and more enjoyable.

Credit: www.youtube.com
Contents
Tools Required
Removing a Ryobi drill bit requires a few basic tools. You will need a wrench or pliers to hold the chuck firmly. A screwdriver might also be necessary to loosen any tight screws. These simple tools make the process straightforward and efficient.
Removing a drill bit from your Ryobi drill might seem straightforward, but without the right tools, it can quickly turn into a frustrating experience. Whether you’re a seasoned DIYer or a beginner, having the right equipment can make the process smooth and hassle-free. Let’s delve into the essential tools you’ll need to successfully remove the drill bit from your Ryobi drill. ###Essential Tools For Drill Bit Removal
Before you get started, ensure you have a few key items. A pair of work gloves is crucial for protecting your hands. Drill bits can be sharp and you don’t want an accidental scrape. Have you ever tried removing a drill bit without gloves and ended up with a splinter? It’s not fun. ###Using A Chuck Key
A chuck key is a small, T-shaped tool that’s often overlooked. It’s designed specifically to loosen the chuck and release the drill bit with ease. If your Ryobi drill didn’t come with one, it’s worth investing in. Can you imagine trying to twist the chuck with your bare hands? It might work, but you’ll wish you had the right tool. ###Adjustable Pliers For Stubborn Bits
Sometimes, drill bits can get stuck, especially if they’re worn out or used frequently. Adjustable pliers can be your best friend in these situations. They provide the grip needed to twist the chuck open. Have you ever had a drill bit that just wouldn’t budge? A pair of pliers can save the day. ###Lubricant For Easy Removal
If your drill bit is particularly stubborn, a little lubricant can work wonders. It helps ease the bit out without unnecessary force. Just a few drops can make a significant difference. Ever spent hours trying to pry out a drill bit, only to wish you had thought of lubrication sooner? ###Maintenance Tips
Lastly, consider how you care for your tools. Regular maintenance like cleaning the chuck and keeping your tools organized can prevent future headaches. You might find that after a bit of cleaning, the drill bit slips out more easily than expected. How often do you clean your tools to ensure their longevity? Having these tools at your disposal can transform your DIY experience from frustrating to enjoyable. Next time you’re faced with a stubborn drill bit, you’ll be ready. What tools do you rely on to make your projects run smoothly?Safety Precautions
Proper safety precautions are crucial when removing a Ryobi drill bit. Always wear safety glasses to protect your eyes. Ensure the drill is off and unplugged to avoid accidents.
Removing a drill bit from a Ryobi drill is a straightforward task, but safety must always come first. Even seasoned DIY enthusiasts can overlook safety measures, leading to accidents or injuries. Before diving into the process, let’s explore some crucial safety precautions that can safeguard you and enhance your drilling experience.Wear Proper Protective Gear
Always equip yourself with safety goggles to protect your eyes from metal shavings and debris. Gloves can shield your hands from sharp edges and hot surfaces. Consider wearing earplugs if you’re sensitive to loud noises, as drills can be surprisingly loud.Ensure The Drill Is Unplugged Or Battery Removed
Before you start, double-check that the drill is unplugged from the power source. If you’re using a cordless Ryobi drill, remove the battery. This simple step prevents accidental activation, which could cause injury.Stabilize Your Work Area
Make sure your workspace is stable and clutter-free. A shaky table or scattered tools can lead to unexpected accidents. A clean, organized area helps you focus on the task without unnecessary distractions.Inspect The Drill And Bit
Examine the drill and bit for any visible damage or wear. A cracked bit or a malfunctioning drill can be hazardous. If something looks off, replace the part before proceeding.Use Proper Technique
Always hold the drill firmly with both hands. Maintain a steady grip to prevent slipping or losing control. If you’re unsure about your technique, it might be helpful to watch a quick tutorial or ask a knowledgeable friend for guidance.Have you ever had an unexpected mishap while working with tools? Share your experiences in the comments to help others learn from them. Safety isn’t just a priority—it’s a habit that can make your DIY projects more enjoyable and accident-free.
Switching Off The Drill
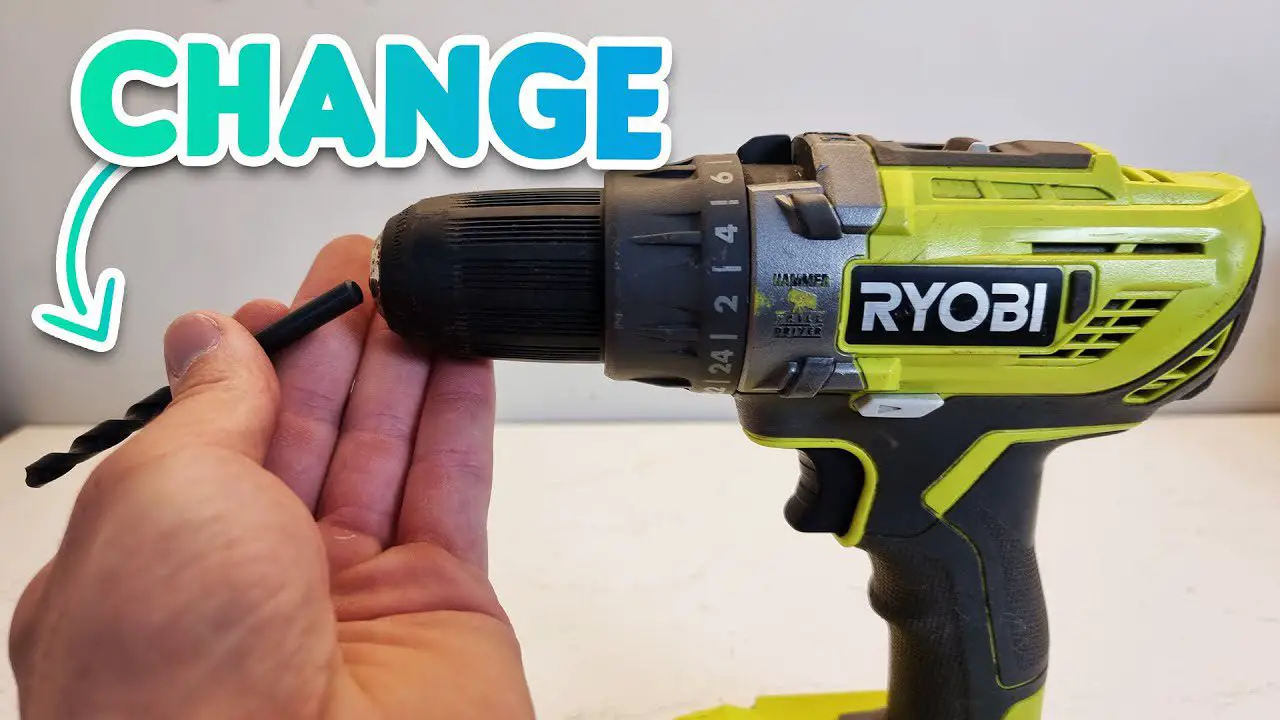
Removing a Ryobi drill bit starts with ensuring the drill is switched off. Grip the chuck firmly and rotate counterclockwise. The bit should loosen and come out easily. Proper handling prevents damage and ensures safety during tool maintenance.
Switching off your drill before removing a Ryobi drill bit is a crucial step that ensures safety and prevents damage. Many people overlook this simple yet vital action, which can lead to accidents or injuries. Understanding how to properly switch off your drill is essential for maintaining both your tool and your safety. ###Power Down Properly
Before you go to remove the drill bit, make sure the drill is completely turned off. This means not just releasing the trigger but also flipping the switch to the off position. If your drill has a battery, remove it to ensure there is no chance of the drill accidentally starting up. ###Unplug To Be Safe
If you’re using a corded drill, unplug it from the power source. This might seem like a hassle, but it’s an essential precaution. You wouldn’t want the drill to suddenly power up while you’re trying to change the bit. ###Check The Drill’s Status
Once the drill is off, check to ensure it’s truly powered down. Feel the motor to see if it’s still warm or listen for any humming noises. A fully powered down drill will be silent and cool to the touch. ###Personal Experience With Safety
I remember the first time I forgot to switch off my drill before changing the bit. I was rushing and didn’t think it was a big deal. Suddenly, my drill spun to life, and I narrowly avoided a nasty injury. That experience taught me the importance of proper shutdown. ###Why It Matters
Switching off the drill isn’t just a formality. It’s a necessary practice to protect yourself and your tools. Do you really want to risk injury or damage to your equipment? A few extra seconds to ensure the drill is off can save you from potential hazards. ###Encourage Mindfulness
Make it a habit to always double-check the power status. This small act of mindfulness can make your DIY projects safer and more enjoyable. How often do you rush through tasks without thinking? Slow down and prioritize your safety. Switching off the drill is a simple but vital step in changing a Ryobi drill bit safely. Keep this guide in mind, and you’ll be well-prepared for your next project.Loosening The Chuck
Loosening the chuck on a Ryobi drill is essential for removing the drill bit. Begin by turning the chuck counterclockwise to release the grip on the bit. A firm grip helps prevent slipping while twisting.
Loosening the chuck on your Ryobi drill is a straightforward process, but it can feel daunting if you’re new to using power tools. You’ve probably been there—standing in your garage, staring at the drill, wondering why the chuck won’t budge. Understanding how to loosen the chuck is essential for changing drill bits efficiently. This section will provide practical tips to help you master this step with ease.Understanding The Chuck Mechanism
The chuck is the clamp that holds the drill bit in place. It operates like a tiny vice grip, ensuring your drill bit stays secure while in use. Ryobi drills typically feature a keyless chuck, making the process simpler since you won’t need a separate tool to loosen it. Grasp the chuck firmly and turn it counterclockwise. Feel the tension release as you rotate—it’s a small but satisfying victory.Using The Right Tools
Sometimes, the chuck might be a bit stubborn. In such cases, employing the right tools can make a difference. A pair of gloves can give you a better grip, preventing slipping. If your chuck has been tightened excessively, a gentle tap with a rubber mallet can help loosen it. Always ensure your drill is off and unplugged to avoid any accidents. Safety first, right?Applying Gentle Pressure
The key to loosening the chuck is gentle, consistent pressure. It’s tempting to use brute force, but that could damage your drill. Instead, apply steady pressure as you turn. Imagine you’re unscrewing a jar lid that’s just a bit too tight. Feel the gradual easing as you turn—it’s a technique that requires patience but pays off.Recognizing When To Seek Help
What if the chuck refuses to budge despite your best efforts? Don’t let frustration get the better of you. Sometimes, a chuck might be jammed due to debris or wear. Consider consulting a professional or checking online forums for advice. Have you ever had to ask for help with something as simple as a stuck jar lid? It’s a reminder that seeking assistance is sometimes the best solution. Engaging with your drill and understanding its mechanics not only makes tasks easier but boosts your confidence. Next time you’re faced with a stubborn chuck, you’ll know exactly what to do. What’s your next project going to be now that you have this skill in your toolkit?Removing The Drill Bit
Easily switch your Ryobi drill bit by loosening the chuck with your hand. Rotate it counter-clockwise. Remove the bit carefully once it’s loose. Ensure the new bit is secure before use.
Removing the drill bit from your Ryobi drill might seem like a straightforward task, but doing it correctly ensures the longevity and effectiveness of your tool. Have you ever found yourself struggling with a stuck drill bit, or unsure which way to turn the chuck? Getting this right can save time and frustration. Let’s walk through the steps to remove your drill bit easily and safely. ###Understanding The Chuck Mechanism
Your Ryobi drill likely uses a keyless chuck, which means no extra tools are needed to change the bit. Grasp the base of the chuck firmly with one hand. Turn the front of the chuck counterclockwise with your other hand to open it. This action loosens the grip on the drill bit. ###Loosening The Drill Bit
Once the chuck is loose, gently pull the drill bit out. If the bit doesn’t come out smoothly, double-check the chuck’s grip. Sometimes, the chuck might feel loose, but the bit is still held tightly. Ensure you’re turning the chuck the correct way—counterclockwise to loosen. ###Handling A Stuck Drill Bit
Encountering a stuck drill bit can be frustrating. If your bit refuses to budge, don’t force it. Instead, try tightening the chuck slightly, then loosening again. This small adjustment can help realign the internal mechanisms and free your drill bit. ###Cleaning And Storing Your Drill Bit
Once removed, clean the drill bit with a dry cloth to remove any dust or debris. A clean bit is more efficient and reduces wear on your drill. Store your bits in a dry, safe place to prevent rust and damage. A well-maintained drill bit will ensure smoother drilling in future projects. ###Checking The Drill For Wear And Tear
Take this opportunity to inspect the chuck and drill for signs of wear. Regular use can loosen the chuck or wear down the internal components. Addressing these issues early can prolong the life of your Ryobi drill and ensure it performs optimally. Have you ever successfully removed a stubborn drill bit? Share your experiences or tips in the comments below. Your insights could help others tackle their DIY challenges with ease!Inspecting The Drill Bit
Before removing the drill bit from your Ryobi drill, inspect it closely. This step ensures safety and efficiency. A detailed inspection helps avoid mishaps during removal.
Check For Damage
Examine the drill bit for any signs of damage. Look for cracks or bends. A damaged bit can pose safety risks. It might also affect the drill’s performance. If you find damage, consider replacing it instead of removing it.
Ensure Proper Fit
Verify the drill bit is fitting correctly in the chuck. A loose bit can cause issues during removal. Tighten the chuck if necessary. This step ensures the bit stays secure while you work.
Clean The Drill Bit
Cleaning the drill bit is important. Dirt and debris can cause complications. Use a cloth to wipe it clean. A clean bit ensures a smooth removal process. It also prolongs the life of your drill bit.
Assess The Chuck Condition
Inspect the chuck for wear and tear. A worn chuck might not hold the bit properly. This can lead to removal difficulties. If the chuck is damaged, it might need replacement.
Proper Storage Of Drill Bits
Proper storage of drill bits is crucial for maintaining their longevity. Storing them correctly prevents damage and rust. It also ensures they remain sharp and ready for use. Organizing your drill bits can save you time and money. A well-organized set makes finding the right bit easy. This enhances productivity during projects.
Drill bits require a clean, dry environment. Moisture can lead to rust, making them unusable. Keeping them dry preserves their quality. Consider investing in a dedicated storage case. This keeps them safe from external elements. A hard case offers protection and organization.
Labeling And Organization
Labeling is important for quick identification. Use labels to mark sizes and types. This helps in finding the correct bit fast. Organize them by size or type. An organized system reduces confusion. It speeds up the process of selecting the right drill bit.
Temperature Control
Store drill bits in a temperature-controlled area. Extreme temperatures can affect their integrity. A stable temperature ensures they remain effective. Avoid places prone to temperature fluctuations. This keeps your drill bits in optimum condition. Temperature control prolongs their lifespan.
Avoiding Moisture
Moisture is a drill bit’s enemy. Keep storage areas dry and moisture-free. Moisture causes rust, leading to dull bits. Use silica gel packets to absorb moisture. This helps maintain a dry environment. Protecting them from moisture ensures they stay sharp.
Using Protective Cases
Protective cases are great for storing drill bits. They shield them from dust and damage. A case keeps bits organized and safe. Choose one with individual slots for each bit. This prevents them from rubbing against each other. A protective case is a wise investment for any toolset.
Common Mistakes To Avoid
Avoid forcing the chuck when removing a Ryobi drill bit. Use the correct tools for smooth operation. Double-check the rotation direction to prevent unnecessary strain on the drill.
When you’re trying to remove a drill bit from your Ryobi tool, it’s easy to make simple mistakes that can lead to frustration or even damage to your drill. Understanding these common pitfalls can save you time and ensure your drill stays in tip-top shape. Let’s dive into some typical errors and how to steer clear of them.1. Not Turning Off The Drill
Always remember to turn off your drill and unplug it from the power source before attempting to remove the drill bit. It’s a safety precaution that many overlook in their haste. By doing so, you prevent accidental activation, which could lead to injury or damage to the drill.2. Using The Wrong Tools
It might be tempting to grab any tool at hand to loosen the chuck, but using the wrong tools can cause scratches or bend the chuck. Stick to using the chuck key that came with your drill or the appropriate wrench size. It ensures a proper grip and avoids unnecessary wear and tear.3. Forcing The Drill Bit Out
If the drill bit is stuck, forcing it out might seem like a quick fix. However, this can damage the chuck or the bit itself. Instead, gently tap around the chuck or apply a bit of lubricant to ease the bit out. Patience here will save you from costly repairs.4. Ignoring The Manual
Ryobi drills often come with specific instructions for changing drill bits. Skipping the manual can lead to missed steps or incorrect procedures. Even if you think you know how, a quick glance at the manual can reveal helpful tips and ensure you’re doing it right.5. Not Checking For Debris
Dirt and debris can accumulate in the chuck, making it difficult to remove the drill bit. Always check for any debris and clean it out before attempting to remove the bit. This simple step can make the process smoother and prevent jamming.6. Overlooking Chuck Maintenance
Regular maintenance of the chuck is essential for its longevity. If you neglect it, the chuck may become stiff or corroded, making bit removal a hassle. Periodically clean and lubricate the chuck to keep it functioning smoothly. By being aware of these common mistakes, you can avoid unnecessary headaches and extend the life of your Ryobi drill. Next time you’re about to change a drill bit, consider each step carefully and ensure you’re not falling into these traps. Have you ever made any of these mistakes? Reflect on your experiences and see how you can improve your technique.Maintaining Your Drill
Removing the drill bit from a Ryobi drill requires a simple process. First, ensure the drill is turned off. Then, rotate the chuck counterclockwise to loosen the bit. Once loose, the bit can be easily removed, allowing for quick maintenance or replacement.
Maintaining your drill is essential for its longevity and performance. Regular upkeep ensures your tool is always ready for action, delivering precise results every time. Neglecting maintenance can lead to inefficient operation, shortening the lifespan of your drill. Think of your drill as an investment. Taking care of it means saving money in the long run. Whether you’re a DIY enthusiast or a professional, understanding how to keep your drill in top shape is crucial. Do you often find yourself frustrated with a stuck drill bit? Knowing how to remove and maintain it can save you time and stress. Let’s dive into practical tips for keeping your Ryobi drill in perfect condition.Inspecting Your Drill Regularly
Check your drill periodically for any signs of wear and tear. Look at the casing, trigger, and other components. A simple visual inspection can prevent major issues. Notice any cracks or unusual noises? Address them before they escalate. Regular checks can help you detect potential problems early, ensuring your drill remains functional.Cleaning The Drill Bit
After each use, clean your drill bit to remove debris and dust. These can affect its performance. A clean bit ensures smooth operation. Use a soft brush or cloth to wipe off any residue. Keeping the bit clean also prevents it from getting stuck, making removal easier.Lubricating Moving Parts
Lubrication is key to smooth operation. Apply a small amount of oil to moving parts. This reduces friction and wear, extending the life of your drill. Avoid over-lubrication, as it can attract dirt. A well-lubricated drill operates efficiently, making your tasks easier.Tightening Loose Screws
Loose screws can lead to instability. Regularly check and tighten them to ensure your drill is secure. A stable drill is safer and more effective. Use the correct screwdriver to avoid stripping the screws. This simple step keeps your drill functioning smoothly and safely.Storing Your Drill Properly
Store your drill in a dry, cool place to prevent rust and damage. Avoid damp environments. Proper storage keeps your tool ready for the next use. Consider using a case for added protection. Storing your drill correctly ensures it’s always in good condition when you need it.Understanding When To Replace Parts
Parts wear out over time. Learn to recognize when they need replacement. Replacing worn-out parts keeps your drill efficient. Check the manufacturer’s guidelines for part longevity. Knowing when to replace parts ensures your drill remains reliable and effective.Removing A Stuck Drill Bit
Removing a stuck drill bit can be tricky. First, ensure the drill is off and unplugged. Gently tap the bit with a rubber mallet to loosen it. If it’s still stuck, use a wrench to carefully turn it. Patience is key. Rushing can damage your drill. Take your time to avoid costly repairs. Maintenance doesn’t have to be a chore. With these tips, you can keep your Ryobi drill performing at its best. How often do you check your tools? Regular maintenance can make all the difference in your projects.
Credit: www.reddit.com

Credit: www.tiktok.com
Frequently Asked Questions
How Do You Remove A Ryobi Drill Bit?
To remove a Ryobi drill bit, first ensure the drill is turned off. Hold the drill chuck and rotate it counterclockwise to loosen the bit. Once loose, pull the bit straight out. Always wear safety goggles during this process to protect your eyes from any debris.
Can I Change Drill Bits Without A Key?
Yes, you can change Ryobi drill bits without a key. Ryobi drills typically have a keyless chuck. Simply grip the chuck and turn it counterclockwise to loosen the bit. Insert the new bit, then turn the chuck clockwise to tighten.
Ensure the bit is secure before use.
Why Is My Ryobi Drill Bit Stuck?
A Ryobi drill bit may get stuck due to debris or overtightening. To remove it, ensure the drill is off. Try turning the chuck counterclockwise while gently pulling the bit. If necessary, use pliers for extra grip. Regular maintenance can prevent this issue.
What Size Chuck Does A Ryobi Drill Have?
Ryobi drills usually have a 3/8-inch or 1/2-inch chuck size. The size determines the maximum diameter of the bit that can be used. Ensure you choose the correct size for your specific drill model. Always consult the manual for accurate specifications.
Conclusion
Removing a drill bit from a Ryobi tool is simple. Start by ensuring safety first. Always unplug the drill before starting. Next, loosen the chuck by turning it counterclockwise. Use a wrench if needed for extra grip. This should release the bit effortlessly.
With practice, you will handle drill bits with ease. Remember, maintain your tools regularly for smooth operation. An organized workspace helps, too. Keep your tools clean and ready for the next project. Now, you can tackle any drilling task with confidence.
Happy drilling!