Views: 16
Are you ready to finally get your new Bosch dishwasher up and running, but feeling a bit overwhelmed with the installation process? You’re not alone.
Many people find themselves staring at their shiny new appliance, wondering where to even begin. The good news is, connecting your Bosch dishwasher doesn’t have to be a daunting task. In fact, with the right guidance, you can do it quickly and efficiently.
Imagine the satisfaction of loading your first batch of dishes, knowing you installed the machine all by yourself. Not only will this save you the cost of hiring a professional, but it also gives you the confidence that comes with tackling a home improvement project. Plus, once you know how to connect your dishwasher, you’ll feel empowered to handle other household tasks. In this guide, we’ll break down the installation process into simple, manageable steps. You’ll learn exactly what tools you’ll need and how to avoid common pitfalls that could lead to costly mistakes. By the end, you’ll have your Bosch dishwasher running smoothly, leaving you more time to enjoy the things you love. So let’s dive in and get your dishwasher connected with ease!
Credit: www.youtube.com
Contents
Positioning The Dishwasher
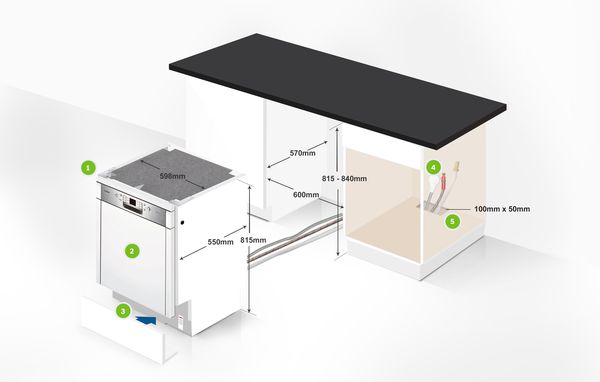
Setting up a Bosch dishwasher begins with placing it correctly. This step ensures efficient operation and easy access. A well-positioned dishwasher blends seamlessly with your kitchen decor.
Choosing The Right Spot
Select a location near the sink and power outlet. This reduces the need for lengthy hoses and cables. Ensure there’s enough space to open the dishwasher door fully.
Avoid placing it next to the stove or oven. Heat from these appliances can damage the dishwasher’s components. Choose a spot with adequate ventilation to prevent overheating.
Leveling The Appliance
A level dishwasher runs smoothly and avoids water pooling. Use a spirit level to check if your dishwasher is even. Adjust the legs as needed to achieve balance.
Turn the leveling screws on each leg. Ensure all sides are equally adjusted. This prevents unwanted vibrations during the wash cycle.

Credit: www.youtube.com
Connect Water Supply
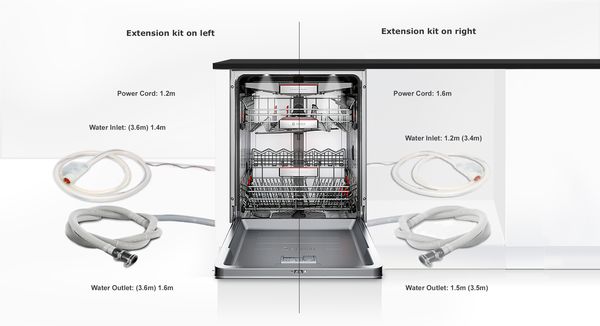
Easily connect your Bosch dishwasher to the water supply with simple steps. First, ensure the water valve is off. Attach the water inlet hose securely to the dishwasher and the water supply.
Connecting the water supply to your Bosch dishwasher is a crucial step in its installation process. This connection ensures that your dishwasher gets the water it needs to operate efficiently. If you’re new to this, don’t worry—it’s simpler than it sounds. Let’s dive into the steps you need to follow to get your dishwasher up and running.Locate Water Inlet
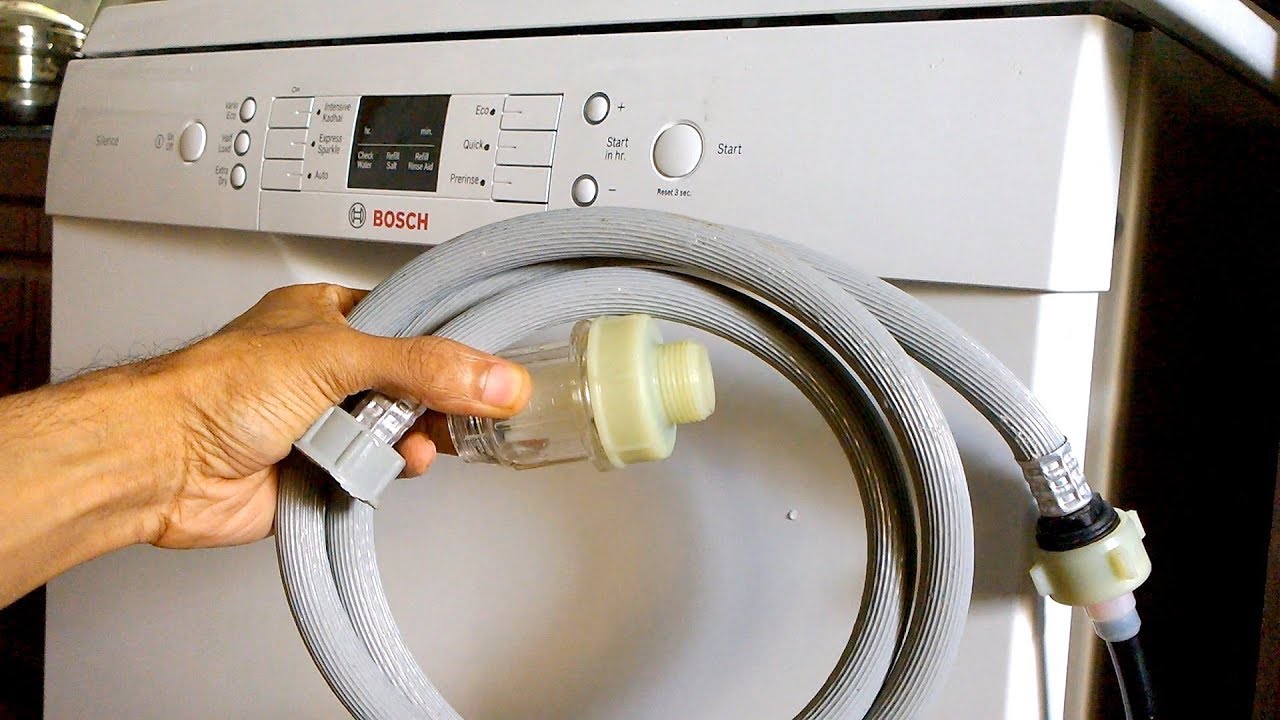
First, identify the water inlet valve on your Bosch dishwasher. It’s typically located at the back or side of the appliance. Look for a small, protruding metal or plastic piece that resembles a connector. Once you’ve located it, check that the area is clean and free from debris. A clogged inlet can cause water flow issues later on. It’s crucial to ensure your water supply is turned off before proceeding. This prevents any accidental flooding during the installation process.Attach Water Hose
Now, take your water hose and connect it to the water inlet valve. Hand-tighten the hose onto the valve until it’s secure. Avoid using tools at this stage to prevent over-tightening, which can damage the connection. Next, connect the other end of the hose to your water supply. Make sure this connection is also tight and secure. A loose connection here can lead to leaks, so double-check your work. Before turning the water supply back on, place a towel under the connections. This catches any drips as you slowly turn the water back on, allowing you to check for leaks effectively. Have you ever turned on your dishwasher only to find a puddle of water on the floor? Ensuring these connections are tight helps prevent that scenario. Once you’re confident there are no leaks, your Bosch dishwasher is ready to tackle your next load of dirty dishes. Are you excited to see how much easier life can be with a fully functioning dishwasher?Connect Drain Hose
Connecting the drain hose of your Bosch dishwasher is crucial for proper functioning. A correctly connected hose ensures water drains efficiently, preventing leaks and water damage. Follow these steps to connect the drain hose securely and effectively.
Position Hose Correctly
Start by locating the drain outlet on your Bosch dishwasher. This is usually at the back of the appliance. Ensure the hose is long enough to reach the drain pipe. Avoid tight bends and kinks in the hose. These can restrict water flow. The hose should have a gentle slope downwards. This helps water flow smoothly.
Secure Hose To Drain
Attach the hose firmly to the drain pipe. Use a hose clamp for a tight connection. This prevents leaks and ensures a secure fit. Check that the hose does not move or slip. A loose hose can lead to water spills. If needed, use a bracket to hold the hose in place. Ensure the connection is airtight.
Credit: www.bosch-home.com.sg
Electrical Connection
Connecting the electrical components of your Bosch dishwasher is crucial. Ensuring a proper connection guarantees smooth operation and safety. Follow these steps for a hassle-free electrical setup.
Check Power Supply
First, ensure the power supply is off. Locate your home’s circuit breaker panel. Find the switch connected to the dishwasher’s outlet. Turn it to the off position. This step prevents electrical accidents. Confirm the voltage matches your dishwasher’s requirement. Usually, Bosch dishwashers require a 120-volt outlet. Consult your dishwasher’s manual for exact specifications.
Connect Power Cord
Next, attach the power cord to the dishwasher. Locate the junction box at the back of the unit. Remove the cover using a screwdriver. Insert the power cord through the strain relief. Ensure the cord is secure but not overtight. Connect the wires according to color. Black to black, white to white, and green to ground. Secure the connections with wire nuts. Replace the junction box cover. Tighten screws to secure it.
Test The Installation
After connecting your Bosch dishwasher, testing the installation is crucial. This step ensures everything functions smoothly before you start using it regularly. Proper testing helps identify any issues early, saving you time and effort in future repairs.
Run A Test Cycle
Begin by running a test cycle on your Bosch dishwasher. Select a short program to check its basic functionality. This cycle helps ensure that the water supply and drainage systems work correctly. Listen for unusual noises during the cycle. This could indicate a problem with the installation.
Check For Leaks
Inspect around the dishwasher for any signs of water leakage. Check the connections and hoses for drips or pools of water. Tighten any loose connections you find. Ensure the drain hose is secure and properly aligned. A leak-free setup ensures your dishwasher operates efficiently. Address leaks immediately to prevent damage to your kitchen floor.
Final Adjustments
You’ve installed your Bosch dishwasher. It’s time for the final tweaks. These adjustments ensure optimal performance. They prevent leaks and improve door function. Follow these simple steps carefully.
Secure The Dishwasher
First, ensure the dishwasher sits level. Use a spirit level for accuracy. Adjust the feet if needed. This stabilizes the unit. It prevents unwanted movement during cycles.
Next, secure the brackets. Locate them on the sides or top. Attach them to the countertop or cabinet. This step keeps the dishwasher in place. It also reduces vibrations.
Adjust Door Alignment
Check the door alignment next. Open and close the door slowly. Ensure it closes snugly. Misalignment can cause leaks. It might also affect cleaning performance.
Adjust the hinges if needed. Many Bosch models have adjustable hinges. Consult your manual for specific instructions. Proper alignment ensures an effective seal.
Conclusion
Connecting a Bosch dishwasher is simple with the right steps. Begin by reading the manual carefully. Follow each step with patience and care. Ensure water and power are turned off before starting. Use the correct tools for safe installation. Check all connections twice to avoid leaks.
Test the dishwasher after installation. Look for any issues, like water not draining. Fix problems quickly to avoid damage. Enjoy the clean dishes your Bosch dishwasher offers. Your kitchen tasks become easier and more efficient. Remember, safety comes first when handling appliances.
Happy dishwashing!