
Are you tired of struggling with overgrown grass and weeds in your yard? A well-maintained trimmer can be your best ally in keeping your outdoor space neat and tidy.
But what happens when the trimmer line on your Ryobi Expand It needs changing? Many of us dread this task, but it doesn’t have to be a frustrating experience. Imagine the satisfaction of effortlessly swapping out the line, ready to tackle your yard with ease and confidence.
In this guide, you’ll discover simple, step-by-step instructions on how to change the trimmer line, transforming a chore into a quick and easy task. Stick around, and you’ll be back to trimming like a pro in no time!
Contents
Tools And Materials Needed
Changing the trimmer line on your Ryobi Expand It is a simple task. With the right tools and materials, you can complete it quickly. Knowing what you need beforehand saves time and makes the process smoother. Proper preparation ensures you avoid interruptions during the change.
Tools Required
Gather a few essential tools for the task. A flat-head screwdriver is needed. This helps in removing the trimmer head cover. It also assists in opening any tight screws. A pair of pliers can be handy. It aids in pulling out the old line easily.
Materials Needed
Choose the correct trimmer line for the Ryobi Expand It. The manual specifies the ideal line diameter. Ensure you have enough trimmer line for replacement. Having extra line is wise in case of errors. Keep the manual nearby. It provides useful instructions and troubleshooting tips.
Safety Equipment
Safety glasses protect your eyes. Always wear them during any maintenance work. Gloves keep your hands safe from sharp edges. They also offer a better grip on tools. Ensure you work in a well-lit area. Proper lighting reduces mistakes and increases efficiency.
Credit: www.youtube.com
Safety Precautions
Changing the trimmer line on a Ryobi Expand It requires careful attention to safety. Always wear gloves and eye protection to guard against injuries. Ensure the trimmer is turned off and unplugged before starting the replacement process.
When you’re about to change the trimmer line on your Ryobi Expand It, safety should be your top priority. Ensuring that you follow the right precautions can prevent accidents and make the process smooth. You’ll feel more confident when you know you’ve taken the necessary steps to protect yourself.Wear Protective Gear
Before you start, make sure you have your safety gear ready. Gloves will protect your hands from cuts and scrapes. Wearing safety glasses can shield your eyes from flying debris. Consider a face mask if you’re sensitive to dust or pollen.Ensure The Trimmer Is Off
Always double-check that your trimmer is turned off and unplugged. If it’s battery-operated, remove the battery completely. This simple step can prevent accidental startups, keeping you safe from unexpected injuries.Work In A Clear Area
Choose a clean and open space to change your trimmer line. Remove any clutter around you to avoid tripping hazards. A clear workspace helps you focus and reduces the risk of accidents.Keep Kids And Pets Away
If you have kids or pets, keep them at a safe distance while you work. They might be curious, but it’s better to have them in a different room or area. This ensures that you can concentrate fully on the task at hand.Read The Manual
Have you ever skipped the manual because you thought you knew it all? Take a moment to review it. The manual provides specific instructions and safety warnings for your Ryobi model. It’s a handy resource that can offer guidance and reassurance. Taking these precautions may seem like extra steps, but they’re crucial for your safety. Are there any other safety tips you find essential when working with tools? Let’s create a space where we can share and learn from each other’s experiences.Removing The Trimmer Head
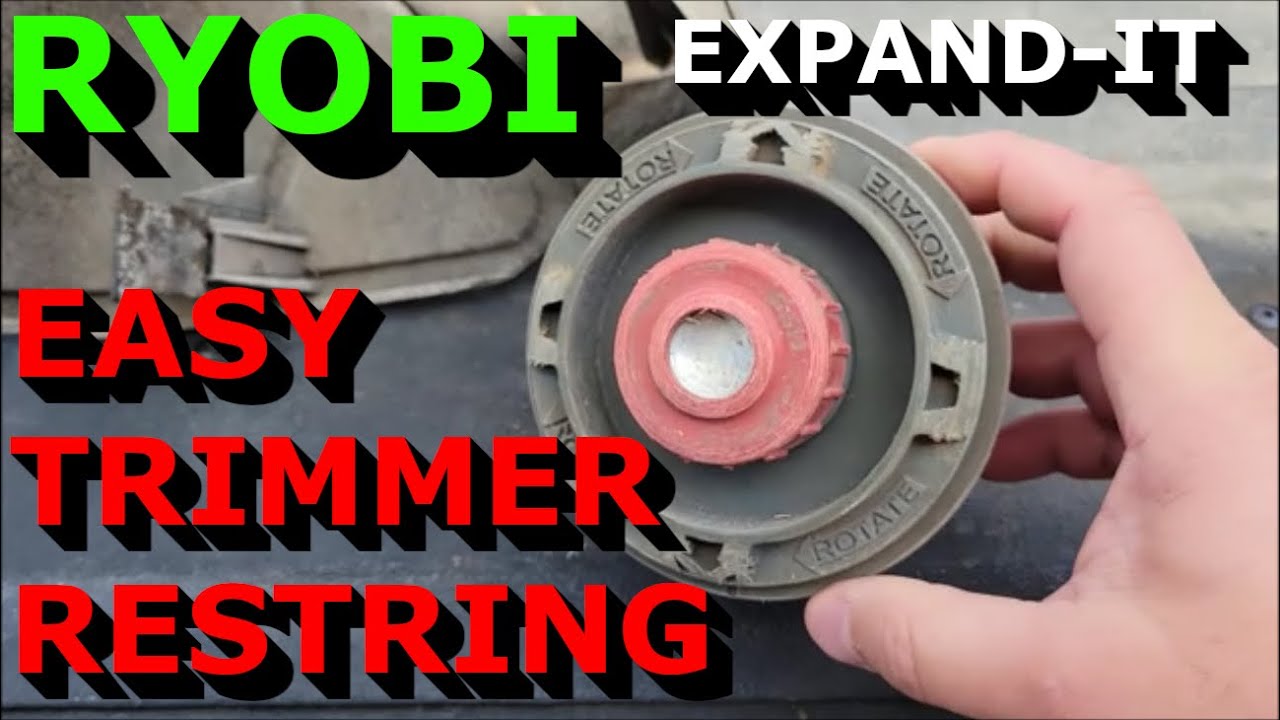
To remove the trimmer head on a Ryobi Expand It, grip the head firmly. Twist it counterclockwise to unscrew. This allows easy access for changing the trimmer line, ensuring efficient maintenance.
Changing the trimmer line on your Ryobi Expand It can seem daunting at first, but once you know the steps, it becomes a simple task. One of the first steps in this process is removing the trimmer head. This step is crucial because it allows you to access the spool where the trimmer line is housed. Removing the trimmer head might sound complicated, but with the right guidance, you can do it quickly and safely. Let’s dive into the details and get your trimmer back in action.Detaching The Shaft
To start, you need to detach the shaft from the power source. Ensure your trimmer is turned off and unplugged if it’s electric, or the spark plug wire is disconnected if it’s gas-powered. This step is important for your safety. Once you’re sure the trimmer is powered off, locate the quick-release mechanism on the shaft. It’s usually a simple lever or button. Press or pull it, and gently separate the shaft from the power unit. This makes accessing the trimmer head much easier. Have you ever struggled with a stubborn quick-release? A little patience goes a long way.Accessing The Spool
With the shaft detached, you can now access the spool. The spool is housed within the trimmer head and holds the trimmer line. Look for tabs or screws on the trimmer head that secure the spool cover. Gently press the tabs or unscrew the cover, depending on your model. Be careful not to lose any small parts. Once the cover is removed, the spool is right there, ready for reloading. Does it surprise you how simple it is to get to the spool? The design is meant to make your life easier. Remember, keeping your trimmer line fresh ensures efficient trimming and a well-maintained garden. What’s your biggest trimmer line headache? Sometimes, it’s just about knowing the right steps to take.
Credit: espanol.ryobitools.com
Preparing The New Trimmer Line
Replacing the trimmer line on a Ryobi Expand It is straightforward. First, remove the trimmer head. Then, carefully insert the new line following the manual instructions. Ensure it’s secure before reattaching the head. This process enhances trimming efficiency and maintains your garden’s neat appearance.
Changing the trimmer line on your Ryobi Expand It can enhance its performance. Preparing the new trimmer line is essential for efficient trimming. Follow these easy steps to ensure your trimmer is ready for action.Choosing The Right Line
Select a trimmer line compatible with your Ryobi Expand It model. Check the manual for recommendations on size and type. Choose a line that suits your trimming needs, like thicker lines for tough weeds. Avoid using lines that are too thick, as they may strain the trimmer.Cutting The Line To Size
Measure the required length for your trimmer line. Ensure the length is not too short or too long. Cut the line evenly using sharp scissors or a utility knife. A correct length ensures smooth operation and prevents tangling.Winding The Trimmer Line
Changing the trimmer line on a Ryobi Expand It is simple. First, remove the trimmer head cover. Next, wind the line evenly onto the spool, ensuring both ends are equal. Finally, replace the cover, and you’re ready to go.
Winding the trimmer line on your Ryobi Expand-It can seem daunting at first, but with a little patience and the right technique, you’ll master it in no time. Remember the time when you tried to untangle a pair of earphones? Think of this as a far more rewarding task! The key is to get it right from the start, ensuring your trimmer works efficiently and saves you frustration later on. So, let’s dive into the specifics and make your garden maintenance hassle-free. ###Inserting The Line Into The Spool
First, you’ll need to cut two pieces of line around 9 feet long. This length works well for most trimming needs. Feed one end of the line into the hole on the inside edge of the spool. Push it through until you have about 3 inches sticking out. Hold the line in place with one hand and prepare to start winding with the other. This setup ensures the line stays secure as you work. ###Winding The Line Correctly
Now, start winding the line in the direction indicated by the arrows on the spool. This small detail can make a big difference. Keep the line taut as you wind it to avoid tangles. Imagine wrapping a gift neatly—precision matters here too. Once you’ve wound all the line, secure the end in the notch on the spool. This prevents it from unraveling when you reassemble the trimmer head. Does this process seem a bit fiddly? It might feel that way initially, but with practice, you’ll do it effortlessly. The effort you put into winding the line correctly pays off with a smooth-running trimmer. Now, are you ready to tackle the rest of your garden with confidence?Reassembling The Trimmer Head
Changing the trimmer line on a Ryobi Expand It requires reassembling the trimmer head. First, remove the spool cover. Then, replace the old line with new line, ensuring it’s securely wound. Finally, snap the cover back on to complete the process.
Reassembling the trimmer head on your Ryobi Expand It might seem daunting at first, but breaking it down into manageable steps can make the process smooth and straightforward. You’ve successfully replaced the trimmer line, and now it’s time to secure everything back in place. With a little patience, you’ll have your trimmer back to perfect working condition in no time. Ready to get started? ###Securing The Spool
First, ensure the spool is correctly wound with the new line. It should be tight and neatly layered to prevent tangling during use. This is crucial for ensuring smooth operation and reducing wear on your trimmer. Place the spool back into the trimmer head. Align it with the slots or guides designed to hold it in place. You’ll know it’s correctly positioned when it sits snugly and doesn’t wobble. Remember, a securely fastened spool ensures consistent trimming performance. If it feels loose, double-check your alignment. Have you ever noticed how a small adjustment can make a big difference? ###Attaching The Shaft Back
With the spool in place, it’s time to attach the shaft back to the trimmer head. Align the shaft with the connectors or grooves on the head. It should fit naturally without forcing it. Gently twist or push the shaft until it clicks into place. This click is your assurance that everything is securely fastened. Finally, give the trimmer head a slight tug to ensure it’s properly attached. No movement means you’re ready to tackle your yard again. Have you ever thought about how a well-maintained tool can transform your gardening experience? A few minutes spent here can save you from future frustrations.Testing The Trimmer
Changing the trimmer line on a Ryobi Expand It is simple. First, ensure the trimmer is off. Then, remove the old line and replace it with a new one. Follow the guide to wind the line properly.
Testing the trimmer after changing the line on your Ryobi Expand It is crucial. It ensures everything is working smoothly and you’re ready for a seamless trimming experience. Let’s dive into how you can effectively test your trimmer and ensure it’s in top shape for your next yard project.Starting The Trimmer
Begin by ensuring all connections are tight and secure. Double-check that the trimmer line is properly installed and the cap is on snugly. Once everything looks good, place the trimmer on a flat surface. Press the primer bulb a few times to get the fuel flowing, then switch the choke to the start position. Hold the handle firmly and pull the starter cord with a quick, steady motion. It might take a few pulls, especially if the trimmer hasn’t been used in a while. Once it starts, listen for smooth operation. Does the engine sound right? It’s like listening to your favorite song—smooth and uninterrupted. If it sputters, you might need to check the line installation again.Checking The Line Dispensation
With the trimmer running, gently tap the head on the ground. This action should release more line. Watch the line as it extends. Is it dispensing evenly? If not, you might have to readjust or rewind the line spool. Ensure the line length is consistent on both sides for balanced trimming. Uneven lines can lead to awkward handling and uneven cuts. Now, engage the trimmer by pressing the trigger. Test it on a small patch of grass or weeds. Notice how it cuts. Are you getting a clean, precise trim? A well-dispensed line makes all the difference. It’s like using a sharp knife in the kitchen versus a dull one. The effort is less, and the results are better. Once satisfied, turn off the trimmer and give yourself a pat on the back. You’ve mastered the art of changing and testing your trimmer line! What other maintenance tips do you find essential for your Ryobi Expand It? Share your thoughts or questions in the comments below.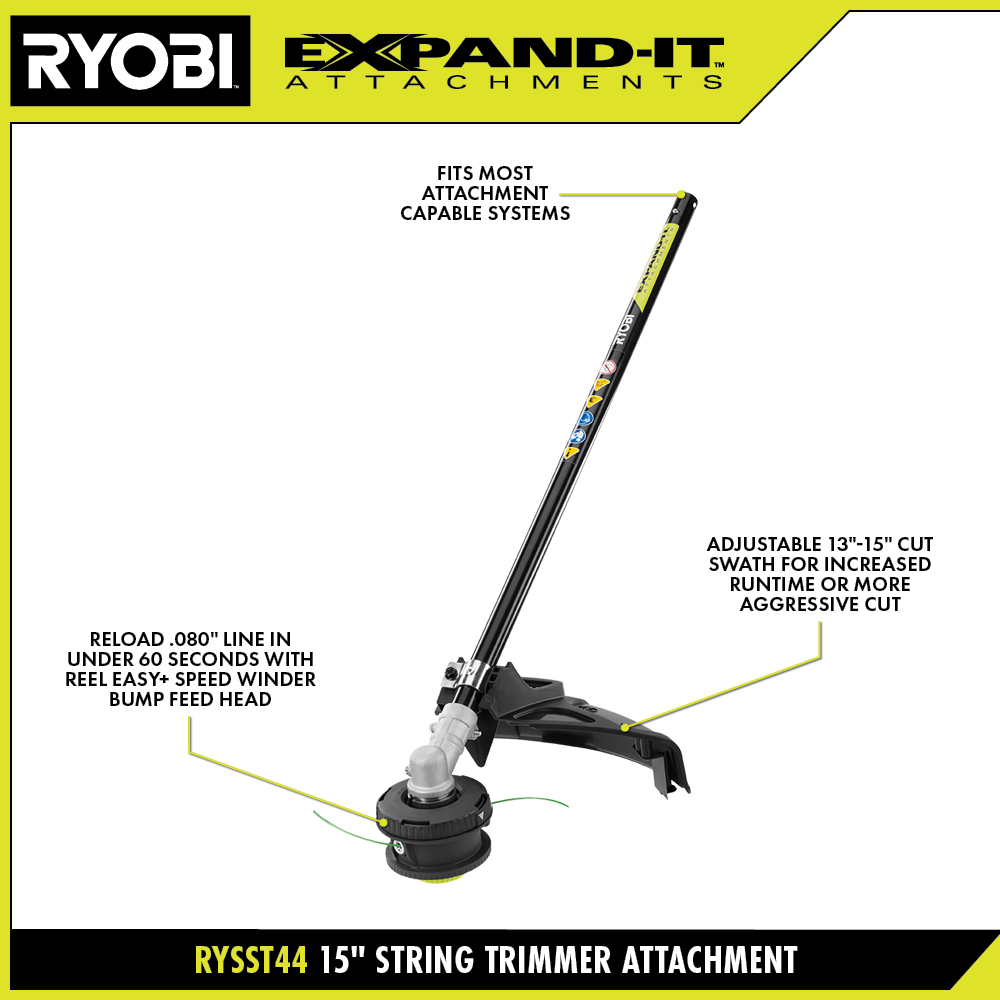
Credit: espanol.ryobitools.com
Troubleshooting Common Issues
Changing the trimmer line on your Ryobi Expand It can sometimes lead to common problems. Knowing how to troubleshoot these issues can save time and effort. This guide will help you identify and fix typical problems. Let’s explore the most frequent issues and their solutions.
Line Jamming
Line jamming occurs when the line tangles inside the spool. To fix this, first, ensure the trimmer is off. Remove the spool cap and check for tangles. Untangle the line gently and rewind it correctly. Ensure the line is wound tightly and evenly. Close the spool cap securely before turning the trimmer on.
Uneven Line Wear
Uneven line wear happens if the line is not feeding correctly. Check if the line is properly installed. Ensure the line is of the correct diameter. Also, inspect the spool for damages. If the line breaks often, it might be too thin. Using the right line size can reduce uneven wear.
Maintenance Tips
Changing the trimmer line on a Ryobi Expand It tool is simple. First, remove the trimmer head. Next, carefully insert the new line into the spool. Finally, reattach the head securely to ensure smooth operation. Regular maintenance keeps your trimmer running efficiently.
Maintaining your Ryobi Expand It trimmer is key to ensuring its longevity and optimal performance. Regular upkeep not only extends the life of your tool but also guarantees a smoother operation every time you use it. By following simple maintenance tips, you can keep your trimmer in excellent shape and enjoy hassle-free gardening.Regular Cleaning
Keeping your trimmer clean is a simple yet effective way to maintain its efficiency. After each use, take a few minutes to wipe down the exterior with a damp cloth. This helps remove grass clippings and dirt that can accumulate and affect its performance. Pay special attention to the air filter. A clogged filter can reduce engine efficiency, so make sure to clean or replace it as needed. Your trimmer will thank you for it with a longer lifespan and more power. Have you noticed your trimmer getting sluggish? It might just need a quick clean to get back to its best. Regular cleaning can prevent unexpected breakdowns and save you time in the long run.Storing The Trimmer Properly
Proper storage is crucial for keeping your trimmer in good working condition. Always store it in a dry, sheltered area to prevent rust and damage from moisture. A garage or shed is ideal. Detach the trimmer head if possible. This prevents the line from becoming misshapen or damaged during storage. It’s a small step that can make a big difference when you next use your trimmer. Do you have a designated spot for your gardening tools? Organizing your space can help you quickly access your trimmer and other equipment without hassle. Proper storage not only protects your tools but also makes your gardening tasks more enjoyable.Frequently Asked Questions
How Do I Remove The Ryobi Trimmer Head?
To remove the Ryobi trimmer head, first disconnect the power source. Hold the head firmly and unscrew it counterclockwise. Some models might have a locking mechanism. Check the manual for specific instructions. Ensure you wear gloves for safety. This process is generally quick and straightforward.
What Size Line Does A Ryobi Trimmer Use?
Ryobi trimmers typically use a 0. 080-inch or 0. 095-inch line. Check your trimmer’s manual for the recommended line size. Using the correct line size ensures optimal performance and prevents damage. Always purchase high-quality trimmer lines for durability. This will enhance the efficiency of your trimming tasks.
Can I Use Any Trimmer Line With Ryobi?
While you can use other brands, ensure compatibility with Ryobi models. Always choose the recommended line size for your trimmer. Using the wrong line can reduce efficiency and cause damage. It’s best to stick to Ryobi’s specified lines for optimal performance.
Check your manual for compatibility details.
Why Is My Ryobi Trimmer Line Not Feeding?
If your Ryobi trimmer line isn’t feeding, check for tangles or jams. Ensure the line is wound correctly. A worn-out bump head might also cause issues. Regular maintenance and correct winding can prevent feeding problems. Consult the manual for troubleshooting specific to your model.
Conclusion
Changing the trimmer line on your Ryobi Expand It is simple. Follow these steps carefully for success. First, prepare your tools and gather supplies. Next, remove the old line from the spool. Then, carefully wind the new line onto the spool.
Ensure it’s tight and secure. Finally, reattach the spool to your trimmer. Test it to make sure it functions properly. Regular maintenance ensures your trimmer works efficiently. Save time and effort with proper care. Now, you’re ready to tackle your lawn with ease.
Keep these tips in mind for future trimmer line changes. Happy gardening!